If your crosshair feels like it's wading through wet concrete or your framerate violently stutters the millisecond an enemy rounds a corner, your hardware isn't necessarily underpowered—it's misconfigured. System latency (the end-to-end time between clicking your mouse and seeing the muzzle flash register on-screen) and erratic 1% low frame rates stem from OS bloat, conflicting driver interrupts, misaligned sync pipelines, and hidden BIOS defaults. You can eliminate up to 30 milliseconds of input lag and iron out micro-stutters by tuning your GPU's low-latency pipeline, purging Deferred Procedure Call (DPC) bottlenecks in Windows, disabling network throttling algorithms, and verifying that your memory runs at its advertised clock profile.
1. Taming DPC Latency and Eliminating Micro-Stutters
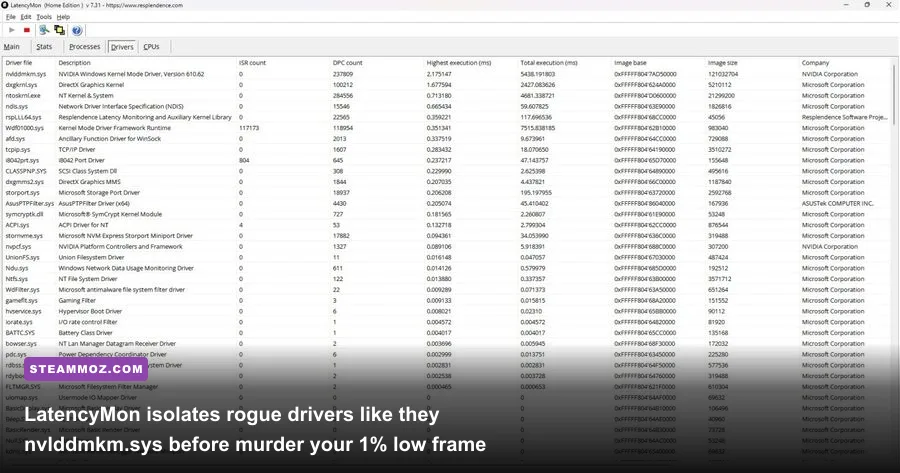
You can drop thousands on an RTX 4090 paired with a high-end Ryzen 7 7800X3D or Core i9, and yet still encounter micro-hitching that feels like your monitor is dropping frames out of nowhere. Nine times out of ten, the culprit is unmanaged DPC (Deferred Procedure Call) latency. In Windows, hardware drivers queue up tasks that execute at elevated kernel priorities. When a rogue driver hogs CPU execution time for more than 1,000 microseconds (1 millisecond), the operating system temporarily stalls game rendering threads. Your average framerate display in Steam will still brag about 240 FPS, but your frame times will spike from 4.1ms to 45ms, delivering a nasty stutter that destroys your aim.
To pinpoint the source, download the free Resplendence LatencyMon utility. Close all background game launchers, launch the software, and let it run for ten minutes while playing an unranked match or roaming an intensive open-world scene. Check the "Drivers" tab and sort by "Highest execution (ms)". If you spot nvlddmkm.sys (NVIDIA display driver), amdkmdag.sys (AMD display driver), wdf01000.sys (Windows Kernel-Mode Driver Framework), or ndis.sys (Network Driver Interface Specification) crossing 1.5ms, you've found your culprit. While troubleshooting deep-seated system hiccups, it's worth checking our breakdowns on ELEX PC fixes that stop crashes and rescue your FPS to see how specific rendering loops collapse under unoptimized background services.
To crush driver execution spikes, execute these proven steps:
- Perform a Clean Driver Sweep: Display drivers often corrupt over successive updates. Download Display Driver Uninstaller (DDU), boot Windows into Safe Mode, wipe your existing display drivers completely without an internet connection active, and install the latest WHQL studio or game-ready driver package using a stripped custom installation without telemetry components.
- Disable USB Power Saving: Go to Windows Device Manager, expand "Universal Serial Bus controllers", open each "USB Root Hub" and "Generic USB Hub", navigate to the Power Management tab, and uncheck "Allow the computer to turn off this device to save power". This stops the USB bus from entering low-power sleep states that cause mouse polling dropouts.
- Disable C-State Core Parking: When CPU cores alternate between sleeping and waking during split-second frame intervals, frame delivery hesitates. In your motherboard BIOS, set CPU Power Management from dynamic aggressive power-saving to a fixed high-performance state, or use third-party tools like QuickCPU to verify that core parking index states are clamped to 100% active. If you've fought brutal frame pacing in other titles, check out our guide on EscapeVR The Basement crashing and low FPS fixes for complementary OS-level remediation techniques.
2. Precision GPU Driver Calibration: NVCP and Adrenalin Settings That Actually Matter
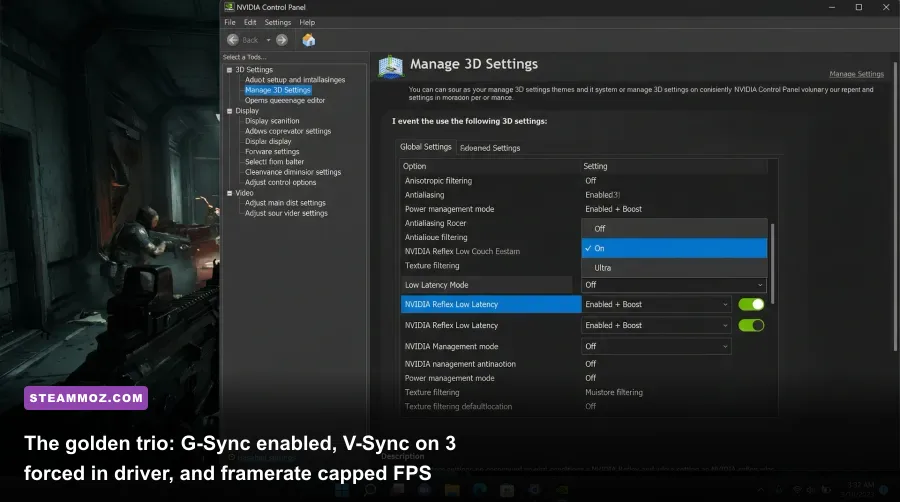
The graphics driver control panel contains dozens of legacy options, but only a handful directly manipulate input latency and frame pacing. The single biggest mistake players make is misconfiguring the display synchronization chain. For decades, players were told to keep V-Sync disabled everywhere to avoid brutal input lag. While double-buffered V-Sync does inject disgusting latency, running an adaptive refresh rate display (G-Sync or FreeSync) with V-Sync disabled creates frame tearing whenever the GPU spits out frames faster than the panel's maximum refresh ceiling.
The definitive, laboratory-tested setup documented across Blur Busters G-Sync 101 research requires three synchronized actions: enable G-Sync in your driver control panel, turn Vertical Sync to On exclusively within the NVIDIA Control Panel (or AMD software), and leave in-game V-Sync strictly Off. To prevent your GPU from blowing past your monitor's VRR operational ceiling (which would engage traditional, laggy V-Sync behavior), you must cap your frame rate approximately 3 to 4 frames below your native refresh rate. On a 144Hz panel, cap at 141 FPS; on a 240Hz panel, cap at 237 FPS; on a 360Hz display, cap at 352 FPS.
| Driver Setting (NVIDIA / AMD) | Recommended Value | Latency Impact | Stability & Visual Frame Note |
|---|---|---|---|
| Low Latency Mode / Anti-Lag | Ultra / Anti-Lag Enabled | -5ms to -18ms | Prevents render queue buildup when GPU utilization hits 98-99%. |
| Max Frame Rate (Frame Limiter) | Display Refresh minus 3 FPS | Zero Added Lag | Keeps frame delivery inside the active G-Sync/FreeSync window permanently. |
| Power Management Mode | Normal (or Optimal) | Negligible | "Prefer maximum performance" forces full clock speeds at idle, raising temps needlessly. |
| Threaded Optimization | Auto or On | -2ms to -6ms | Directs driver work across multi-core CPU architectures on modern titles. |
| Shader Cache Size | 10 GB (or Driver Default) | Major Stutter Reducer | Prevents shader recompilation hitches during live asset loading in competitive matches. |
For games implementing NVIDIA Reflex official documentation—such as Counter-Strike 2, Apex Legends, and Call of Duty: Warzone—set Reflex to On + Boost inside the game settings. Reflex automatically takes over the render queue, throttling game simulation engines just enough to keep GPU utilization hovering around 95-97%. This prevents the frame buffer from filling up, eradicating input queue lag altogether. For more performance profiles on specific titles, you can cross-reference our breakdown of Far Cry 6 GOTY Upgrade Pass settings for max FPS, where render-scaling bottlenecks frequently mimic hardware instability.
3. Stripping Windows 11 Bloat and OS-Level Performance Traps
Windows 11 ships out of the factory with enterprise-level security modules and consumer-facing telemetry suites running in parallel. While great for corporate laptops handling sensitive databases, these virtualization layers introduce measurable latency penalties into raw gaming thread scheduling. The most insidious culprit is Virtualization-Based Security (VBS) and its child feature, Hypervisor-Protected Code Integrity (HVCI), also labeled "Memory Integrity". When enabled, every memory call made by your game client must pass through an emulated hypervisor security layer. On modern CPUs this costs between 3% and 8% in pure gaming performance, but on older mid-range processors, it can drag down 1% low frame rates by upwards of 15%.
To disable Memory Integrity, tap your Windows key, search for "Core Isolation", and toggle Memory Integrity to Off. Restart your machine. Your CPU will now address memory directly without running a background hypervisor layer. Don't worry—as long as you aren't downloading rogue executables from questionable internet corners, Windows Defender's real-time file scanner remains fully operational to safeguard your system.
Next, tackle Hardware-Accelerated GPU Scheduling (HAGS). Located under Settings > System > Display > Graphics > Default Graphics Settings, HAGS offloads frame scheduling tasks from your CPU directly to a dedicated scheduling processor on the GPU. Here is the nuance: if you utilize NVIDIA DLSS 3 Frame Generation, HAGS must remain enabled, as optical multi-frame generation architectures depend on it. However, on pure native rasterization esports setups running CPU-bound games at 1080p or 1440p, toggling HAGS off can occasionally smooth out stubborn frametime spikes. Test your specific primary game using CapFrameX before leaving it permanently toggled. For similar software-level tweaks, explore our tuning notes in the Filament Marmalade Edition settings for higher FPS analysis.
Finally, clean out the Windows background recording bloat:
- Turn On Windows Game Mode: Unlike Windows 10's early iterations, the modern Windows 11 Game Mode works brilliantly. It prioritizes CPU execution threads for the active window process and deprioritizes background tasks.
- Kill Xbox Game Bar Background Captures: Head to Settings > Gaming > Captures. Disable "Record what happened" (background clipping). Even on beefy rigs, continuous background encoding can trigger minor encoder contention hitches on single-GPU systems.
- Disable Notifications and Focus Assist: Windows notifications sliding into the bottom-right corner of your screen force a desktop window manager (DWM) redraw layer that can drop your full-screen game out of true exclusive presentation mode for several frames.
4. Network Jitter, Bufferbloat, and Packet Pacing for Competitive Play
You can achieve pristine 240 FPS frame delivery with sub-10ms system latency, but if your local network connection suffers from bufferbloat and packet queue congestion, your shots will still phantom-miss, and enemies will teleport around corners due to desync. High ping is often dictated by physical geographic distance to the server cluster, but jitter and packet delay variation are almost entirely dictated by your local hardware configuration and router queue management.
First, never game on standard 2.4GHz or congested 5GHz Wi-Fi if competitive integrity matters to you. Even with Wi-Fi 6E or Wi-Fi 7, wireless signals operate over shared half-duplex radio spectrums prone to radio frequency interference from home appliances, structural walls, and neighboring routers. A direct Cat6 or Cat6a Ethernet cable ensures full-duplex communication with consistent sub-millisecond local network hops.
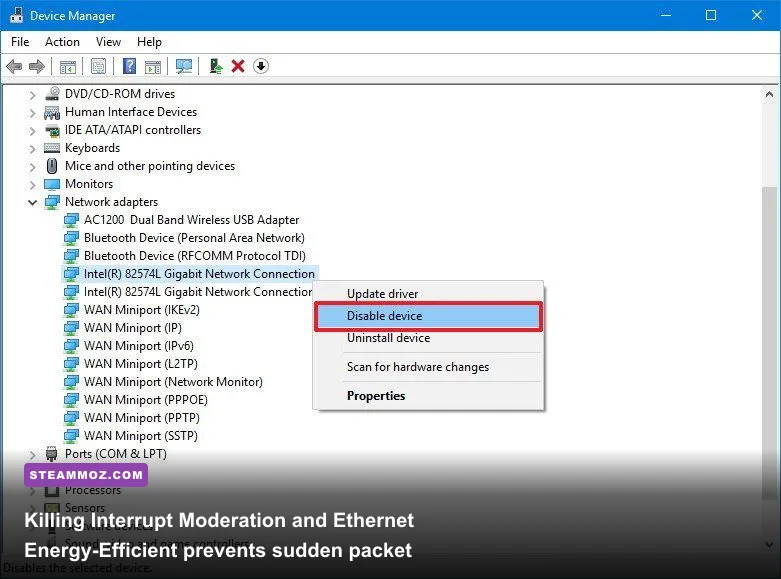
Once you are wired, configure your Network Interface Card (NIC) properties in Windows Device Manager:
- Open Device Manager, expand "Network adapters", right-click your Intel, Realtek, or Killer Ethernet Controller, and select Properties.
- Navigate to the Advanced tab.
- Locate Interrupt Moderation and set it to Disabled. Interrupt Moderation groups network packets together before notifying the CPU, saving processor cycles at the cost of tiny packet dispatch delays. Disabling it forces your CPU to process network packets instantly the microsecond they hit the physical interface. For deep architectural specifics on this queue behavior, consult Microsoft's hardware documentation on network processing efficiency.
- Disable Energy Efficient Ethernet and Green Ethernet. These power-saving routines put your PHY transceiver into low-power mode during brief micro-intervals of silence, causing burst ping spikes when sudden combat action floods network traffic.
- Disable Large Send Offload (LSOv4 and LSOv6). LSO offloads packet packetization to the network card, which can occasionally cause micro-burst queuing delays with fast-paced UDP packets common to competitive game engines.
Beyond your PC, check your home router for bufferbloat using Waveform's Bufferbloat Test. If your ping spikes by +40ms under simulated upload or download load, your router lacks effective packet queuing. Enable Smart Queue Management (SQM)—typically utilizing CAKE or FQ-CoDel algorithms in advanced router firmwares like OpenWrt, Asuswrt-Merlin, or commercial gaming routers. SQM caps overall bandwidth by roughly 5-10% to completely eliminate packet queue buildup, guaranteeing stable, jitter-free ping regardless of who else is streaming 4K video in your household. If your games suffer from sudden engine freezes alongside networking stalls, our troubleshooting guide for Everspace 2 Wrath of the Ancients crashing and FPS fixes provides additional insight into process contention resolution.
5. BIOS, Memory Timings, and Hardware Bottleneck Diagnostics

Countless gamers unbox high-end pre-builts or assemble dream systems only to play for years with their high-speed DDR4 or DDR5 memory running at baseline JEDEC safety speeds (2133MHz for DDR4, or 4800MHz for DDR5). Modern game engines—especially dense open worlds and physics-heavy competitive arenas—are relentlessly memory-bandwidth and cache-latency dependent. Running your RAM at base JEDEC clock speeds throttles CPU instruction pipelines, capping your 1% low frame rates and introducing periodic, frustrating stutters.
Restart your computer, mash the Delete or F2 key to enter your motherboard's UEFI BIOS, and verify that XMP (Extreme Memory Profile) on Intel motherboards or EXPO (Extended Profiles for Overclocking) / DOCP on AMD boards is enabled. Selecting Profile 1 immediately unlocks your RAM's rated frequency (e.g., 6000MHz CL30 for modern AMD Ryzen rigs, or 6400MHz+ for Intel Raptor Lake architectures) and tightens sub-timings to deliver snappier data transfers between system memory and the CPU's L3 cache.
While inside your BIOS, enable Resizable BAR (Re-BAR) or Smart Access Memory (SAM). Traditional Windows architectures limited the CPU's access to GPU video memory (VRAM) to 256MB chunks. Re-BAR enables the CPU to negotiate simultaneous, full access to the entire VRAM buffer. This eliminates transfer bottlenecks in modern DirectX 12 and Vulkan titles, stabilizing frame delivery when heavy asset textures stream dynamically into the scene. For baseline hardware requirements across newer titles that lean heavily on modern instruction sets, check out our analysis on Fatal Fury City of the Wolves PC specs explained.
| Observed System Symptom | Probable Root Cause | Diagnostic & Verification Tool | Targeted Action Fix |
|---|---|---|---|
| Random spikes to 100ms+ every 10 seconds | DPC driver contention (Audio/WLAN) | LatencyMon | DDU driver wipe, disable Wi-Fi background scans, disable audio enhancements. |
| Visible horizontal line tearing during swift turns | Unsynchronized refresh rate ceiling | CapFrameX / RivaTuner (RTSS) | Enable G-Sync + Driver V-Sync; lock framerate 3 FPS below panel max refresh. |
| Persistent frame drops after 20 minutes of play | Thermal throttling on GPU VRM or CPU | HWiNFO64 | Repaste thermal interface, clean dust filters, adjust custom fan curves. |
| Mouse input feels delayed despite high FPS | Maxed-out GPU render buffer (99% load) | NVIDIA FrameView / Reflex Analyzer | Turn on NVIDIA Reflex (On + Boost) or configure Low Latency Mode to Ultra. |
| Choppy 1% low frames in esports titles | RAM running at base JEDEC clock | CPU-Z (Memory tab) / Task Manager | Enter BIOS and enable XMP Profile 1 (Intel) or EXPO Profile (AMD). |
Finally, keep an eye on silent thermal throttling using HWiNFO64. Launch HWiNFO in "Sensors-only" mode and monitor "Thermal Throttling" flags across your CPU cores and GPU hotspot temperature. If modern Intel CPUs brush 100°C or modern GPUs exceed 90°C on the memory junction or hotspot, the silicon automatically dials back its core frequency via down-clocking steps to protect itself from damage. That split-second down-clock manifests directly in your game as an inexplicable frame-pacing hiccup. Adjust your case fan curves in BIOS to react proactively to CPU package temperatures, elevate your PC case off carpet floors, and ensure your intake fans are not suffocating behind decorative glass panels.
Once you methodically calibrate these operating system hooks, sync pipelines, and driver parameters, your gaming PC will behave like the precision instrument it was built to be. You'll stop fighting your settings, kill erratic input delay, and enjoy pure, unfiltered mechanical responsiveness every time you queue up.