If your playthrough of Capcom's reimagined classic keeps getting cut short by a sudden desktop crash, a jarring "Fatal D3D Error," or nasty frame-time spikes whenever you aim your weapon, you are wrestling with known quirks in the RE Engine. Resident Evil 4 looks astonishing, but its Direct3D 12 implementation aggressively devours VRAM, stumbles over high mouse polling rates, and chokes on heavy volumetric effects. You can fix nearly all of these issues right now by trimming your texture allocation below the engine's danger threshold, disabling Strand Hair, extending your Windows virtual memory pagefile, and capping frame pacing properly. Let's walk through every critical tweak to eliminate stutters, stabilize frame rates, and permanently silence crashes on the Resident Evil 4 Steam page release.
Diagnosing RE4's Fatal D3D Error and Hard Crashes
The infamous "Fatal D3D Error (25)" or "Fatal Application Exit" is the most frequent roadblock on PC. It almost always occurs because the RE Engine requests video memory that your GPU physically cannot deliver, causing the graphics driver to time out and reset (known as a TDR event). Capcom's memory allocator doesn't gracefully swap textures out to system RAM when it hits capacity; instead, it simply drops the D3D device and crashes the executable. Much like troubleshooting we see when resolving stubborn PC crashing and low FPS, you have to stabilize memory pipelines before tweaking anything else.
Your first move is expanding your Windows Virtual Memory (Pagefile). Many modern rigs running 16GB or 32GB of physical RAM disable or limit their swap files, but RE4 requires substantial virtual paging headroom to manage streaming asset buffers. Follow these exact steps:
- Press Win + R, type
sysdm.cpl, and hit Enter to open System Properties. - Navigate to the Advanced tab and click Settings under the Performance section.
- Select the Advanced tab in the new window, then click Change... under Virtual Memory.
- Uncheck "Automatically manage paging file size for all drives."
- Highlight your fastest NVMe or SSD drive (preferably where the game is installed), select Custom size, and input 16384 MB for Initial Size and 24576 MB for Maximum Size.
- Click Set, confirm with OK, and reboot your PC.
If you still encounter crashes right after launching from Steam, corrupt shader cache files or third-party hook conflicts might be at fault. If you ever installed mods using Fluffy Mod Manager or Praydog's REFramework, an official game update can cause loose .dll or .pak files to destabilize the engine. Navigate to your installation folder (usually steamapps\common\RESIDENT EVIL 4 BIOHAZARD RE4), delete dinput8.dll if present, and verify your game files via Steam by right-clicking the title, selecting Installed Files, and clicking Verify integrity of game files. Also, check out Capcom's official technical support notices to confirm whether a fresh game patch broke compatibility with existing save states.
Eliminating Stutter and Frame-Time Spikes in the Village and Castle

Few things ruin an intense parry like a micro-freeze right as a Ganado swings a pitchfork. RE4 suffers from two distinct types of stutter: shader compilation hitching and input-driven frame-time pacing spikes. Unlike older Capcom releases, RE4 compiles many pipeline states on the fly when entering new zones like the Village Square, the Del Lago lake section, or the Castle ramparts. While you cannot completely rewrite the engine's shader compiler, you can radically diminish its impact on your gameplay.
One overlooked bug in the PC port revolves around high-polling-rate gaming mice. The RE Engine ties camera tracking logic directly to Windows raw input polling cycles. If your mouse runs at 1000Hz, 4000Hz, or 8000Hz, aggressive sweeps across dense scenes force the engine to process hundreds of camera updates per frame, stalling the main rendering thread and creating erratic micro-stutters. Open your mouse configuration software (such as Razer Synapse, Logitech G Hub, or SteelSeries GG) and reduce your polling rate to 500Hz. The camera movement will feel instantly smoother without sacrificing precision.
Next, clean up background overlay hooks. Steam Overlay, Discord Game Overlay, and GeForce Experience ShadowPlay overlays all inject hook layers into the Direct3D 12 swapchain. Turning off hardware acceleration inside Discord and disabling unnecessary game overlays prevents frame pacing interruptions, mirroring fixes used when remedying crashes and fixing FPS drops in other modern 3D titles.
Finally, tackle CPU scheduling hitches by disabling Control Flow Guard (CFG) specifically for the game binary:
- Search for Exploit Protection in the Windows search bar.
- Click on Program settings and choose Add program to customise -> Choose exact file path.
- Locate your
re4.exeexecutable. - Scroll down to Control flow guard (CFG), check Override system settings, toggle the setting to Off, and click Apply.
The Optimized Graphics Settings: High FPS Without Losing Visual Grit
Resident Evil 4 gives you dozens of visual toggles, but roughly five of them account for over 60 percent of your performance overhead. Cranking everything to "Max" is a trap—especially on graphics cards equipped with 8GB or even 12GB of VRAM. Similar to the optimization workflows detailed in our guide on maximizing FPS through optimal graphics settings, the goal here is preserving visual fidelity while clawing back massive chunks of GPU rasterization overhead.
The single biggest performance thief is Hair Strands. While Leon's flopping locks look realistic with individual strand simulation, this setting relies on brute-force compute passes that slam your GPU shaders. Turning Hair Strands to "Off" immediately recovers 15% to 22% of your baseline frame rate and prevents hair-related memory buffer crashes during tight camera cutscenes. The standard baked mesh hair looks sharp, integrates cleanly with ambient occlusion, and won't crater your framerate during rainy chapter sequences.
The second major culprit is Ray Tracing. The RE Engine's ray-traced reflections and ambient lighting add subtle realism to water puddles in the quarry and marble floors in Salazar's castle, but the visual upgrade is surprisingly modest compared to the steep VRAM penalty. Turning Ray Tracing off saves roughly 1.5GB to 2GB of physical video memory and prevents direct DX12 driver crashes. Follow this breakdown to dial in the best performance profile:
| Graphic Setting | Optimal Value | FPS Gain / Impact | Visual Impact & Practical Notes |
|---|---|---|---|
| Rendering Mode | Normal | Baseline | Interlaced introduces harsh shimmering on chain-link fences and hair. |
| Image Quality | 100% | Neutral | Set to 100% native; use FSR 2 or XeSS instead if upscaling is required. |
| Texture Quality | High (2 GB) | Negligible (Huge VRAM savings) | Looks identical to High (8 GB) in gameplay; prevents D3D memory dumps. |
| Texture Filtering | High (ANISO 16x) | Under 1% | Keeps ground textures and cobblestones crisp at oblique viewing angles. |
| Mesh Quality | High | 2% - 4% | Prevents aggressive model pop-in on enemy Ganados at mid-range distances. |
| Shadow Quality | Mid | 6% - 9% | High eats shader resources; Mid provides clean, stable contact shadows. |
| Shadow Cache | Enabled | +10% Frame Stability | MUST stay on! Keeps static shadows in VRAM so the CPU doesn't recalculate them. |
| Contact Shadows | On | 1% - 2% | Rounds out small shadow details beneath boots, foliage, and clutter. |
| Ambient Occlusion | FidelityFX CACAO | 3% - 5% | Provides cleaner depth shading in corners than standard SSAO at lower cost. |
| Volumetric Lighting | Mid | 8% - 12% | High creates heavy rendering drag in the foggy graveyard and lake caves. |
| Particle Lighting | Low | 4% - 7% in Combat | Prevents severe FPS drops during explosions, molotov fires, and muzzle flashes. |
| Bloom | On | < 1% | Adds atmospheric lens glow to torches and bonfires with no real penalty. |
| Screen Space Reflections | On | 3% - 5% | Delivers convincing water and floor reflections without ray tracing costs. |
| Hair Strands | Off | 15% - 22% Boost | Massive frame rate saver; prevents cutscene hitching and memory spikes. |
| Ray Tracing | Off | 18% - 25% Boost | Critical for cards under 16GB VRAM to stop hard crashes. |
By implementing these settings, you shed unnecessary compute overhead while retaining the dark, damp, atmospheric aesthetic that makes the remake so compelling. Applying targeted presets in this manner aligns closely with techniques for optimizing settings for higher frame rates across modern PC game engines.
Managing VRAM Limits to Prevent Memory Leaks and Freezes

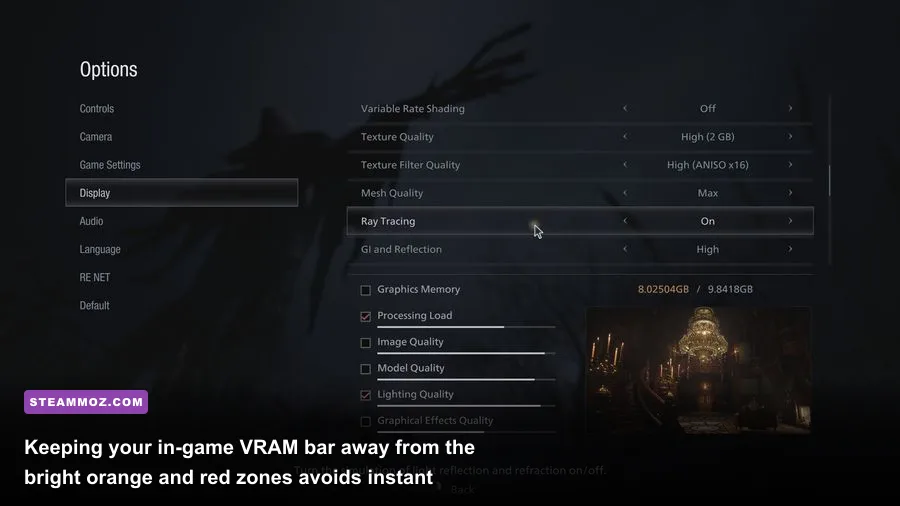
The in-game display menu features a colored VRAM bar that causes endless confusion. When you adjust visual toggles, the meter estimates how much video memory the game expects to allocate. Many players assume that as long as the bar remains just under their maximum GPU capacity, everything is fine. In reality, the RE Engine’s meter accounts only for the base game assets—it completely ignores Windows desktop background allocation, auxiliary direct display buffers, and dynamic spikes during chaotic combat encounters.
If that meter turns orange or red, your game is living on borrowed time. Once Leon enters an area featuring heavy particle physics, dense rain, and multiple enemy models (such as the Cabin siege with Luis Sera), the dynamic VRAM overhead shoots up by 700MB to 1.2GB instantly. If your card runs out of physical memory addresses, Direct3D crashes immediately. As we explore when breaking down hardware demands like understanding PC specs and hardware limits, leaving headroom is the golden rule of stable PC gaming.
Always tune your settings so the in-game VRAM indicator displays in white or light yellow, keeping it at least 1.0 GB to 1.5 GB below your GPU's maximum pool. For an 8GB card (like an RTX 3070 or RX 6600 XT), the in-game allocation should read no higher than 5.8 GB / 7.1 GB. For a 12GB card, aim for under 9.5 GB. Choosing Texture Quality: High (2 GB) instead of High (8 GB) does not visibly downgrade surface details on character models or weapons in gameplay; it simply adjusts the background mipmap cache footprint. Pair that with Texture Filtering: High (ANISO 16x), which costs practically zero GPU overhead on any card made in the last decade, and your visuals will stay needle-sharp without triggering an out-of-memory exception.
| Hardware Bracket | Target Resolution | Upscaling Tech | Recommended Profile | Expected Framerate |
|---|---|---|---|---|
| Budget (GTX 1660 Super / RTX 3050 / RX 6500 XT) | 1080p | FSR 2 / XeSS "Quality" | Texture Quality: Mid (1GB), Hair Strands: Off, RT: Off, Volumetrics: Low | 50 - 60 FPS |
| Mainstream (RTX 2060 Super / RTX 3060 / RX 6600) | 1080p / 1440p | Native or FSR 2 "Quality" | Texture Quality: High (2GB), Hair Strands: Off, RT: Off, Shadows: Mid | 65 - 85 FPS |
| Mid-Range (RTX 3070 / RTX 4060 Ti / RX 6700 XT) | 1440p | Native (100% Scale) | Texture Quality: High (2GB), Hair Strands: Off, RT: Off, Shadows: High | 85 - 110 FPS |
| Enthusiast (RTX 4070 Ti / RX 7800 XT and above) | 1440p / 4K | Native or DLSS Mod | Texture Quality: High (4GB), Hair Strands: On, RT: Normal, Shadows: High | 90 - 140+ FPS |
Following this hardware matrix prevents the slow memory creep that gradually robs your framerate over long two-to-three-hour play sessions, keeping frame delivery smooth through every chapter transition, just like our proven steps for halting performance drops and crashes in deep action RPGs.
Driver Tweaks, Shader Cache Configuration, and Windows Optimizations

Once your in-game options and virtual memory are squared away, fine-tuning your graphics control panel guarantees rock-solid frame pacing. Capcom’s engine struggles with variable refresh rate synchronization when the framerate fluctuates wildly between 70 and 110 FPS. Setting up an external frame rate limiter produces far better frame times than relying on the game's internal frame limiter toggle, which often introduces erratic frame pacing.
For Nvidia graphics users, grab the newest drivers directly from Nvidia GeForce Game Ready drivers. Open the Nvidia Control Panel, jump to Manage 3D Settings, select the Program Settings tab, and locate Resident Evil 4 (re4.exe). Apply these adjustments:
- Low Latency Mode: Set to On. (Avoid Ultra if your CPU is heavily utilized, as it can cause stutter during heavy enemy spawns).
- Max Frame Rate: Set this to 3 FPS below your monitor's native refresh rate (e.g., set to 141 FPS on a 144Hz monitor, or 162 FPS on a 165Hz monitor) to ensure G-Sync remains continuously engaged without tripping standard V-Sync lag.
- Power Management Mode: Set to Prefer Maximum Performance. This stops the GPU core clock from dynamically downthrottling during slow, dark puzzle sequences.
- Shader Cache Size: Change from "Driver Default" to 10 GB or Unlimited. Giving the shader cache ample disk capacity ensures compiled RE Engine shaders aren't purged between play sessions.
If you run an AMD Radeon setup, download the latest package from AMD Software: Adrenalin Edition. Open the software, navigate to Gaming -> Resident Evil 4, and make sure Radeon Anti-Lag is enabled. Toggle Radeon Chill on to cap your frame rates cleanly within your FreeSync range. Avoid enabling Radeon Boost here, as dynamic resolution scaling can clash with RE4's internal temporal anti-aliasing passes, causing rapid blur artifacts during quick turns.
Finally, don't forget Windows 10 and 11 Game Mode. Open Windows Settings, click Gaming, and verify that Game Mode is turned On. This simple toggle instructs the Windows thread scheduler to prioritize re4.exe across physical CPU performance cores while pausing low-priority background tasks. If you've been plagued by unexplainable dips down into the 40s while exploring the rainy shores or taking down the Garrador, these comprehensive adjustments will stabilize your frame times, eliminate the dreaded Fatal D3D Error, and let you experience Leon Kennedy's nightmare with silky-smooth responsiveness.