
The fastest way to improve at Buffet Knight - Decadent Full Course is to stop treating every pickup as an upgrade. Build around one reliable damage tool, protect your plate economy, and spend the first few minutes creating a safe route through the arena. New players usually lose runs by grabbing flashy bonuses too early, ignoring movement speed, or entering the next course without enough healing and space. These 10 tips turn the game’s delicious chaos into a repeatable plan.
Buffet Knight is built around short, escalating runs where positioning, pickup timing, and upgrade choices matter more than frantic button mashing. The game looks playful, but its difficulty curve is serious: enemies become denser, hazards occupy more of the floor, and bosses force you to prove that your build actually works. The advice below focuses on the decisions that matter from the opening course through the final serving.
1. Build Your First Course Around One Damage Plan
Your first three upgrades should answer one question: how will this run kill groups? A weapon with dependable reach is usually a better opening choice than a high-damage option that only works when enemies are already close. The Fork Lance is particularly useful for beginners because its straight-line hit gives you a clear spacing rule: keep enemies in front, never let the crowd wrap around your sides, and attack while retreating.
The common mistake is pairing several unrelated damage sources before any of them has enough power. A Fork Lance bonus, a single-target garnish effect, and a slow critical-hit perk may look impressive on separate cards, but the build can still struggle against a wide wave. Choose one main weapon, then add upgrades that improve its damage, range, cooldown, or number of targets.
Use this priority in the opening minutes:
- First pick: a reliable weapon or direct weapon upgrade.
- Second pick: cooldown, projectile count, or area coverage for that weapon.
- Third pick: movement speed, pickup range, or defensive utility.
Only branch into a second weapon once your main tool clears ordinary enemies without constant repositioning. This is the same principle behind strong weapon choices in Borderlands 2’s best weapon builds: consistency beats a spectacular number that rarely connects.

🎮 Buffet Knight - Decadent Full Course
Looking to experience this game? Grab your digital key directly on our store for $4.99.
View on Steammoz Store →2. Learn What Each Course Is Really Testing
Every course changes the question the game is asking. The opening course tests whether you can collect food while maintaining distance. The middle courses test crowd control and route planning. The final course tests whether your damage remains effective when the arena is filled with overlapping threats. Don’t use the same movement pattern for all three.
In the first course, circle the outer edge and make short inward trips for food. In the second, start cutting through the center only after a lane is clear. In the final course, stay near the middle only when your area damage can create an escape route; otherwise, the perimeter gives you more warning time and fewer surprise collisions.
Pay attention to the transition screen. If the next course offers a larger reward but removes healing opportunities, enter with a fuller health bar and at least one defensive option. A mediocre upgrade with safe recovery is often more valuable than a premium reward that forces you into a damaged, underpowered fight.
| Course Situation | Main Threat | Best Response | Priority Upgrade |
|---|---|---|---|
| Opening waves | Overextending for food | Fight from the edge and collect in short trips | Weapon damage or cooldown |
| Dense middle waves | Being surrounded | Create a lane before moving toward rewards | Area damage or movement speed |
| Elite encounters | Stacked attack patterns | Save your escape tool for the telegraph | Defense, range, or burst damage |
| Boss course | Hazards shrinking safe space | Rotate clockwise and preserve an exit lane | Reliable sustained damage |
3. Treat Food as a Resource, Not Automatic Healing
Food pickups are tempting because they immediately make the screen look safer, but vacuuming everything the moment it appears can ruin the next minute of a run. Small food items are best collected when you are already passing through the area. Large plates and premium ingredients deserve more thought: save them for the point where your health, plate meter, or build economy actually benefits.
Try to leave one or two safe pickups behind when the arena is quiet. Those leftovers become emergency fuel after an elite spawns or a boss attack clips you. This matters especially in crowded rooms, where returning to a distant corner can force you through enemies and hazards.
Pickup range is an underrated early upgrade. It lets you collect rewards without walking directly over them, which means you spend less time crossing danger zones. If you are choosing between a small damage increase and a meaningful pickup-range improvement during the first course, take the range bonus when your weapon already clears basic enemies. Better collection creates more experience, more money, and more upgrade opportunities over the full run.
Do not confuse a full plate with a safe run. Plate resources cannot compensate for poor positioning. If the screen is crowded, stop harvesting and spend a few seconds opening space. The best pickup is the one you can claim without surrendering control of the arena.
4. Movement Speed Is a Damage Stat
New players often rank movement speed below raw attack power because it does not produce a satisfying damage number. That is a trap. Faster movement improves survival, pickup efficiency, boss uptime, and the number of attacks you can make while kiting. It also gives you more time to react to enemy telegraphs.
Build a simple movement habit: attack while travelling in a wide circle, then briefly cut across the arena only when a gap opens. Avoid tight loops around a single enemy group. Tight circles feel safe until another wave enters from the opposite side and closes the exit.
Use dashes or emergency movement abilities proactively, not after an enemy has already touched you. The strongest timing is just before a telegraphed attack completes. Dashing too early can leave you standing inside the impact zone when the animation catches up; dashing too late usually means the ability becomes a panic button instead of a planned reposition.
Graphics settings can affect this skill directly. If frame pacing is uneven, attack warnings become harder to read and your movement rhythm falls apart. Players on modest hardware should lower shadows and effects before reducing resolution. Steamoz’s guide to settings that make every frame count explains the same principle: stable frames are more valuable than a prettier particle burst.
| Setting or Upgrade | Recommended Choice | Gameplay Impact | When to Prioritize It |
|---|---|---|---|
| Movement speed | Take one early bonus | Improves dodging and pickup routes | When your main weapon already handles basic waves |
| Effects quality | Medium on crowded arenas | Reduces visual clutter and frame drops | When attacks are difficult to read |
| Shadows | Low or medium | Usually a strong performance gain | On integrated graphics or older GPUs |
| Resolution scale | Keep native if stable | Preserves telegraph clarity | Lower only after other settings |
5. Read Enemy Telegraphs Before Chasing Damage
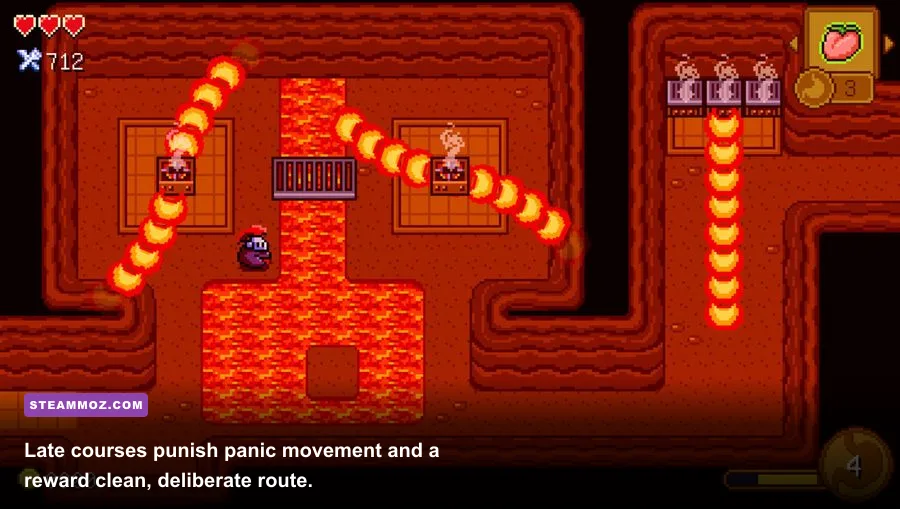
Buffet Knight’s enemies are dangerous because their attacks are easy to ignore until the arena becomes crowded. Watch the warning shapes, not just the enemy models. A narrow line usually rewards a sideways dodge, while a circular warning demands that you leave the area entirely. If several indicators overlap, follow the newest warning first and move toward the largest clear section of floor.
Ranged enemies should be your first target when they can fire into your route. Melee units are visible and predictable; projectiles turn a safe escape lane into a delayed collision. However, do not chase a ranged enemy across a packed arena. Keep attacking the nearest threat while drifting toward a better angle, then finish the ranged unit when the route is open.
Elite enemies deserve a dedicated answer. Save burst skills for the moment an elite enters a dangerous phase rather than spending them on ordinary food carriers. If your build has a slow, stun, knockback, or temporary invulnerability effect, hold it until the elite’s warning begins. Defensive effects are strongest when they deny a known attack, not when they are triggered randomly at full health.
For a quick reference, use this battle logic:
| Enemy Pattern | Telegraph | Counter Movement | Best Damage Window |
|---|---|---|---|
| Charging melee unit | Brief pause and forward line | Step sideways, then attack from behind | Immediately after the charge |
| Ranged projectile | Small line or orb marker | Keep circling; avoid stopping at the edge | During its firing recovery |
| Area hazard | Expanding circle | Leave early and preserve a second exit | After the effect disappears |
| Elite wave | Large warning and spawn pause | Clear a lane before committing | After its special attack |
6. Don’t Spend Every Upgrade on Damage
A run with six offensive bonuses can still lose to a run with three offensive bonuses and two defensive tools. Once your main weapon reaches comfortable clear speed, buy the upgrade that fixes your weakest situation. If you die while collecting food, take pickup range or movement speed. If you survive but cannot finish elites, add burst, penetration, or cooldown reduction. If bosses push you into corners, improve range or area control.
Think in breakpoints rather than percentages. A cooldown reduction that lets the Fork Lance fire one extra time during a wave is worth more than a smaller bonus that changes no practical outcome. Likewise, one additional projectile may transform a narrow attack into a genuine crowd-control tool. Test whether an upgrade changes how many attacks are needed to defeat common enemies; that is the number that matters.
When offered a reroll, don’t burn it just because the first three choices look average. Save it for a course transition or an elite reward when your build has a specific hole. Rerolls are most valuable when you know exactly what you are hunting: a weapon upgrade, a defensive cooldown, or a synergy component.
7. Use a Simple Upgrade Priority
For a first successful run, follow this order: reliable weapon, weapon scaling, movement or pickup utility, defense, then a second damage source. This is not the most explosive possible build, but it is forgiving and teaches the game’s real rhythm. Once you understand enemy patterns, you can trade defense for greed.
A useful beginner setup pairs the Fork Lance with a short-range area option such as the Gravy Bomb. The lance handles enemies approaching from one direction, while the bomb creates breathing room when the crowd compresses. Don’t throw the bomb on cooldown if it is your only escape tool. Keep it ready for a sudden flank or elite spawn.
| Build Slot | Beginner Choice | Purpose | Upgrade Goal |
|---|---|---|---|
| Main weapon | Fork Lance | Consistent forward damage | Cooldown, range, target count |
| Emergency tool | Gravy Bomb | Creates space around the knight | Area, charges, cooldown |
| Utility | Pickup range | Collects food without overexposing | Range before greed bonuses |
| Defense | One shield or recovery effect | Prevents a single mistake ending the run | Shorter cooldown or stronger duration |
8. Fight Bosses From the Outside In
Boss fights become much easier when you stop trying to stand beside the boss. Begin along the outer edge, rotate in one direction, and watch how the boss fills the arena. Your goal is not maximum immediate damage; it is preserving a clear lane for the next attack cycle.
During the boss’s warning animation, stop attacking if necessary and move early. A missed attack costs less than a collision, especially when the boss chains an area attack into a projectile pattern. After the attack finishes, turn back toward the boss and use your strongest damage window. This creates a reliable rhythm: rotate, dodge, re-enter, burst, rotate again.
Never spend every cooldown at the start. Keep one defensive or movement option available for the second phase, when hazards usually overlap. If the boss summons adds, clear only the enemies blocking your route. Chasing every summon wastes time and can put you in the exact position the next telegraph targets.
9. Know When to Abandon a Bad Run
Not every run deserves to be rescued. If your main weapon has received no meaningful upgrade by the middle course, your damage may be too far behind the curve. Likewise, if you have no movement, defense, or crowd-control option, one difficult elite can consume all your food and end the run anyway.
Use a checkpoint after each course to assess three things: can you clear ordinary enemies, can you escape a crowded corner, and can you defeat an elite without spending every resource? If the answer to two of those is no, stop forcing the run. Restarting is not wasted time; it gives you another chance to practice the opening route with better information.
This mindset also protects your learning. A failed run should tell you something specific, such as “I needed range before the second course” or “I spent my bomb too early.” That is much more useful than blaming random upgrades.
10. Practice Routes, Not Just Reflexes
The best players are not simply reacting faster. They are entering each arena with a route already in mind. Identify the safest perimeter, note where food clusters appear, and leave yourself a fallback lane before starting an elite fight. Once you repeat this process, the game feels dramatically less random.
Record which upgrade choices caused problems. If a build looked strong but collapsed against dense waves, it probably lacked area coverage or movement speed. If it handled crowds but failed against the boss, it likely needed single-target scaling. Treat every run as a short experiment and change only one major decision next time.
For broader roguelike habits, Steamoz’s Crowntakers weapon guide and Legend of Keepers rewards guide are useful comparisons. The same lesson carries across both games: strong runs come from understanding risk, not from grabbing the rarest-looking option.
The Winning Buffet Knight Routine
For your next run, commit to this compact routine. Pick one dependable weapon, improve its clear speed, take one movement or pickup upgrade, and save an emergency tool for elites. Circle rather than panic-dash, collect food on safe passes, and leave recovery items behind when the arena is quiet. At every course transition, ask whether your build needs damage, space, or survivability before choosing another shiny bonus.
That approach makes Buffet Knight - Decadent Full Course much more manageable. You’ll still have messy runs, surprise hits, and upgrades that refuse to cooperate—that’s part of the fun. But with a stable route and a clear upgrade plan, the game’s delicious chaos starts working for you instead of against you.
Check the game’s official Steam listing for current patches and availability, and keep an eye on the developer’s official Steam updates before relying on older balance advice. For more practical PC guidance, see Steamoz’s low-FPS troubleshooting guide before blaming your dodges on the game.