
If your PC is chugging through modern releases with erratic frame rates and jerky frametimes, the solution is not blindly dropping every visual slider to the lowest preset. You can achieve maximum FPS and butter-smooth frame delivery by dropping three notoriously heavy rendering passes—Volumetric Fog, Screen Space Reflections, and Ultra-tier Shadows—while locking temporal upscalers to Quality mode and matching your frame rate ceiling to your monitor's adaptive refresh window. Doing this immediately recovers anywhere from 30% to 55% in baseline GPU throughput without turning your games into a blurry, pixelated mess.
Too many players fall into the trap of letting games auto-detect hardware or blindly clicking the "Ultra" preset because their rig meets the recommended specs. Modern rendering engines like Unreal Engine 5, REDengine, and proprietary AAA engines pack rendering pipelines that demand exponentially higher compute power for visual differences you cannot even spot during intense combat. Whether you are dialing in graphics settings for max FPS or trying to fix erratic frame drops in unoptimized open worlds, understanding what each toggle actually computes is the key to fluid, competitive gameplay.
Cut the Dead Weight: Universal In-Game Settings to Lower First
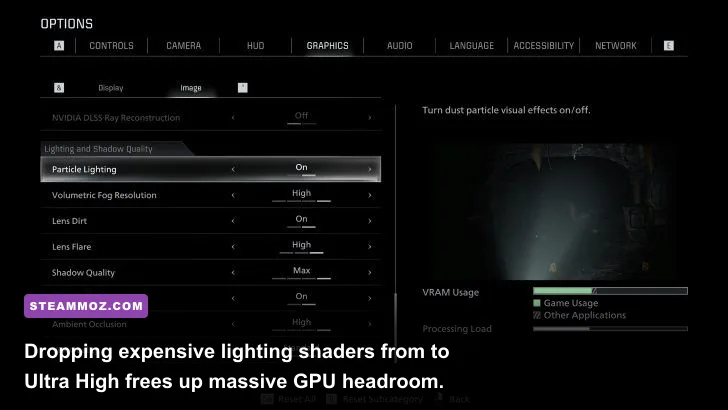
Every graphics menu looks different, but modern rasterized and hybrid ray-traced engines share the exact same compute bottlenecks. The biggest frame rate killer on PC is Volumetric Lighting and Fog. Volumetric effects cast light through simulated atmospheric particulate matter using expensive voxel grids or ray marching. Setting Volumetrics to Ultra in games like Cyberpunk 2077 or Red Dead Redemption 2 drains up to 18% of your GPU budget just to render ambient mist. Dropping this single setting down to Medium retains 90% of the atmosphere while handing you double-digit frame gains instantly.
Next in line is Shadow Quality. Ultra shadows calculate complex cascading shadow maps at native, razor-sharp resolutions across enormous draw distances. Switching shadows from Ultra to High or Medium introduces soft filtering at edges—which actually looks more natural in real-world lighting—while significantly cutting down memory bandwidth and VRAM usage. Combine this with lowering Screen Space Reflections (SSR) from Ultra to Medium, and you eliminate the micro-stutters that happen whenever your camera sweeps over dynamic puddles, wet asphalt, or polished metal surfaces.
On the flip side, keep Texture Quality at the highest level your graphics card's VRAM can physically accommodate. Textures have practically zero impact on raw compute performance; as long as you stay within your card's memory buffer (e.g., keeping textures at High on an 8GB card, or Ultra on a 12GB+ card), frame rates remain rock-solid. Lowering textures does not grant extra frames unless you are actively exceeding your VRAM capacity and paging into system RAM.
| In-Game Setting | Recommended Value | Typical FPS Uplift | Visual Impact Breakdown |
|---|---|---|---|
| Volumetric Fog / Clouds | Medium | 12% – 18% | Slightly coarser mist density; virtually indistinguishable during action. |
| Shadow Quality / Cascades | High or Medium | 8% – 14% | Softens distant shadow borders; eliminates aggressive geometry pop-in. |
| Screen Space Reflections (SSR) | Medium / Off (if using RT) | 7% – 12% | Reduces reflection clarity on glossy floors; stops camera sweep frame drops. |
| Ambient Occlusion (SSAO/HBAO) | High / Standard | 4% – 7% | Preserves essential depth contact shadows without taxing raster pipelines. |
| Motion Blur & Depth of Field | Disabled | 2% – 4% | Removes smeary post-processing; vastly improves target acquisition clarity. |
| Texture Quality | Ultra (Matches VRAM) | 0% (VRAM Bound) | Keep maxed out to avoid muddy surfaces; zero cost if VRAM overhead exists. |
| Crowd / NPC Density | Medium | 10% – 15% (CPU Bound) | Relieves heavy CPU draw call bottlenecks in bustling hubs and cities. |
Disabling Motion Blur and Depth of Field is another mandatory step for performance-minded players. Beyond the modest 2% to 4% performance lift, post-process blur filters introduce visual latency and obscure incoming threats in fast-paced shooters. If you are struggling with unpredictable hitching when roaming dense game environments, take a look at our guide on how to stop crashes and rescue your FPS for deeper engine-level fixes.

🎮 FORM
Looking to experience this game? Grab your digital key directly on our store for $14.99.
View on Steammoz Store →Mastering Modern Upscalers: DLSS, FSR, and XeSS Done Right
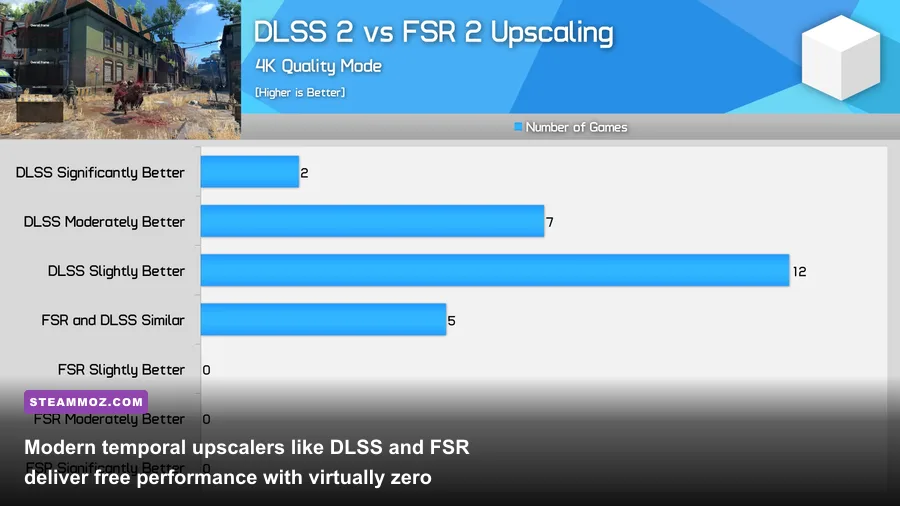
Running native display resolution without temporal reconstruction in modern graphics-intensive games is an inefficient use of silicon. Whether you use an Nvidia GeForce RTX, AMD Radeon RX, or Intel Arc GPU, enabling a temporal upscaler is the single most effective way to multiply your FPS while maintaining crisp edges. The golden rule: stick exclusively to the Quality preset at 1440p and 4K resolutions. Quality mode renders internally at 67% of your native pixel count per axis (1080p internal for a 1440p screen; 1440p internal for a 4K screen), feeding advanced spatial and temporal reconstruction algorithms that often resolve thin wires, chain-link fences, and distant geometry better than standard native TAA (Temporal Anti-Aliasing).
If you are playing on a standard 1080p monitor, approach upscalers carefully. At 1080p, the internal rendering target in Quality mode drops to roughly 720p. While Nvidia's DLSS handles this lower input reasonably well thanks to dedicated AI Tensor Cores, AMD's FSR and spatial scalers can introduce shimmering and ghosting artifacts. At 1080p, native resolution paired with light antialiasing (or DLAA / FSR Native if your GPU has headroom) is preferred unless you desperately need extra frames to match a high-refresh monitor.
What about Frame Generation (DLSS 3 / FSR 3)? Frame generation inserts an AI-synthesized intermediate frame between two traditionally rendered frames. While your displayed frame counter will jump by 40% to 70%, frame generation does not reduce input lag—in fact, it slightly increases latency due to the internal frame pacing buffer. As a baseline rule, only turn Frame Generation on if your native base frame rate is already comfortably sitting above 50 to 60 FPS. Generating frames on top of an unstable 30 FPS baseline results in muddy mouse input and visual artifacting that ruins competitive responsiveness.
Always pair upscaling with Nvidia Reflex or AMD Radeon Anti-Lag. In modern games, setting Nvidia Reflex to On + Boost forces your GPU clocks to stay at peak frequency, bypassing CPU-bound render queue delays and drastically shaving system latency during explosive firefights.
Steam Client Tweaks and Launch Options That Actually Work
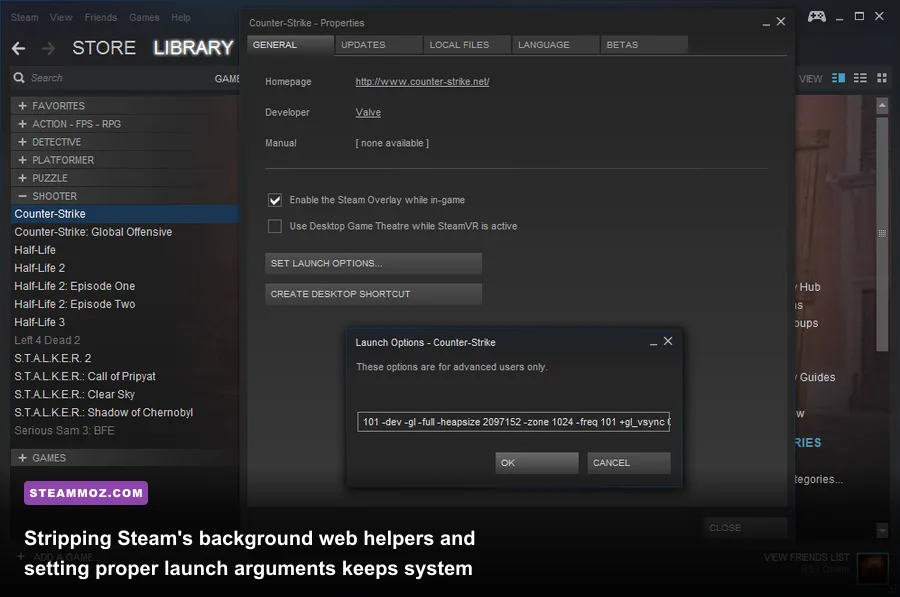
The Steam desktop client has evolved into a full Chromium-based browser ecosystem. While that brings smooth store pages and rich community features, it also means background processes regularly eat CPU cycles, steal memory bandwidth, and compete for hardware resources while your game is running. Fine-tuning Steam's client settings ensures no background web renderers sap power from your active games.
Open Steam settings and head to the Interface tab. Disable "Enable GPU accelerated rendering in web views" if you are on an entry-level GPU with limited VRAM, or leave it active only if your CPU is the bottleneck. Next, head to In-Game and evaluate the Steam Overlay. While the overlay is convenient for messaging friends and tracking achievements, in CPU-limited titles like Counter-Strike 2 or Rust, hooking into the DirectX/Vulkan presentation queue via the overlay can introduce sporadic frame hitching. Disabling it entirely in highly competitive titles often nets a cleaner frametime delivery.
To access game-specific launch parameters, right-click any game in your Steam Library, select Properties, and scroll down to the Launch Options field. While many legacy launch parameters circulating on old forums (like `-threads` or `-high`) can actually break modern Windows thread-scheduling engines on hybrid CPUs with Performance and Efficiency cores (such as Intel 12th–14th Gen processors), several modern parameters deliver legitimate gains:
| Launch Parameter / Tweak | Command Syntax | Target Engine / Scenario | Practical Result |
|---|---|---|---|
| DirectX 12 Forcing | -dx12 |
Modern Multi-Core CPUs | Improves multi-threaded draw call distribution on modern GPUs. |
| Vulkan API Override | -vulkan |
Titles with native Vulkan backends | Reduces driver overhead and bypasses heavy DirectX presentation queues. |
| Skip Intro Videos | -novid or -skipintro |
Source & Unreal Engine Titles | Bypasses unskippable video codecs, speeding up boot times directly into RAM. |
| Window Mode Lock | -fullscreen |
Unreal Engine / Unity Games | Forces the Windows Desktop Window Manager (DWM) to yield direct display control. |
For more detailed breakdowns on game-specific command lines and engine quirks, check our instructions for fixing low FPS and stuttering. Consult the official Steam launch options guide before adding experimental parameters to prevent crash-on-launch issues.
Eliminating Micro-Stutter: Frame Pacing, Refresh Rates, and G-Sync
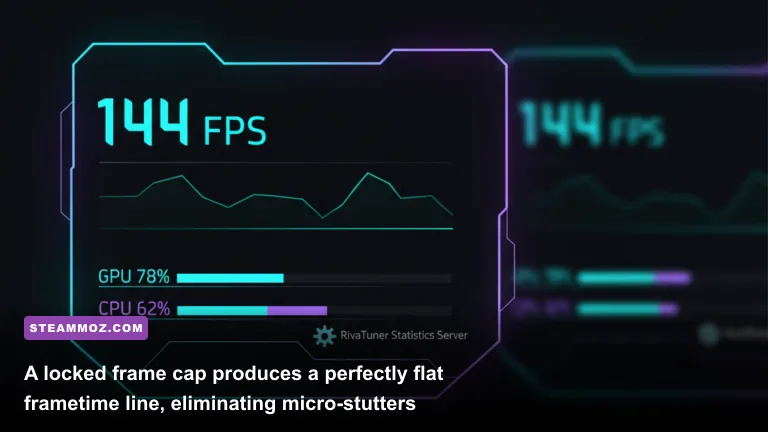
Here is an undeniable truth of PC gaming: A rock-solid 80 FPS with flat frametimes feels significantly smoother than an uncapped frame rate fluctuating erratically between 90 and 140 FPS. Frame rate volatility creates micro-stutters because the time each frame sits on your monitor varies constantly. If frame one arrives in 7 milliseconds and frame two arrives in 22 milliseconds, your eye registers that discrepancy as an annoying visual hitch, even if your overlay insists your average FPS is well into triple digits.
To eliminate this, configure your variable refresh rate (VRR) display correctly according to the proven Blur Busters G-Sync 101 protocol. Follow this precise three-step setup:
- Turn G-Sync / FreeSync ON in your GPU control panel (enable it for both fullscreen and windowed modes).
- Turn V-Sync ON inside the Nvidia Control Panel or AMD Software globally, but turn V-Sync OFF inside the in-game menus. Enabling driver-level V-Sync acts as a frame pacing backstop that prevents tear lines at the bottom of the screen without adding the horrible input lag associated with traditional in-game buffer queues.
- Cap your maximum frame rate 3 to 4 FPS below your monitor's native refresh rate. If you run a 144Hz monitor, cap your frame rate at 141 FPS. For a 165Hz panel, cap at 162 FPS. For a 240Hz display, lock it at 237 FPS.
Why cap below the refresh ceiling? Because if your frame rate reaches or exceeds your monitor's native frequency (e.g., hitting 145 FPS on a 144Hz panel), G-Sync instantly deactivates, throwing you straight into traditional V-Sync buffer latency or aggressive screen tearing. Locking your frame cap slightly below the ceiling keeps the variable refresh module permanently engaged, locking your input latency down to the bare minimum.
For frame capping, in-game frame rate limiters are your best choice due to minimal latency overhead. If a game lacks a reliable internal limiter, utilize RivaTuner Statistics Server (RTSS). RTSS manages frametimes at the engine presentation layer with microsecond accuracy, producing a perfectly flat, horizontal frametime line on your diagnostic graphs. If you frequently encounter performance dips during heavy action sequences, our guide on stabilizing frame drops in demanding scenes offers additional troubleshooting advice.
Windows 11 and GPU Driver Tweaks for Maximum Overhead
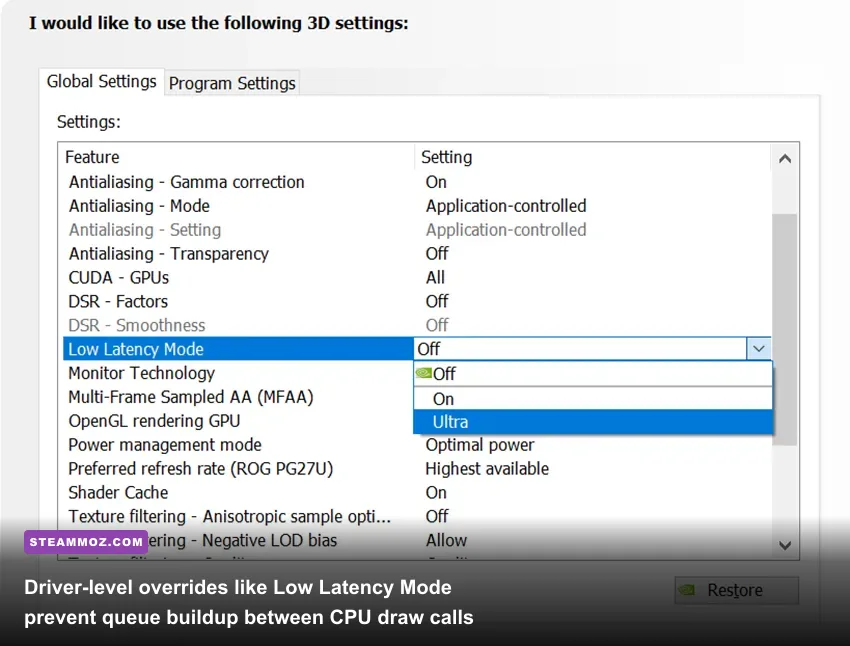
Your graphics settings will only perform as well as the underlying operating system allows. Windows 11 has introduced major architectural shifts for gaming, making specific OS toggles non-negotiable if you want sustained maximum frame throughput.
First, verify that Windows Game Mode is switched ON. In earlier iterations of Windows 10, Game Mode had a bad reputation for causing stuttering. Today, as detailed in Microsoft's Game Mode guide, it prioritizes GPU and CPU thread allocations directly to the active game process while aggressively suppressing background Windows Update routines and maintenance tasks. Alongside Game Mode, enable Hardware-Accelerated GPU Scheduling (HAGS) in your Windows Display Graphics settings. HAGS offloads high-frequency scheduling tasks directly to a dedicated scheduling processor on your graphics card, reducing overall CPU overhead and enabling DLSS 3 Frame Generation compatibility.
Next, tune your GPU control panel settings for raw efficiency without degrading image quality:
- Power Management Mode: Set to "Normal" or "Optimal Power" for general use, and switch to "Prefer Maximum Performance" only on a per-game profile basis if you notice clock-speed throttling during light scene transitions. Forcing maximum performance globally prevents your GPU from downclocking when idling at desktop, drawing unnecessary wattage and generating idle heat.
- Low Latency Mode (Nvidia) / Radeon Anti-Lag (AMD): Set this to On. This prevents your CPU from preparing more than one frame ahead of the GPU, virtually wiping out render queue latency without dropping your average frames.
- Shader Cache Size: Set this to 10 GB or Unlimited inside the Nvidia Control Panel. Modern DirectX 12 titles compile shaders dynamically, and the default 1GB cache size frequently fills up, forcing the driver to wipe and recompile shaders on the fly. Expanding this cache completely eliminates traversal shader stutters when entering new visual zones.
- Max Frame Rate: If you don't use RTSS or in-game limiters, define your Blur Busters cap (-3 FPS below monitor max) right here.
Finally, avoid third-party "game booster" utility suites like the plague. Programs promising to "clean RAM" or "turbo-charge CPU clocks" do little more than run intrusive background telemetry that interferes with Windows' own thread dispatchers. By applying clean in-game visual cutbacks, utilizing modern upscalers at Quality presets, maintaining a stable frame rate cap within your VRR window, and configuring your OS correctly, you will extract every ounce of performance from your PC—delivering razor-sharp responsiveness, blazing FPS, and uninterrupted visual clarity across every single game in your Steam library. For more game-specific hardware performance breakdowns, be sure to read our look at optimizing graphic profiles for high frame rates.