
For the best Dead in Antares performance, use exclusive fullscreen, native resolution or a moderate upscaling mode, high textures, medium shadows, low-to-medium volumetric effects, ambient occlusion on, motion blur off, and a frame-rate cap just below your display refresh rate. That combination protects the game’s dark visual identity while removing the settings most likely to cause stutter and sudden frame-time spikes.
Dead in Antares is the kind of game where a flat average FPS number can be misleading. A system may report 70 fps in an empty room and still hitch badly when lighting, fog, enemies, and streaming all arrive together. The profiles below are built around consistent frame pacing rather than a flashy benchmark result. Before changing anything, check the official Steam listing for the latest patch notes and system requirements, since performance can shift after updates.
Use This Balanced Profile First
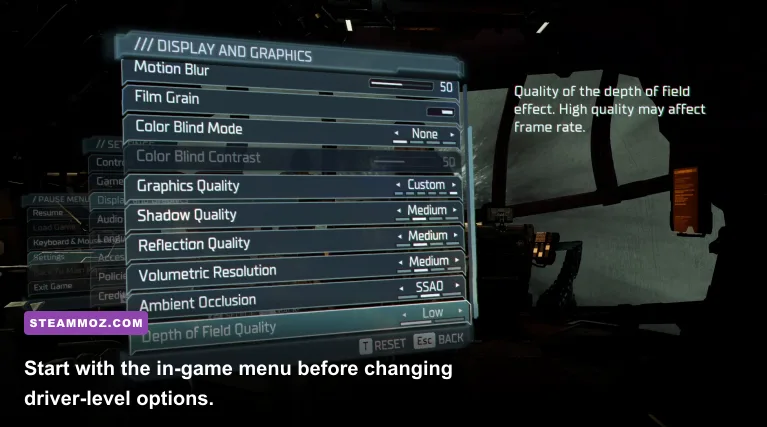
Start with the Balanced profile if you have a modern four-core or six-core CPU paired with a GTX 1660, RTX 2060, RX 5600 XT, or anything faster. Set the game to your monitor’s native resolution, choose exclusive fullscreen if that option is available, and disable V-Sync while testing. A 60 fps cap is the sensible starting point for a 60 Hz display; on a 120 or 144 Hz monitor, cap at 90 or 120 depending on your GPU’s headroom.
Keep texture quality at High unless your graphics card has less than 6 GB of VRAM. Texture quality mostly affects video memory rather than raw shader workload, so dropping it first often makes the image look worse without solving GPU bottlenecks. Shadows are different: they can force extra rendering passes across large areas, which is why Medium is usually the best performance-to-quality setting.
| Setting | Recommended Value | FPS Impact | Visual Note |
|---|---|---|---|
| Resolution | Native 1080p or 1440p | Very high | Lower only after reducing effects |
| Texture Quality | High | Low | Needs adequate VRAM |
| Shadow Quality | Medium | High | Still preserves major silhouettes |
| Effects Quality | Medium | Medium | Reduces expensive flashes and particles |
| Volumetric Effects | Low or Medium | High | Fog remains readable at Medium |
| Ambient Occlusion | On, Medium | Medium | Keeps corners and contact shadows grounded |
| Motion Blur | Off | Small | Cleaner camera movement |
| V-Sync | Off while testing | Variable | Use adaptive sync instead when possible |
That profile should be your baseline, not a promise of a particular frame rate. PC hardware, game version, resolution, and background processes all matter. If your frame rate is already stable, raise shadows one step before touching textures. If it is unstable, leave shadows alone and reduce volumetrics first.

🎮 Dead in Antares
Looking to experience this game? Grab your digital key directly on our store for $13.99.
View on Steammoz Store →Which Settings Actually Cost the Most FPS?

The biggest mistake is lowering every option at once. You lose the game’s atmosphere, learn nothing about the bottleneck, and often gain less performance than expected. Change one setting, run the same route for 60 to 90 seconds, and watch the GPU utilization and frame-time graph. MSI Afterburner, NVIDIA FrameView, AMD Adrenalin, and the Steam performance overlay can all help.
Shadows and volumetrics are the first serious cuts
Shadow quality is expensive because it affects many visible surfaces, not just the object casting the shadow. Medium usually removes the harshest render cost while keeping doors, machinery, and large environmental shapes legible. Low can create distracting jagged edges and unstable shadow transitions, so it should be a last resort rather than the default.
Volumetric lighting and fog are even more unpredictable. Their cost rises in scenes with multiple light sources, enclosed corridors, and dense atmospheric effects. If you see the frame rate collapse when entering a misty or heavily lit area, reduce volumetrics before resolution. This often improves the worst one-percent lows without making the whole image blurry.
Ambient occlusion is worth keeping
Ambient occlusion adds contact depth under objects and around wall joints. Turning it off can recover a few frames, but the result tends to look washed out in a dark horror game. Keep it on Medium if your GPU can manage it. Disable it only when you are chasing a strict 30 or 45 fps target, or when GPU usage remains pinned at 99 percent after reducing shadows and volumetrics.
| Setting | Priority to Lower | Typical Performance Benefit | Best Reason to Change It |
|---|---|---|---|
| Volumetrics | First | High in foggy scenes | Fixes sudden drops and frame-time spikes |
| Shadows | Second | Medium to high | Improves sustained GPU load |
| Effects | Third | Medium | Helps during combat or heavy particles |
| Resolution Scale | Fourth | Very high | Best emergency option for GPU limits |
| Textures | Last | Low unless VRAM is full | Prevents texture pop-in and memory swapping |
For more general troubleshooting habits, our guide to Deadfall Adventures graphics settings covers the same useful order of operations: stabilize frame time first, then chase visual upgrades.
Best Profiles for Low-End, Mid-Range, and High-End PCs

Use the profile that matches your hardware, then adjust for your monitor. A 1080p 60 Hz display needs consistency, not 140 fps. A high-refresh panel benefits from a cap that your system can hold during the hardest scenes. Uncapped rendering can make menus and quiet rooms look fast while causing unnecessary heat and erratic frame pacing later.
| Hardware Target | Resolution | Core Settings | Target |
|---|---|---|---|
| Entry-level GPU, 4 GB VRAM | 1080p, 80-90% scale | Textures Medium, shadows Low, volumetrics Low, AO Off | 30-60 fps |
| GTX 1660 / RX 5600 XT class | 1080p native | Textures High, shadows Medium, volumetrics Medium, AO Medium | 60 fps |
| RTX 3060 / RX 6700 XT class | 1440p native or upscaled | Textures High, shadows High, volumetrics Medium, AO High | 60-90 fps |
| RTX 4070 / RX 7800 XT class | 1440p native or 4K upscaled | Textures Ultra, shadows High, effects High, volumetrics Medium | 90-120 fps |
On a lower-end card, do not immediately select the lowest preset. Keep textures at Medium or High if VRAM allows, turn off motion blur, and lower volumetrics. If the GPU still sits near full utilization, use 90 percent resolution scale before dropping every quality option. That preserves sharper geometry than a very low preset while reducing pixel shading workload.
CPU-limited players need a different approach. If GPU usage is below roughly 90 percent while the frame rate refuses to rise, reducing resolution will not help much. Lower effects, view distance, crowd density, or simulation-heavy options if the game exposes them. Close browser tabs, launchers, recording tools, and overlays too; a CPU-bound game has less spare headroom for background activity.
Upscaling, Frame Caps, and Stutter Fixes
If Dead in Antares offers an in-game upscaler, start with Quality at 1440p or 1080p and compare still objects, thin cables, and distant text. Quality mode is usually the best compromise. Balanced can provide a worthwhile GPU reduction on demanding scenes, but it may soften dark detail and produce shimmering around high-contrast edges. Avoid Performance mode unless you are below your target by a wide margin.
Use your monitor’s adaptive sync whenever possible. With G-SYNC or FreeSync, disable in-game V-Sync, enable the driver’s V-Sync option if recommended for your display, and cap the game two or three frames below refresh. For a 60 Hz panel, try 58 or 59 fps. For 144 Hz, try 141 fps. A cap reduces runaway GPU load and usually makes camera movement feel more consistent.
Stutter is not always a graphics-quality problem. The first launch after a driver update or game patch can include shader compilation and asset caching. Let the game sit at the main menu for a minute, then play through the same opening route once before judging performance. Keep the game on an SSD, leave at least 10 to 15 percent free space, and update GPU drivers with a clean installation only if normal driver updates fail.
Disable unnecessary overlays one at a time. Steam, Discord, GeForce Experience, Xbox Game Bar, and monitoring software can each introduce a different hook. Don’t delete shader caches as a routine fix; rebuilding them can temporarily make traversal stutter worse. For broader crash and hitching checks, see our PC stutter troubleshooting guide and driver and overlay fixes.
How to Test Your Final Settings Properly
Choose one repeatable section with camera movement, lighting changes, and several interactive objects. Walk the same path three times, record the average FPS and one-percent low, and pay attention to the graph rather than the headline number. A locked 60 fps with a 16.7 ms frame time feels far better than an unstable 80 fps that repeatedly jumps above 25 ms.
| Test Result | Likely Bottleneck | Change to Make | Expected Outcome |
|---|---|---|---|
| GPU at 99%, FPS low | GPU rendering load | Lower volumetrics or resolution scale | Higher average and one-percent lows |
| GPU below 90%, FPS low | CPU, streaming, or cap | Close background apps and check caps | Better consistency, not always higher average FPS |
| Good average, poor one-percent low | Effects, shaders, or streaming | Reduce effects and keep game on SSD | Fewer hitches during movement |
| VRAM nearly full | Texture memory pressure | Drop textures one level | Less hitching and texture swapping |
Once the result is stable, raise one setting at a time. Textures are the safest upgrade when VRAM remains available; shadows and volumetrics are the most dangerous upgrades for frame pacing. Keep motion blur off unless you genuinely prefer its film-like look, and save a screenshot of the final menu so a future patch or driver update doesn’t quietly reset your profile.
For perspective on tuning other atmospheric PC games, Steamoz’s Gangs of Sherwood performance fixes and Daymare 1998 survival tips are useful companions. The short version for Dead in Antares remains simple: preserve textures, cut volumetric effects first, cap the frame rate, and judge success by smooth frame times rather than a single peak FPS reading.
For official patch information and any renderer-specific updates, also monitor the Steam news hub and the game’s official community announcements. Performance guides age quickly when shader systems, upscalers, or lighting passes change, so retest after major updates before assuming your old profile is still optimal.