If you dive into Marvel's Spider-Man Remastered expecting a casual button-masher, Manhattan will chew you up within your first two hours. Insomniac’s web-slinger rewards momentum, positional awareness, and ruthless gadget rotation far more than raw reflex speed. Between sniper nests, brute-class bruisers with hyper-armor, and high-velocity traversal mechanics that the tutorial barely skims over, succeeding as Peter Parker means breaking bad habits before you lock yourself into suboptimal upgrades.
Whether you are jumping onto PC for the first time or revisiting the game with ultra-wide monitor support and ray-traced reflections, dialing in your core mechanics early pays massive dividends. From rationing your rarest upgrade currencies to understanding why staying on the pavement is a death sentence, these are the fundamental mechanics and tactical strategies you need to lock down before taking your first swing off the Empire State Building.
Master Momentum and the Web Zip for Speed and Evasion

Web-swinging in Spider-Man Remastered feels intuitive on the surface, but holding down the swing trigger continuously is actually the slowest way to cross Manhattan. When you hold your swing line until the apex, Peter converts his horizontal kinetic energy into upward vertical lift. That is fantastic if you want to scale a skyscraper, but it completely stalls forward momentum. To move through the concrete canyons at maximum velocity, release your swing line at the exact bottom of its arc—the lowest dip where Peter’s trajectory runs parallel to the asphalt.
The true engine of high-speed traversal is the Point Launch. When you zip toward an edge, antenna, or water tower using the dual-web zip (L2 + R2 on a controller, or middle mouse + right mouse by default), do not wait for Spider-Man to land on the perch. Press the jump button at the split second Peter reaches the landing point. Nailing this timing triggers a kinetic burst that catapults you forward with double the speed of a standard swing. Combine this with the Dive input (clicking the left analog stick or pressing Shift) during freefall to break the game's terminal velocity limit before launching into your next swing.
In combat, the Web Zip (pressing X on controller or tapping the dodge key mid-air without directional input) serves as your primary survival tool. It snaps Peter directly out of grenade blast radiuses and breaks incoming rocket target-locks without relying on ground rolls. If an enemy fires an RPG from across the rooftop, zipping horizontally through the air clears the explosion cone instantly and resets your spatial advantage.
Early Skill Tree Priorities: Dodge Window and Air Combat First

The progression menu throws three distinct branches at you right out of the gate: Innovator, Defender, and Webslinger. Spreading your early skill points evenly across these trees is an amateur trap. Your absolute top priority during the first ten levels should be unlocking defensive margins and vertical crowd control. The ground in Spider-Man Remastered is a hazard zone; it exposes Peter to unblockable melee swings from Brutes, electric batons, and off-screen shotgun blasts.
Under the Defender tree, rush Perfect Dodge immediately, followed directly by Dodge Window. Perfect Dodge gives you a brief flash of blue Spider-Sense right before an attack lands; dodging during this blue window shoots a web shot directly into the attacker’s face, temporarily blinding and incapacitating them. Dodge Window expands that timing threshold significantly, making parry timings forgiving even when fighting under unstable frame rates or high difficulty spikes. Much like dialing in your character setup in our Far Cry 6 beginner build recommendations, establishing a reliable defensive baseline completely alters your survivability.
Next, pivot to the Webslinger tree and grab Air Combat upgrades. Holding the attack button launches an enemy into the air where ground-based melee mobs cannot hit you. Once you are airborne, you can safely pummel priority targets, juggle them with web strikes, and use the Swing Kick to punt them off skyscraper roofs for instant eliminations. If you need to level up rapidly to grab these baseline perks, our approach to fast character progression in our Kakarot fast leveling and resource farming guide highlights how focusing on core early game milestones speeds up long-term performance.
| Skill Name | Tree Category | Mechanical Effect | Unlock Priority |
|---|---|---|---|
| Perfect Dodge | Defender | Enables blue Spider-Sense counter that webs enemy faces instantly. | Essential (Level 2) |
| Dodge Window | Defender | Widens reaction timing for Perfect Dodges by roughly 25%. | Essential (Level 3-4) |
| Air Marshall | Webslinger | Increases aerial attack damage and yields more Focus points per hit. | High (Level 5) |
| Hazard Zone | Innovator | Yanks weapons out of enemy hands and knocks back nearby foes. | High (Level 6-7) |
| Point Launch Boost | Webslinger | Massively amplifies forward launch speed when timing perch releases. | Medium-High (Level 8) |
Gadget Synergies Beat Pure Punching Every Single Time

Spider-Man’s standard four-hit punch string deals respectable chip damage, but relying exclusively on fists against mid-game Fisk, Demon, or Sable factions is painfully inefficient. High-level play revolves around environment interaction and gadget combinations that take enemies off the board permanently without grinding down massive health bars. In this game, wrapping an enemy in webbing while they are knocked against any flat surface—be it an alley wall, a dumpster, a sedan hood, or the floor—results in an immediate knockout.
The single most lethal early-game combo in the entire sandbox is the Web Bomb paired with the Concussive Blast. When a wave of six to eight Demon thugs drops into the arena, firing basic web-shooters wastes precious seconds. Instead, throw a single Web Bomb into the center of the cluster. This covers every enemy within a four-meter radius in fresh webbing. Before they can peel it off, immediately switch to the Concussive Blast (or use a well-placed ground slam) to fire a sonic shockwave. The blast hurls the entire webbed crowd backwards into surrounding architecture, sticking every single target to the walls simultaneously. You clear whole combat encounters in three seconds flat.
Similarly, keep your eye out for the Impact Webbing gadget. While standard Web-Shooters require three to five successive hits to stick an enemy, Impact Webbing instantly knocks back and pins any normal-sized human target to a surface on the first shot. If a thug is standing within ten feet of a wall, streetlight, or parked police cruiser, a single trigger pull takes them completely out of the fight. Treat gadgets not as optional party tricks, but as instant-kill tools designed to cull mob density before engaging Brutes.
Suit Mods and Suit Powers: How to Build Peter Correctly

One of the best design choices made by Insomniac Games is that suit visuals are purely cosmetic once unlocked. When you craft a new suit using research, crime, and landmark tokens, you unlock both that suit’s appearance and its unique Suit Power. Crucially, you can equip any unlocked Suit Power and any three Suit Mods onto whatever outfit you want. You are never forced to wear a suit you dislike just to keep a powerful combat buff active.
For your active Suit Power, the default Web Blossom (unlocked with the Classic Suit) remains top-tier throughout the entire campaign. When activated, Peter leaps into the air and spins 360 degrees, spraying a web storm in every direction that incapacitates almost every non-boss enemy on the screen. It is your emergency get-out-of-jail-free card when mob density spirals out of control during high-level Fisk Construction Base clearances.
For your three passive Suit Mod slots, focus entirely on Focus generation and incoming damage mitigation. Focus is Spider-Man’s lifeblood: it fills the meter beneath your health bar that you spend either on instant one-hit Finishers (Triangle + Circle) or on tapping the D-pad to heal Peter mid-brawl. Running mods that generate Focus through basic swings, dodges, or gadget deployments allows you to chain finishers back-to-back, which inherently grants invulnerability frames while the execution animation plays out.
| Mod / Power Name | Slot Category | Primary Benefit | Tactical Synergy |
|---|---|---|---|
| Web Blossom | Suit Power | Rapid-fires webbing in a 360-degree radius around Spider-Man. | Instant mob room-clearing and fast Focus buildup. |
| Kinetic Power Cells | Suit Mod | Significantly accelerates rate of Focus generation during combat. | Pairs with finishers to trigger constant invulnerability frames. |
| Ballistic Inserts | Suit Mod | Reduces incoming damage taken from bullets and projectile snipers. | Vital buffer when engaging late-game Sable mercs and rifle squads. |
| Threat Sensors | Suit Mod | Slows down game time dramatically after performing a Perfect Dodge. | Creates wide openings to pick off heavy targets without interruption. |
Optimize Your PC Settings and Keybinds for Peak Fluidity
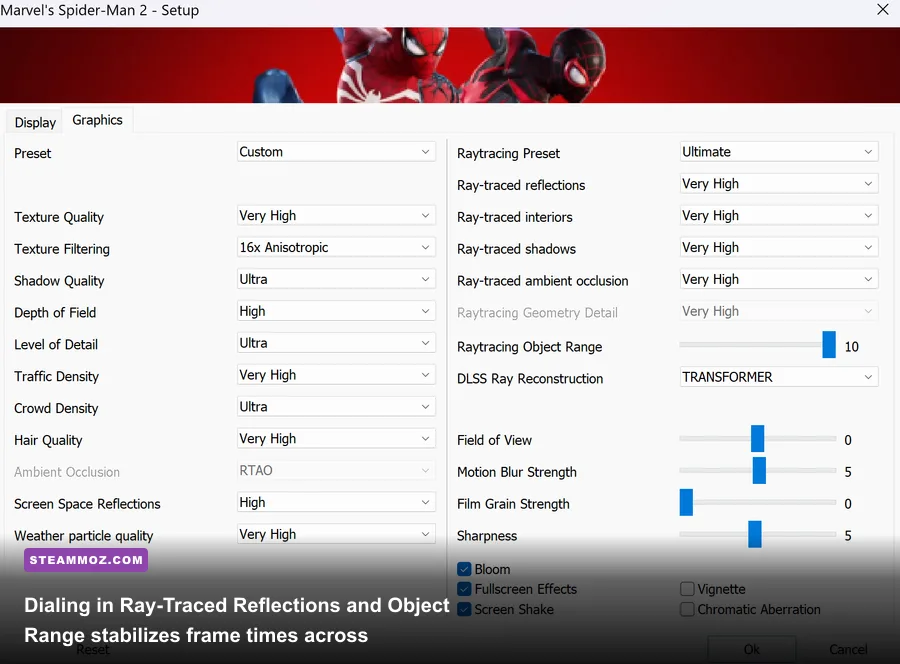
Ported to PC by Nixxes Software, the remastered release runs phenomenally well on modern hardware, but high-speed traversal across Manhattan can hammer both your CPU and your VRAM. If you notice frame rate stuttering while diving toward street-level traffic, your settings are likely choked on physics streaming rather than raw geometry rendering.
The two heaviest performance hogs in the display suite are Ray-Traced Reflections and Crowd Density. Manhattan is loaded with glass skyscrapers that reflect moving vehicles, pedestrians, and sunlight. If you are experiencing micro-stutters during high-speed swings, lower Ray-Traced Object Range from High to Medium, or utilize DLSS, FSR 2.0, or Intel XeSS in Quality mode to regain frame-time consistency. Just as we explored in our optimization breakdowns for maximizing PC frame rates in Far Cry 6 and tweaking graphics profiles in our Filament Marmalade Edition FPS fix guide, smooth frame times are far more critical than raw benchmark numbers when parry and dodge windows demand sub-second accuracy. If your installation encounters erratic crashes or erratic frametime spikes, checking background driver stability using methods outlined in our ELEX PC crash and FPS recovery guide can help clean up external OS interference.
Regarding controls: while the mouse-and-keyboard implementation is remarkably tight, playing on an analog gamepad (like a DualSense or Xbox Controller) gives you granular analog control over swing arcs and launch trajectories. If you do stick with a mouse and keyboard, bind your Dodge and Web Zip to dedicated thumb buttons on your mouse. Reaching for standard keyboard inputs like Left Ctrl or C mid-air while simultaneously manipulating your WASD movement vector will severely compromise your parkour fluidity.
Token Economy and Map Cleanup: Don't Waste Challenge Tokens

As you unlock Manhattan’s surveillance towers, your map will flood with collectibles: Backpacks, Landmark Photos, Research Stations, Crime events, Enemy Bases, and Taskmaster Challenges. Each activity rewards a specific type of currency token used to craft suits, unlock suit powers, and upgrade gadgets. While Backpack and Landmark tokens are plentiful—and discovering them mirrors the satisfaction of tracking down secrets in our Eternal Destiny hidden locations breakdown—there is one currency you must treat like pure gold: Challenge Tokens.
Awarded by Taskmaster’s stealth, combat, bomb-defusal, and drone-chase trials scattered across the boroughs, Challenge Tokens are strictly capped based on your performance medal (Bronze, Silver, or Gold). Earning Gold on drone chases requires near-flawless traversal routing that frustrates even seasoned players on their first run. Because the total pool of Challenge Tokens is limited, do not spend Challenge Tokens on cosmetic suits until you have fully upgraded your core gadget roster.
Gadget upgrades—such as increasing Web Bomb capacity from two to four, or expanding the area of effect on Trip Mines—directly alter your survival capabilities in end-game combat trials and DLC story expansions. You can consult the official progression breakdowns on the PlayStation Spider-Man Remastered hub to verify how gadget upgrades scale into late-game challenges. Lock down your gear first, master your aerial combat loops, and leave the completionist cosmetic wardrobe collection for after the credits roll.