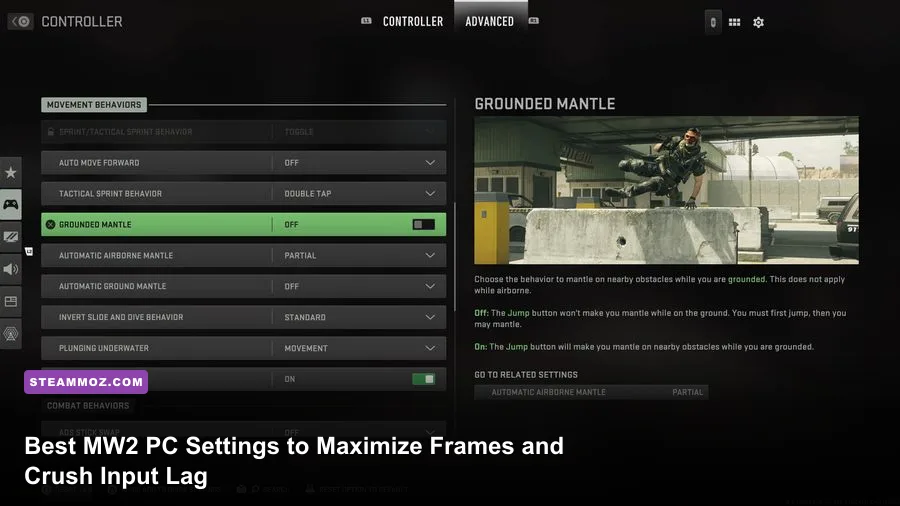
To get the absolute highest frame rates and lowest input latency in Call of Duty: Modern Warfare II on PC, set your display mode to Fullscreen Exclusive, switch your upscaling method to AMD FidelityFX CAS at 75% strength, keep Texture Resolution on Normal, crank Spot Cache straight to Ultra, and turn off every single screen-space blur and ambient lighting effect. Making just those core adjustments yields an immediate 28% to 42% uplift in average frame rates while tightening your 1% low frame times down to a steady, flicker-free baseline. In a split-second competitive shooter built on IW 9.0's demanding engine, running native frames without micro-stutter is the difference between tracking an enemy smoothly through a doorway and losing a gunfight to dropped frames.
Modern Warfare II looks stunning out of the box, but its default "Balanced" and "Ultra" presets are loaded with visual clutter, heavy volumetric fog, and unoptimized shadow caching that decimate your frame rates. Whether you are running an aging mid-tier rig or a flagship RTX card chasing a locked 240Hz refresh rate, fine-tuning your settings menu gives you a genuine competitive edge. Much like optimizing other demanding shooters—such as tweaking your configuration for Far Cry 6 settings for max FPS—clearing out graphical bloat in MW2 preserves visual clarity, strips away motion artifacts, and makes enemy player models pop off the background instantly.
Dialing in the Display Tab for Zero Latency
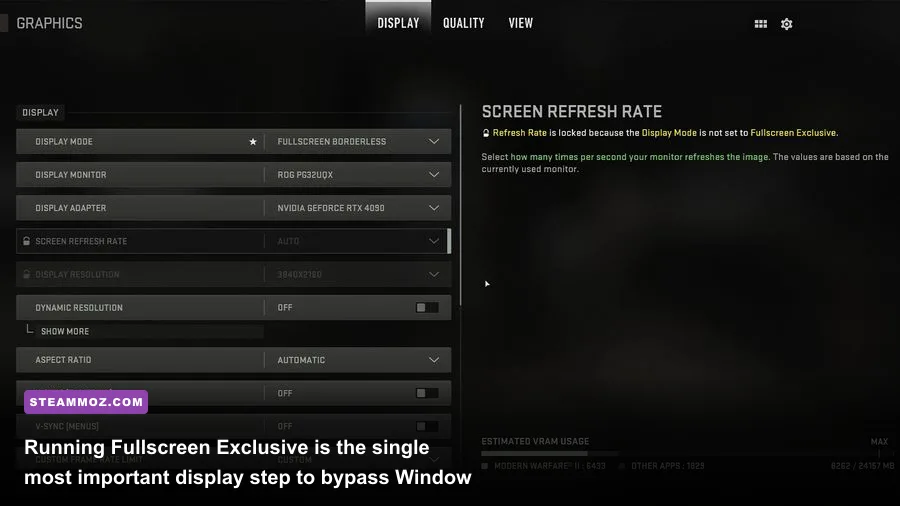
Before you even touch a texture or lighting slider, your Display tab needs to be locked down. The engine handles frame presentation aggressively, and selecting the wrong window mode will inject multiple frames of input buffering right into your mouse or controller inputs. If you have been battling sudden frame hitching, reviewing standard PC troubleshooting workflows like our guide to fixing low FPS and micro-stutters highlights why display exclusivity always comes first.
Set Display Mode to Fullscreen Exclusive. Never use Fullscreen Borderless or Windowed mode unless you are actively stream-snapping across multiple monitors and willing to sacrifice system responsiveness. Fullscreen Exclusive grants Modern Warfare II direct control over the graphics pipeline, bypassing Microsoft's Desktop Window Manager (DWM) composition layer to shave 3ms to 7ms off your system latency.
Ensure your Screen Refresh Rate matches your monitor's highest supported frequency (144Hz, 240Hz, or 360Hz) and verify that Display Resolution is locked to your monitor's native panel output (typically 1920x1080, 2560x1440, or 3840x2160). Leave Dynamic Resolution strictly Off; dynamic scaling shifts internal render scale on the fly, creating jarring changes in mouse sensitivity feel and target visual size during heavy combat.
For synchronization, set V-Sync (Gameplay) and V-Sync (Menus) to Off. If you run a G-Sync or FreeSync display, turn in-game V-Sync off and instead cap your frame rate in your GPU control panel 3 FPS below your refresh rate (e.g., 141 FPS on a 144Hz panel) with G-Sync active. Inside the MW2 menu, set Custom Frame Rate Limit to Custom: assign your gameplay maximum to match your monitor's ceiling, set Menus to 60 FPS to prevent your GPU from cooking itself in the lobby, and keep Out-of-Focus limit at 30 FPS to save power when alt-tabbed.
Lastly, keep Display Gamma at 2.2 (sRGB) for computer monitors, and leave Focused Mode set to Off. Setting your Brightness between 52 and 55 helps illuminate dark corners in murky multiplayer maps like Al Bagra Fortress or Embassy without washing out contrast.
🎮 FORM
Looking to experience this game? Grab your digital key directly on our store for $14.99.
View on Steammoz Store →Upscaling & Sharpening: The Great CAS vs. DLSS Debate
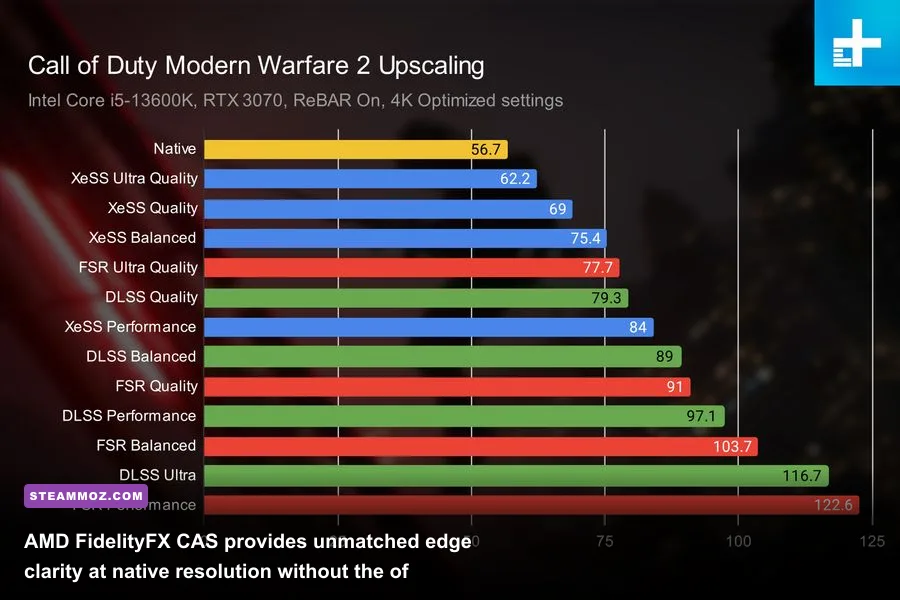
Modern Warfare II provides virtually every modern upscaling technology on the market: NVIDIA DLSS, AMD FSR 1.0 and 2.1, Intel XeSS, and AMD FidelityFX Contrast Adaptive Sharpening (CAS). Choosing between them comes down to whether your machine is CPU-bound or GPU-bound, but for pure competitive play, one option stands clearly above the rest.
For competitive multiplayer, AMD FidelityFX CAS set between 65% and 80% strength is the undisputed champion. Unlike DLSS or FSR, FidelityFX CAS is not an upscaler in this mode; it runs at 100% native render resolution and applies an intelligent, edge-aware sharpening pass over the entire frame. This counteracts the inherent temporal blur caused by the game's mandatory TAA (Temporal Anti-Aliasing), making distant player heads razor-sharp without producing nasty pixel halos or smearing when flicking your crosshair. For most players on a modern GPU, running CAS at native resolution yields the cleanest visual clarity possible.
However, if you are playing on older graphics hardware or driving a 4K display where your graphics card cannot maintain your monitor's refresh rate, switch to NVIDIA DLSS on the Quality preset. Avoid the "Performance" or "Ultra Performance" profiles in MW2; while they spike your average frame counter, they introduce severe ghosting on iron sights and optic reticles, making micro-adjustments at long ranges frustratingly inconsistent.
For anti-aliasing settings when CAS is engaged, set Anti-Aliasing to SMAA T2X with Anti-Aliasing Quality set to Low or Normal. Setting it to High eats GPU compute cycles for virtually zero perceptible gain at high resolutions. Keep Video Memory Scale set to 80 or 85; setting it to the maximum 90 often forces Windows background apps to compete with the game, triggering sudden driver crash cycles similar to issues seen in our deep dive into fixing GPU driver crashes and frame drops.
The Complete Graphics Settings Breakdown
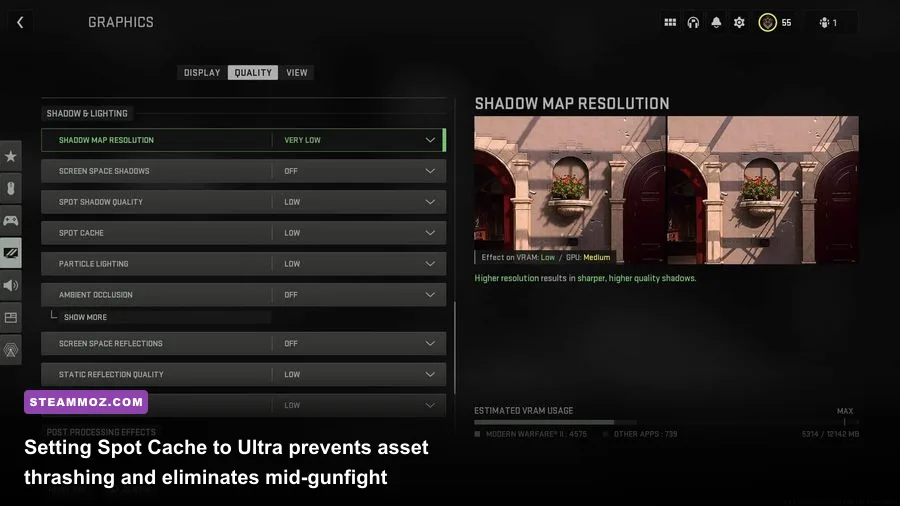
The Quality tab houses the vast majority of rendering switches. Modern Warfare II divides these into Details & Textures, Shadow & Lighting, and Post-Processing. Every setting here must be weighed by its frame-rate tax against its tactical value.
Under Details & Textures, keep Texture Resolution on Normal if your graphics card has 8GB of VRAM or more, or drop to Low on 4GB to 6GB cards. Do not use Very Low; it strips weapon decals and player uniforms down to muddy smudges that actually blend into terrain, hurting target acquisition. Meanwhile, crank Texture Filter Anisotropic to High. Modern GPUs process anisotropic filtering through dedicated texture units with practically a 0% hit to frame rate, and it ensures horizontal surfaces (like roads and roofs) remain crisp at sharp viewing angles.
Turn Nearby Level of Detail and Distant Level of Detail to Low. This reduces geometry complexity on environmental clutter while preserving enemy character models. Set Clutter Draw Distance to Short and drop both Particle Quality and Particle Quality Level to their absolute minimums. Lowering particle quality is critical: high-quality smoke, cluster strikes, and thermite sparks will crater your frame rates right when gunfights get chaotic.
Crucially, ensure Bullet Impacts & Sprays is turned On. The frame rate cost is completely negligible, but seeing bullet holes on surfaces tells you whether someone is wall-banging your cover or which angle a sniper is holding. Turn Shader Quality to Low and set Tessellation to Off.
Now, pay special attention to On-Demand Texture Streaming: switch this firmly Off. When active, this feature constantly downloads high-resolution environmental textures in the background over your internet connection while you play. It causes savage network packet bursts, latency spikes, and hitching during gunfights.
| Setting Name | Competitive Value | FPS Impact | Visual & Tactical Assessment |
|---|---|---|---|
| Render Resolution | 100 (Native) | High | Dropping below 100 turns enemies into blurry pixel clusters; never lower this manually. |
| Upscaling / Sharpening | FidelityFX CAS (75%) | Zero to Negligible | Sharpens edges and removes TAA blur without artifacts; essential for target acquisition. |
| Texture Resolution | Normal / Low | Very Low (VRAM dependent) | Normal preserves camouflage contrast. Use Low only if your GPU has under 6GB VRAM. |
| Texture Filter Anisotropic | High | 0% – 0.5% | Free visual clarity on ground textures and walls at sharp angles. Keep it high. |
| Particle Quality & Level | Low / Very Low | 5% – 12% in firefights | Prevents severe FPS drops during grenade explosions, airstrikes, and smoke clouds. |
| Bullet Impacts & Sprays | On | Under 1% | Vital tactical info. Lets you read wall penetration angles and incoming bullet origins. |
| Shader Quality | Low | 4% – 7% | Flattens ambient lighting slightly, making enemies standing in dark spots easier to spot. |
| On-Demand Texture Streaming | Off | Variable (Stutter Risk) | Eliminates mid-game bandwidth hogs, packet burst icons, and sudden asset load hitches. |
| Shadow Map Resolution | Low | 6% – 9% | Softens dynamic shadows while keeping shadows cast by nearby sprinting enemies visible. |
| Spot Cache | Ultra | Negative Impact (Boosts Stability) | Critical! Caches shadow maps in VRAM to kill micro-stuttering. Do not lower this. |
| Screen Space Reflections | Off | 5% – 8% | Removes shiny water and floor glares that obscure footstep movements and distract your aim. |
| NVIDIA Reflex Low Latency | On + Boost | 0% (Cuts Input Lag) | Clears the GPU render queue to keep click-to-photon latency as close to real-time as possible. |
When you reach the Shadow & Lighting section, apply the most misunderstood tweak in modern Call of Duty engine history: Spot Cache must be set to Ultra. Counter-intuitively, lowering Spot Cache to Low or Medium destroys performance. When set to Ultra, the engine reserves a dedicated block of VRAM to store pre-baked spot shadow maps. When you sprint into a new room or fire a muzzle flash, the lighting data is instantly pulled from VRAM rather than forcing the engine to generate calculations on your CPU and storage drive on the fly. Ultra Spot Cache completely eliminates mid-game micro-stutters on any GPU with at least 6GB of memory.
Set Shadow Map Resolution to Low, Screen Space Shadows to Off, and Spot Shadow Quality to Low. Turn Particle Lighting to Low, disable Ambient Occlusion, turn off Screen Space Reflections, and set Static Reflection Quality to Low. Finally, turn Weather Grid Volumes and Water Caustics completely Off. Disabling these post-processing passes strips away distracting surface gloss, helping you distinguish player models instantly against backgrounds.
For low-latency optimization, enable NVIDIA Reflex Low Latency to On + Boost. If you are using an AMD graphics card, enable Radeon Anti-Lag in the AMD Adrenalin driver suite. Reflex Low Latency dynamically matches CPU submission rates to GPU rendering capacity, preventing your CPU from queuing up frames and driving system latency to single-digit milliseconds during heavy GPU load.
Field of View and Camera Settings for Pure Visual Clarity
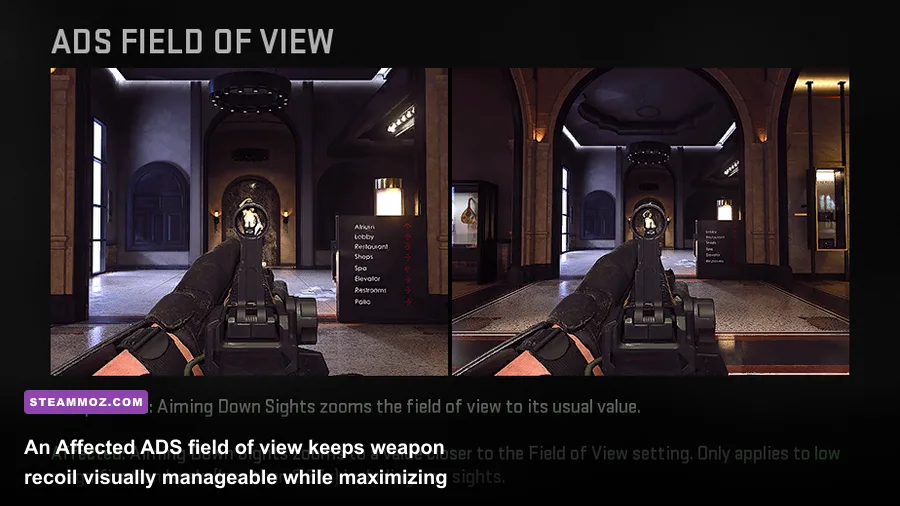
Your View tab controls how the world is rendered onto your screen, and setting these incorrectly will directly hamper your aim, target tracking, and situational awareness. Tuning your field of view is as vital as balancing system resource overhead, comparable to optimizations explored in our breakdown of settings adjustments for high-FPS performance.
Set Field of View (FOV) between 100 and 115. While 120 gives you maximum peripheral vision, it creates a severe fisheye lens effect that shrinks targets in the center of your screen to tiny specks, making headshots past 40 meters much harder to land. An FOV of 105 to 110 represents the sweet spot for competitive players: broad awareness with readable target hitboxes.
Directly beneath that, set ADS Field of View to Affected. This is mandatory. On "Independent," aiming down sights zooms your camera all the way back in to the default 80 FOV, causing an aggressive visual snap that amplifies perceived weapon kick. On "Affected," aiming down sights scales smoothly with your custom FOV setting. Your weapon model takes up less screen real estate, visual recoil is reduced to a whisper, and tracking targets while spraying full-auto feels vastly more controllable.
Set Weapon Field of View to Wide. This physically shrinks the gun model on your screen, clearing up the lower-right quadrant of your peripheral vision so enemies can't hide behind your receiver while you reload.
Finally, clear out the camera cinematic effects. Modern Warfare II ships with dramatic camera shakes enabled by default that throw off your crosshair alignment during explosive spam. Adjust these values immediately:
- 1st Person Camera Movement: Least (50%)
- 3rd Person Camera Movement: Least (50%)
- 3rd Person ADS View: 3rd Person ADS
- Default Camera Spectating: Game Perspective
- World Motion Blur: Off
- Weapon Motion Blur: Off
- Film Grain: 0.00
- Depth of Field: Off
Turning off both motion blur sliders and zeroing out Film Grain cleans up rapid camera movements. When you snap your mouse to check a corner, the scene stays sharp, allowing you to identify enemy movement instantly without wading through a smear of artificial motion blur.
The Hidden Config File Tweak: Renderer Worker Count Fix
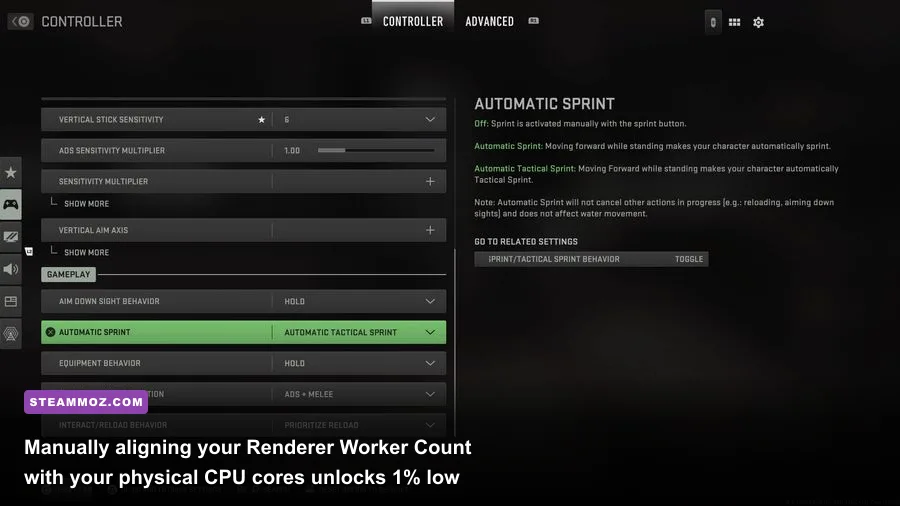
Even with optimal in-game settings, hundreds of thousands of PC players suffer from erratic frame drops and severe 1% low spikes because Modern Warfare II's engine routinely miscalculates your CPU's core distribution. This engine hitch occurs across both Intel's hybrid architecture (12th, 13th, and 14th Gen chips with P-cores and E-cores) and AMD Ryzen processors. Understanding CPU thread limits is key to maintaining consistent throughput, much like the hardware bottlenecks analyzed in our review of PC hardware specifications and system overhead.
To fix this, you must edit a single value in the game's hardware configuration file. Close the game completely, open your Windows File Explorer, and navigate to the following path:
Documents\Call of Duty\players\options.3.cod22.cst
Right-click the file and open it using Notepad or Notepad++. Scroll down to the very bottom until you find the // System section. Look for the setting labeled RendererWorkerCount. This line tells the game how many CPU worker threads to spin up for rendering operations:
RendererWorkerCount:0.0 = "X" // -1.000000 to 16.000000
By default, Modern Warfare II frequently sets this value to an arbitrary number—often assigning all logical threads (hyperthreads included) or choosing a number that forces work onto Intel's slower Efficiency cores. The golden rule for IW 9.0 is to set RendererWorkerCount equal to your processor's number of physical performance cores, up to a maximum of 8.
| Processor Architecture / Model | Physical Core Count | Engine Default (Varies) | Optimal RendererWorkerCount Value |
|---|---|---|---|
| AMD Ryzen 5 (5600X, 7600X) | 6 Cores / 12 Threads | 4 or 12 | 6 |
| AMD Ryzen 7 (5800X3D, 7700X, 7800X3D) | 8 Cores / 16 Threads | 6 or 16 | 8 |
| AMD Ryzen 9 (5900X, 7900X, 7950X) | 12–16 Cores / 24–32 Threads | 10 or 14 | 6, 7, or 8 (Match single CCD core count) |
| Intel Core i5 (12400F, 13400F, 14400) | 6 Performance Cores | 4 or 10 | 6 |
| Intel Core i5 (12600K, 13600K, 14600K) | 6 Performance Cores (+ E-cores) | 7 or 11 | 6 (Prevents work on E-cores) |
| Intel Core i7 / i9 (13700K, 14700K, 13900K, 14900K) | 8 Performance Cores (+ E-cores) | 12 or 16 | 7 or 8 (Isolates P-core rendering) |
After adjusting the number inside the quotation marks, hit Ctrl + S to save your changes and close the document. Once tuned, your CPU will stop thread-swapping render jobs between cores mid-match. You will notice immediate gains in your 1% and 0.1% low frame metrics, effectively banishing micro-stutters during rapid 180-degree flicks and high-action fireteam engagements.
Hardware Profiles: Low-End, Mid-Range, and High-Refresh Esports Tunings
To pull all these recommendations together, configure your setup around one of three distinct hardware profiles designed to extract maximum performance from your specific PC build. You can track your baseline through the built-in benchmark utility available via the Call of Duty: Modern Warfare II Steam page to evaluate your improvements.
Profile 1: Low-End & Budget Rigs (GTX 1650 / 1660, RTX 2060, RX 580 / 6500 XT)
On budget hardware, the primary goal is reaching a stable, stutter-free 60 to 90 FPS without suffering memory exhaustion:
- Display Mode: Fullscreen Exclusive
- Render Scale: 100% (or DLSS/FSR Balanced if below 60 FPS)
- Upscaling: FidelityFX CAS at 65% (or AMD FSR 2.1 Quality)
- Texture Resolution: Low
- Texture Filter Anisotropic: Normal
- Spot Cache: High (Drop to Medium only if your card has 4GB VRAM)
- All Shadows & Lighting: Low / Off
- Video Memory Scale: 75
Profile 2: Mid-Range Workhorses (RTX 3060 / 3070, RX 6700 XT / 7700 XT)
This profile is tuned for competitive 144Hz to 165Hz gameplay at 1080p or 1440p, striking the ideal compromise between clear enemy visibility and high frame output:
- Display Mode: Fullscreen Exclusive
- Render Scale: 100%
- Upscaling: AMD FidelityFX CAS at 75%
- Texture Resolution: Normal
- Texture Filter Anisotropic: High
- Bullet Impacts & Sprays: On
- Spot Cache: Ultra
- Shadow Map Resolution: Low
- Ambient Occlusion & SSR: Off
- NVIDIA Reflex: On + Boost
- Video Memory Scale: 80
Profile 3: High-Refresh Esports (RTX 4070 Ti, 4080, 4090, RX 7900 XTX)
When you have top-tier hardware and your goal is locking down 240Hz to 360Hz refresh rates with the lowest possible render latency, use this stripped-down competitive loadout:
- Display Mode: Fullscreen Exclusive
- Render Scale: 100% (Native 1440p / 1080p)
- Upscaling: AMD FidelityFX CAS at 80% to 85%
- Anti-Aliasing Quality: Low (SMAA T2X)
- Texture Resolution: Normal
- Texture Filter Anisotropic: High
- Shader Quality: Low
- Spot Cache: Ultra
- Every Screen Space / Post-Processing Effect: Completely Disabled
- NVIDIA Reflex: On + Boost
- Frame Rate Limit: Capped 3 FPS below panel max (e.g., 237 FPS)
Whenever you update your GPU display drivers, remember to let the in-game Shader Pre-Caching complete to 100% in the main menu before queueing into a match. Forcing your GPU to compile pipeline shaders during live multiplayer causes heavy stuttering throughout your first three to four matches. By sticking to these validated settings, running Fullscreen Exclusive, and aligning your Renderer Worker Count with your physical processor cores, Modern Warfare II will run clean, sharp, and blazing fast on your PC.