The best beginner build in Alekhine's Gun is a quiet infiltration setup: start with Agent Alekhine, carry the Welrod as your primary firearm, keep the garrote or a close-range takedown option ready, and treat disguises, poison, and distractions as your real equipment. This is not an RPG with skill trees or stat points. Your “build” is a repeatable loadout and a disciplined route through each sandbox mission.
That distinction matters. Alekhine's Gun is built around the same patient espionage DNA as Death to Spies, not a loot-driven progression system. You don't become stronger by grinding levels. You become effective by learning which uniform gets you through a checkpoint, which body can be hidden, and which suspicious guard is about to ruin an otherwise perfect assassination.
The Best Beginner Build at a Glance

For a first playthrough, use a low-noise, high-control setup rather than a combat-heavy one. Your priority is to finish objectives without triggering a full alert, because open combat quickly turns Alekhine's Gun into an awkward shooting gallery. The game is far more manageable when you control sightlines and move with a disguise.
| Build Slot | Beginner Choice | Why It Works | When to Change It |
|---|---|---|---|
| Operative | Agent Alekhine | Designed for infiltration and silent objective play | Only when a mission explicitly favors another role |
| Primary weapon | Welrod | Suppressed, discreet, and useful against isolated targets | Use a rifle when the briefing demands distance |
| Silent tool | Garrote | No muzzle flash, no ammunition cost, and ideal in blind spots | Swap to poison for timed kills |
| Utility | Poison or distraction item | Creates indirect kills and separates guards | Carry mission-specific tools when required |
| Disguise | Closest access-level uniform | Lets you cross restricted areas without fighting | Change uniforms when entering a new security tier |
| Mindset | Scout, isolate, hide, then kill | Matches the game's detection and patrol systems | Never switch to aggression just because one plan failed |
The Welrod is the standout recommendation because it solves the most common beginner problem: removing one dangerous guard without announcing your position to an entire compound. It isn't a license to fire freely. Use it only when the target is isolated, the impact point is hidden, and you already know where the body will go.
For official reference material, check the Alekhine's Gun Steam page before starting. The Steam community hub is also useful for mission-specific oddities, although older posts can be inconsistent.

🎮 Alekhine's Gun
Looking to experience this game? Grab your digital key directly on our store for $2.24.
View on Steammoz Store →Weapon Choices and the Correct Combat Rotation

Alekhine's Gun does not reward carrying every weapon you find. Extra firepower creates temptation, and temptation creates noise. Build your kit around three layers: a silent takedown, a suppressed emergency shot, and one indirect method that can remove a target without putting Alekhine beside the corpse.
Use the garrote for close, controlled kills
The garrote is your default answer for a lone guard who can be approached from behind. Before moving in, check three things: the guard's patrol direction, the nearest witness, and the body-hiding location. If any of those are unknown, don't attack yet. A silent kill is only silent if nobody sees the animation, discovers the body, or notices the missing patrol.
Use the Welrod as a reset button, not a main weapon
The suppressed pistol is strongest when your route has already been planned. Fire from behind cover or inside a room, then move immediately. Even when the shot doesn't create a full alarm, nearby characters may investigate. That investigation is often more dangerous than the original target, so position the body and your escape route first.
Reserve rifles and loud pistols for scripted opportunities
Long guns can be excellent for a carefully prepared assassination, especially when the objective provides a clear firing lane. They are poor beginner weapons in a crowded area. A loud shot can pull multiple guards from different floors, lock down doors, and force a reload while enemies are already searching. If the mission gives you a sniper position, exploit it. If it doesn't, don't manufacture one.
| Weapon or Tool | Noise Risk | Best Target | Beginner Verdict |
|---|---|---|---|
| Garrote | Very low | Isolated human target from behind | S-Tier for controlled takedowns |
| Welrod | Low, but not invisible | Single target inside a prepared room | S-Tier emergency firearm |
| Poison | Very low | Predictable target with a usable drink or food setup | A-Tier indirect method |
| Sniper rifle | High after the shot | Mission-provided long-range assassination | A-Tier when scripted, risky elsewhere |
| Unsuppressed pistol | High | Last-resort escape or forced combat | C-Tier for beginners |
Your basic combat rotation should be: observe patrol, create separation, perform the takedown, move the body, change position, then continue. Don't loot or admire the result immediately. Bodies are evidence, and evidence is what turns a clean mission into a restart.
Disguises Are Your Main Defensive Stat
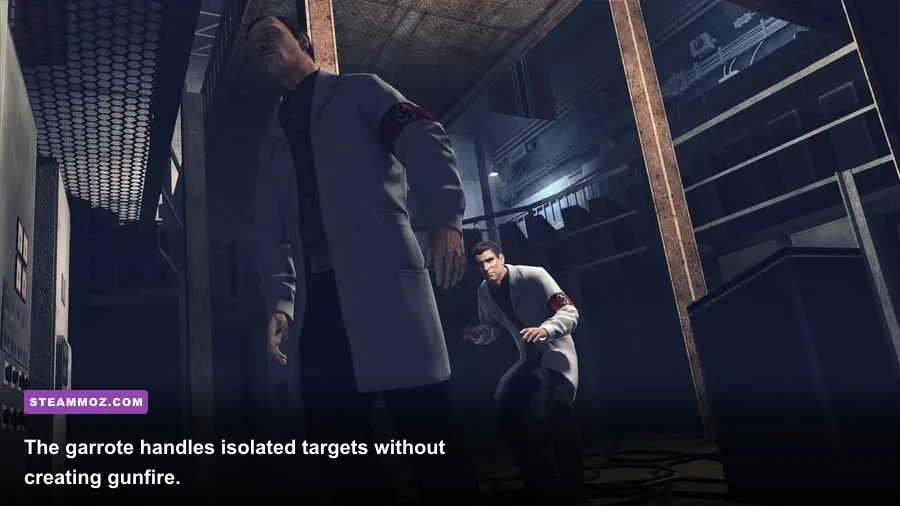
The most important “stat” in Alekhine's Gun is access. A disguise determines which doors, corridors, and guards you can approach safely. Think of uniforms as keys, not armor. Wearing the wrong outfit in the wrong zone won't protect you from suspicion, and lingering near a guard while staring at him is still a great way to get exposed.
Start every mission by identifying the uniform hierarchy. Civilian clothing may let you move through public areas, while a soldier, officer, technician, or specialist disguise can open restricted sections. Don't take the first body you find automatically. The best disguise is the one that reaches your next objective with the fewest inspections.
A reliable disguise routine
- Map the boundary. Find the edge between public and restricted space before taking a uniform.
- Choose a low-traffic target. An isolated worker is safer than a guard surrounded by colleagues.
- Hide the body immediately. A discovered corpse can expose the entire route even if your disguise is perfect.
- Walk with purpose. Move toward an objective instead of circling suspiciously around checkpoints.
- Keep an exit disguise in mind. The outfit that gets you inside may not be the safest one for leaving.
One subtle beginner mistake is treating disguise as permission to sprint everywhere. It isn't. Restricted characters can still challenge you, and certain NPCs are more likely to recognize an impostor. Keep your route short, avoid unnecessary conversations, and don't walk directly into a guard's personal space unless the game requires it.
This is also why Alekhine's Gun feels closer to a puzzle box than a conventional action game. Your inventory, uniform, corpse placement, and timing all interact. If you're used to games where a strong weapon tier list solves every encounter, this game demands a different kind of preparation.
Mission Progression: What to Practice First

Don't judge your early performance by body count. Judge it by information gained. The first successful run through a mission should be a reconnaissance pass whenever possible. Learn guard routes, discover usable disguises, locate hiding places, and identify which doors create the biggest shortcut. Then reload and execute the cleaner version.
| Stage | Primary Goal | What to Avoid | Success Signal |
|---|---|---|---|
| Opening minutes | Find a safe disguise and observe patrols | Taking the first visible guard | You know two exits before entering danger |
| First infiltration | Reach the objective zone without firing | Crossing checkpoints repeatedly | Suspicion stays low while moving forward |
| Target setup | Separate the target from witnesses | Attacking during a patrol overlap | The target has a private window |
| Assassination | Use garrote, poison, or Welrod | Improvising with a loud firearm | The body disappears before discovery |
| Extraction | Return through a known safe route | Exploring after the objective is complete | You leave with the same discipline used to enter |
Save often, but save intelligently. A save made while a guard is already suspicious can preserve a bad situation rather than prevent it. Create a clean checkpoint before taking a disguise, before entering the target area, and immediately after hiding a body. If your first attempt becomes noisy, reload instead of trying to outshoot a compound.
For players coming from more modern stealth games, the slower pace may feel unforgiving. Our guides to melee timing in Hunt: Showdown 1896 and high-FPS settings cover faster feedback loops; Alekhine's Gun is the opposite. Here, patience is the mechanical advantage.
Beginner Mistakes That Break Good Runs

Looting before securing the area
Searching a body feels efficient, but it keeps you in the danger zone. Complete the immediate objective first, hide evidence, and only then consider collecting equipment. A few extra bullets are never worth exposing the route you spent ten minutes building.
Dragging bodies across active sightlines
Body movement is useful, but the drag animation is slow and vulnerable. Wait for the patrol to turn, move in short sections, and use rooms, closets, or shadowed corners. If you can't hide a body safely, choose a different takedown location.
Changing disguises without checking the room
Changing clothes doesn't erase witnesses. If someone saw you enter a restricted room as a civilian and leave as an officer, the uniform won't magically repair that contradiction. Break line of sight, wait for the area to settle, and then move.
Turning one mistake into a firefight
The moment suspicion rises, beginners often draw a pistol. That's usually the worst response. Retreat behind a door, break visual contact, and relocate. If the alarm is already active, escape toward a previously scouted safe zone rather than advancing toward the target.
For technical issues, don't confuse low frame rate with stealth detection. Performance problems can make patrol timing feel inconsistent, particularly during crowded scenes. The troubleshooting approach in our stutter-to-smooth-FPS guide is useful general PC advice, while these low-FPS fixes cover older PC releases more broadly.
Finally, keep expectations realistic: Alekhine's Gun has no perfect meta build, no permanent stat scaling, and no single weapon that trivializes every mission. The strongest beginner setup is the one that keeps you unseen long enough to make informed decisions. Start with the Welrod, garrote, poison, and the most useful disguise available. Scout before acting, hide every body, and reload before panic turns a surgical assassination into a noisy escape.
For publisher information and release details, consult Kalypso Media's official website. The game is old-school in the best and worst ways, but once its rules click, this build gives beginners the safest path into its elaborate stealth sandboxes.