If you own the Extra Pass and want a strong first character, create a Female Saiyan and build around ki-blast supers, stamina control, and Potential Unleashed. Put your first 125 points into Ki Blast Supers, raise Ki to 42, invest 84 in Stamina, and use Super Destructo-Disc, Big Bang Kamehameha, Maximum Charge, and Potential Unleashed as your core kit. It hits hard without demanding perfect melee execution, and every part of it remains useful after you start using Extra Pass DLC skills.
This is a level-99 template, because that is the cleanest point to compare a new character. Later level caps add more attribute points, so you can extend the same priorities rather than rebuilding from scratch. The build also works without every DLC mission, but the Extra Pass gives you better supers, mentors, and late-game upgrade options.
Before spending anything, check the official Steam page for the current Extra Pass bundle and platform contents. DLC naming has changed across editions, and owning the bundle does not automatically mean every skill is unlocked from the first story mission.
Start with the right race and attribute spread

Female Saiyans are the best beginner choice here because their ki-blast damage is naturally strong, their transformations support aggressive burst play, and their damage improves after they revive from a KO. That last trait is not a reason to play recklessly, but it makes a failed first attempt less punishing. You can use a male Saiyan, but male Saiyans lean more heavily toward basic attacks and strike damage, which makes the opening hours more dependent on close-range combo timing.
At level 99, use this spread:
| Attribute | Points | Purpose | Priority |
|---|---|---|---|
| Health | 0 | Keep damage focused; use clothing and QQ Bangs for survivability | Low |
| Ki | 42 | Provides two extra ki bars with a suitable QQ Bang | High |
| Stamina | 84 | Gives four extra stamina bars and room for evasive play | High |
| Basic Attacks | 42 | Makes light strings and basic ki generation less sluggish | Medium |
| Strike Supers | 0 | Not part of this damage plan | None |
| Ki Blast Supers | 125 | Your main source of burst damage | Maximum |
The exact number of bars you gain depends on your race, level, QQ Bang, and modifiers, so treat the table as a target rather than a promise of a specific HUD result. If you hate playing with low health, move 25 points from Basic Attacks into Health. Don't take points out of Ki Blast Supers: that is the stat that makes every charged blast and ultimate worth the setup.
Use the five Dragon Balls to reset attributes if your early experiments go badly. Shenron's attribute reset wish is far cheaper than deleting a character with rare skills, festival rewards, or mentor progress. You can also read the game's official Dragon Ball Xenoverse 2 site for current announcements before planning around a newly added level cap.
🎮 DRAGON BALL XENOVERSE 2 - Extra Pass
Looking to experience this game? Grab your digital key directly on our store for $14.99.
View on Steammoz Store →Use this skill loadout from the first serious quests
Your starting preset should reward clean openings, not flashy button mashing. The most important skill is Super Destructo-Disc. It tracks well, travels quickly, and can catch an opponent who is moving sideways after a knockback. It is especially useful in Parallel Quests where enemies refuse to stay in one place. If you do not have it yet, use Consecutive Energy Blast until you unlock the skill through the relevant mission or skill shop rotation.
For your second super, choose Big Bang Kamehameha. It costs more ki and has a noticeable charge-up, but a stamina break turns it into a devastating punish. Fire it immediately after a knockback only when you know the enemy cannot vanish behind you. The Extra Pass and other DLC packs add alternatives such as Earth Splitting Galick Gun; keep it as a later upgrade rather than delaying your basic progression.
Maximum Charge is the beginner-friendly charge skill. It is slower than Burst Charge, but it lasts longer and lets you build a full bar while a quest target is down. Once you are comfortable reading knockbacks, replace it with Burst Charge for faster two- or three-bar charge windows. Your evasive should be Instant Rise or Energy Barrier. Instant Rise costs less and gets you upright quickly; Energy Barrier is safer against large area attacks but consumes more stamina.
For the ultimate slot, start with Special Beam Cannon if you have unlocked it, or use Emperor's Death Beam once your ki economy is stable. Emperor's Death Beam is one of the Extra Pass-era damage tools worth building around, but it drains a large amount of ki and leaves you vulnerable if the target has stamina. The safest beginner rule is simple: never launch it before a stamina break.
| Slot | Recommended Skill | Why It Works | Beginner Warning |
|---|---|---|---|
| Super 1 | Super Destructo-Disc | Fast projectile with strong tracking | Don't throw it repeatedly into a blocking enemy |
| Super 2 | Big Bang Kamehameha | High burst after a knockback or stamina break | Needs a safe opening because of its charge time |
| Charge | Maximum Charge | Reliable ki recovery during quest downtime | Do not charge beside an active boss |
| Evasive | Instant Rise | Quick escape with manageable stamina cost | Save stamina for enemy vanish attacks |
| Ultimate | Special Beam Cannon | Efficient single-target finisher | Requires accurate timing and a stable lock-on |
| Awoken | Potential Unleashed | Strong damage increase without transformation drain | Unlock it through advancement tests first |
Potential Unleashed is the correct first awoken skill because it does not constantly bleed stamina or ki while active. Super Saiyan God Super Saiyan looks tempting with Extra Pass access, but its ki drain punishes beginners who miss charge windows. Save Blue and Blue Evolved for a second preset after you understand stamina management. The older RPG progression lessons here are surprisingly relevant: build around a repeatable core before chasing the most spectacular endgame option.
Fix your QQ Bang and Super Soul before chasing perfection

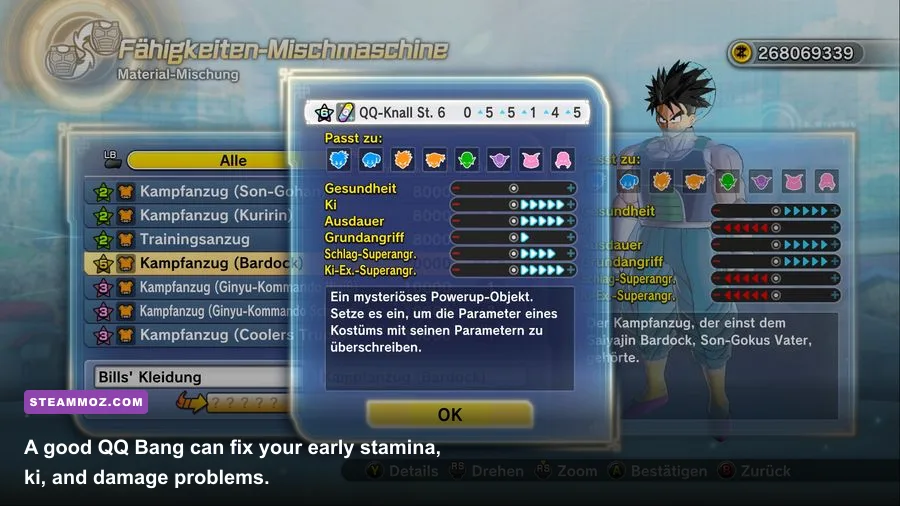
Clothing stats matter less than the QQ Bang replacing them. A useful beginner QQ Bang should give positive Ki, Stamina, and Ki Blast Supers, with negative Strike Supers if possible. Do not throw away a QQ Bang because it has average Health. Surviving one extra combo is often more valuable than gaining a tiny amount of damage, especially while you are still learning enemy timing.
Use the mixing shop in Conton City and experiment with clothing bought from shops or earned in Parallel Quests. QQ Bang results are random, and the exact recipe depends on the items and mixing capsule used. The famous high-end recipes involving rare Z Mix Capsules are worth pursuing later, but they are not required for story completion. A modest five-star QQ Bang with pluses in Ki, Stamina, and Ki Blast Supers will carry a fresh character comfortably.
For a Super Soul, choose one that improves ki recovery or boosts damage after a condition you can control. Before Creation Comes Destruction... is a popular offensive option because it can increase damage after a timed trigger, while defensive or ki-recovery souls are easier during the story. Read the full activation text: some souls only trigger below half health, after a revival, or when a specific attack lands.
Your accessory can be cosmetic at first. The build does not require a particular four-star accessory, and chasing one early wastes time better spent unlocking mentors and advancement tests. If you want a practical farming route, use Parallel Quests that can be cleared quickly rather than the highest mission you can barely survive. Repeated fast clears produce more clothing, TP Medals, and skill chances per hour.
Master the rotation instead of spamming ultimates
The basic rotation is: charge safely, tag the enemy with a light knockback, use Super Destructo-Disc to force movement, then take a measured approach for a stamina break. After the break, activate Potential Unleashed, use Big Bang Kamehameha, and follow with your ultimate if you have enough ki. That sequence keeps your expensive attacks inside a controlled punish window.
Against aggressive bosses, block first and attack second. A perfect block can create the opening you need, but do not mash after every successful guard: many bosses vanish immediately and punish the follow-up. When an enemy vanishes behind you, tap guard or use Instant Rise rather than burning your entire stamina bar on panic evasives. A stamina break with zero stamina is a death sentence because you cannot escape the next ultimate.
Learn the difference between a normal knockback and a stamina-break opportunity. A heavy attack string ending in a charged heavy hit can break stamina, but only if the opponent is not already flashing or recovering. In player missions, use a light stamina break after a knockback for reliability. In Parallel Quests, partner AI can interrupt the setup, so move the target away from the group before committing.
| Situation | Enemy Tell | Your Response | Best Follow-Up |
|---|---|---|---|
| Enemy rushes in | Long forward dash or red attack flash | Block, sidestep, or perfect block | Light combo into Super Destructo-Disc |
| Enemy is knocked away | Long horizontal recovery animation | Close distance without spending stamina | Charged heavy stamina break |
| Enemy has no stamina | Broken stamina icon and stagger | Activate Potential Unleashed | Big Bang Kamehameha, then ultimate |
| Boss begins an area ultimate | Wide aura and attack wind-up | Instant Rise or move behind cover | Charge only after the attack ends |
| You are out of stamina | Empty stamina bar after a vanish | Stop attacking and guard | Recover, then re-enter with a light string |
For more general progression discipline, these early-game survival habits apply perfectly here: secure the objective, avoid unnecessary risks, and don't confuse a flashy win with an efficient one. Xenoverse 2 rewards the player who controls the pace.
Upgrade this preset as your Extra Pass character grows
Finish the main story before treating DLC Parallel Quests as your primary farming destination. Unlock all advancement tests, train with mentors, and raise your friendship with characters whose Dual Ultimates or skills you want. The academy tests are not busywork: they teach stamina breaks, charged attacks, transformations, and evasives in a safer setting than high-level DLC missions.
Once your build has a strong QQ Bang, consider a second preset built around Super Saiyan God Super Saiyan. Keep the same 125 Ki Blast Supers, but add enough Ki and recovery support to maintain the transformation. The awoken skill is powerful, yet the drain means you need cleaner charge timing and more disciplined stamina use. If your damage falls while Blue is active, the problem is usually not the transformation; it is spending ki on supers before the damage window appears.
Extra Pass characters also make useful mentors and skill sources. Try abilities from Goku, Vegeta, Future Trunks, Android 17, and other DLC additions, but test them in Training Mode before replacing the reliable core. A skill can have impressive listed power and still underperform if its startup is long, its tracking is poor, or it leaves you open after a miss. Performance-focused testing advice is worth applying here too: stable frame pacing makes vanish timing and stamina-break inputs easier to read.
Finally, keep a second preset with a safer ultimate and defensive Super Soul. Use the damage preset for familiar quests and the safe preset when a mission has escort targets, multiple bosses, or a harsh time limit. That small bit of preparation matters more than another five points in an attribute. With Female Saiyan ki-blast scaling, four extra stamina bars, Potential Unleashed, and a disciplined stamina-break rotation, you have a build that is forgiving on day one and still deadly after the Extra Pass content gets serious.