If Don't Be Afraid 2 keeps crashing, freezing during startup, or running below a comfortable frame rate, the fastest fix is to verify the Steam installation, update your GPU driver with a clean install, force the game onto your dedicated GPU, and lower shadows, effects, and rendering resolution before touching texture quality. Those steps solve most launch and performance problems without turning the game into a blurry mess.
Start with the short version: close overlays, disable unnecessary background recording, verify the files in Steam, restart Windows, and test the game in exclusive fullscreen or borderless mode. If the crash happens at the same loading point, treat it as a file, driver, permission, or save-data problem rather than simply a weak graphics card. If the game launches but hitches every few seconds, focus on frame-time spikes, shader compilation, CPU load, and the correct GPU.
This guide is aimed at the Windows PC version. Menus can change after patches, so use the current options exposed by your build rather than copying a setting that no longer exists. For broader troubleshooting, Steamoz's Deadlight Director's Cut PC fixes and Clanfolk crash guide cover several of the same Windows-side problems.
Do these checks before changing graphics settings
Before experimenting with resolution, create a clean baseline. Launch Don't Be Afraid 2 with the laptop plugged in, close browsers and recording software, and reboot Windows if the game has already crashed repeatedly. A failed launch can leave behind a hung process, an occupied graphics device, or a temporary file that makes the next attempt fail in exactly the same place.
1. Verify the Steam installation
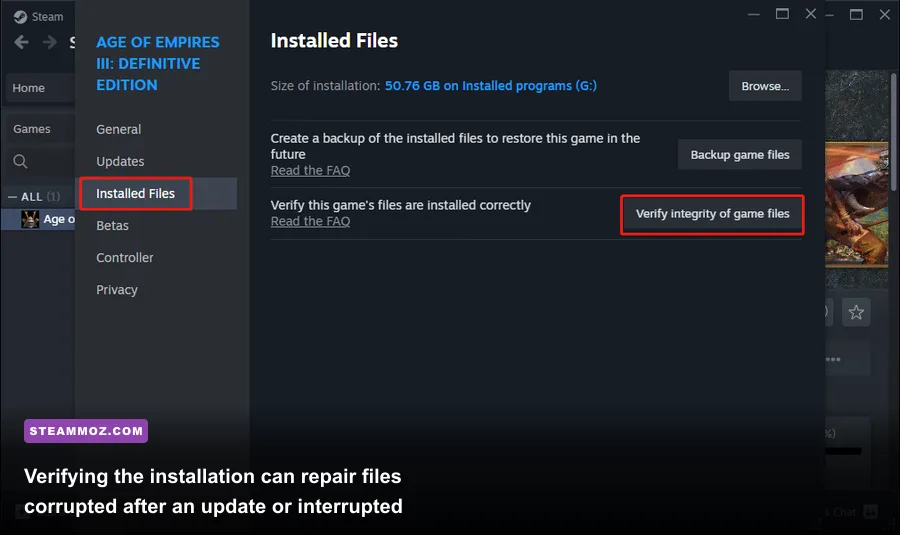
Open Steam, right-click Don't Be Afraid 2, choose Properties, select Installed Files, and click Verify integrity of game files. Steam checks the local install against its depot and redownloads damaged or missing files. This is especially important after a patch, an interrupted update, or moving the game between drives.
Do not launch the game until the verification process has finished. If Steam reports that files were reacquired, restart the client and test again. Repeating verification endlessly is not useful; if the same files fail every time, check available drive space, disable aggressive antivirus quarantine temporarily, and install Steam updates.
2. Remove unstable overlays
Turn off the Steam Overlay for one test run through the game's Properties page. Also disable Discord Overlay, NVIDIA App or GeForce Experience overlay, AMD Adrenalin overlay, MSI Afterburner and RivaTuner's on-screen display, and Xbox Game Bar recording. Overlays hook into the rendering pipeline, and a horror game that uses video playback, post-processing, or exclusive fullscreen can be more sensitive to that hook than a basic 2D title.
Don't permanently uninstall anything. Disable one overlay group, test the same scene, and then restore the features you actually use. If the crash disappears, re-enable tools individually until you identify the culprit.
3. Check Windows and driver basics
Install pending Windows updates, then use the current driver from the official NVIDIA driver page or AMD driver page. Choose a clean installation when the installer offers one. Intel Arc and integrated-graphics users should use Intel's current driver package instead of relying on a generic Windows driver.
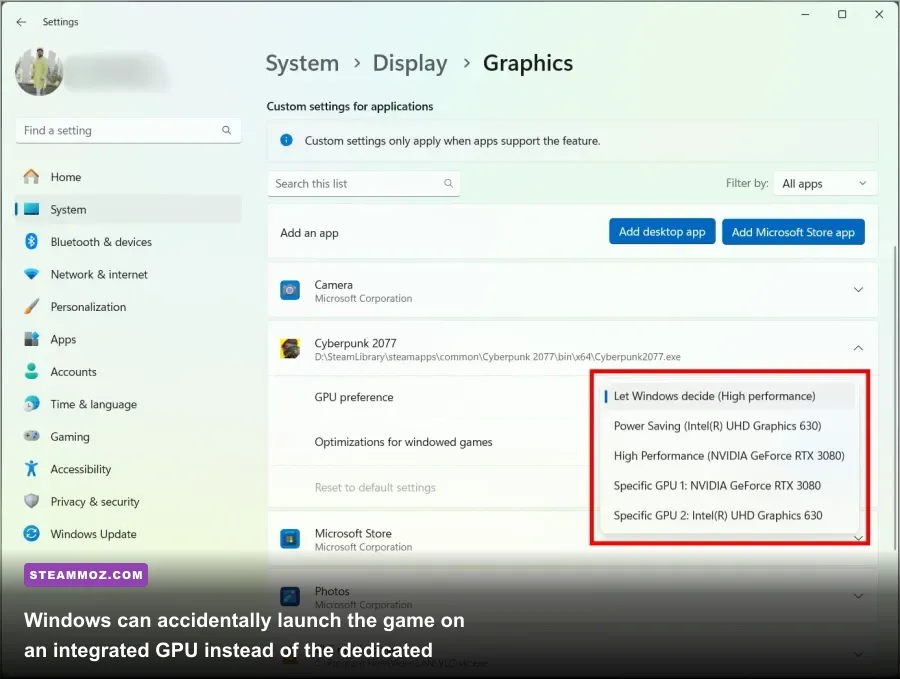
For a laptop, open Windows Settings > System > Display > Graphics, add the game's executable if it is not listed, choose Options, and set it to High performance. Many apparent low-FPS problems are simply the game running on the integrated Radeon or Intel GPU while the dedicated NVIDIA or AMD chip sits idle.

🎮 Don't Be Afraid 2
Looking to experience this game? Grab your digital key directly on our store for $8.49.
View on Steammoz Store →The best first-pass settings for higher FPS
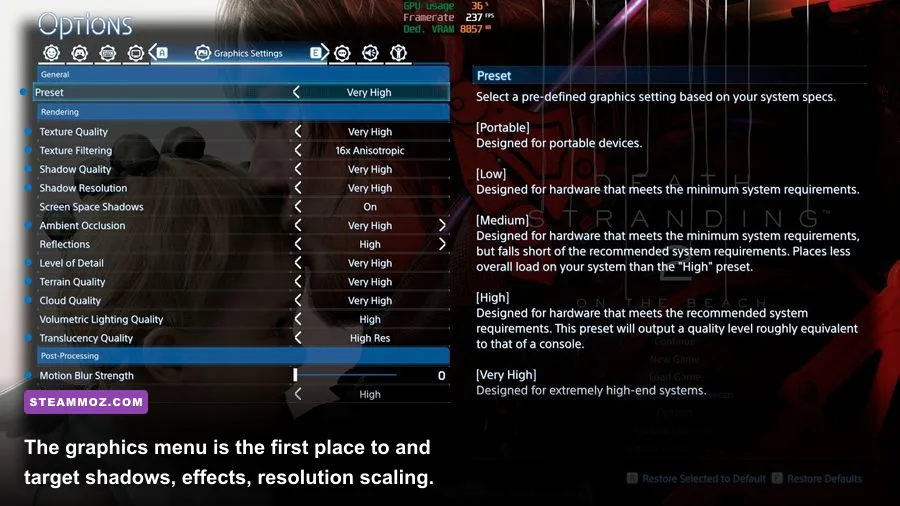
Don't slash every option to Low immediately. Horror games depend heavily on shadow depth, volumetric lighting, fog, reflections, and ambient occlusion, but texture quality usually affects VRAM more than raw frame rate. Keep textures as high as your graphics memory allows and reduce the settings that force the GPU to redraw the scene expensively.
| Setting | Recommended starting value | FPS impact | Visual trade-off |
|---|---|---|---|
| Display mode | Borderless fullscreen | Low | Easy alt-tab; exclusive fullscreen may reduce overhead on some systems. |
| Resolution | Native resolution first | Very high | Lower only after reducing heavy effects; use 90% rendering scale if available. |
| Textures | High, then Medium if VRAM is tight | Low to medium | Lower values soften walls, props, and character surfaces. |
| Shadows | Medium | High | Reduces shadow distance and contact detail, but preserves the atmosphere. |
| Effects or post-processing | Medium | High | Less bloom, fog detail, depth of field, and screen-space effects. |
| Ambient occlusion | Low or Medium | Medium to high | Corners look flatter, but indoor frame times improve. |
| Reflections | Low or Medium | Medium to high | Water, glass, and polished surfaces lose quality. |
| Motion blur | Off | Negligible | Sharper camera movement and clearer horror-game exploration. |
| V-Sync | Off for testing; on if tearing is severe | Low | Off can expose tearing but helps diagnose frame pacing. |
Use a repeatable test route instead of judging performance from the title screen. Walk through the same doorway, rotate the camera across the same light source, and wait several seconds in the same room. If the average looks acceptable but movement still feels jerky, the problem is probably frame-time consistency rather than the headline FPS figure.
Start with a 60 FPS cap if your display is 60 Hz. A locked 60 is usually better than a fluctuating 75-110 FPS with regular drops into the 40s. On a 120 Hz or 144 Hz monitor, try a 90 or 120 FPS cap only after the game holds that target in the most demanding interiors. Use the in-game limiter when available; otherwise, NVIDIA Control Panel, AMD Software, or RTSS can impose a stable cap.
Fix stutter, shader hitching, and sudden frame drops
Stutter has several causes, and lowering resolution will not fix all of them. A game can render at 100 FPS and still feel rough if one frame takes 80 milliseconds to appear. That is why you should watch frame-time graphs in MSI Afterburner or another trusted monitor instead of relying only on the Steam FPS counter.
Give shader compilation time
The first run after a driver update or game patch may hitch while shaders are created. Let the game sit at its menu for a minute, then explore for several minutes before deciding the performance is permanently broken. Avoid deleting shader caches as a first response: rebuilding them can make the next session stutter again.
If the hitching never improves, clear only the relevant GPU shader cache through your driver's storage-cleanup tools, reboot, and repeat the warm-up route. Keep the game and shader cache on a healthy SSD where possible. A nearly full drive, especially one with less than roughly 10 percent free capacity, can make asset streaming and cache writes less consistent.
Separate GPU limits from CPU limits
Lower the resolution by one step. If FPS rises substantially, the GPU is the bottleneck. If FPS barely changes while one CPU core is saturated, reduce background applications, close browsers, and lower view distance, shadows, or simulation-heavy options if the menu provides them. Do not expect a faster graphics card setting to solve a CPU-bound hitch.
Disable background recording in Xbox Game Bar, NVIDIA App, or AMD Software. Real-time capture can produce periodic spikes even when the average GPU utilization looks normal. Windows power mode should be set to Best performance while testing, and laptops should use the manufacturer's performance profile rather than Silent or Battery Saver.
Be careful with frame generation and upscaling
If your version of the game exposes an upscaler or frame-generation option, first establish a stable native-rendered baseline. Upscaling can improve GPU-limited performance, but aggressive modes make dark corridors shimmer and can blur small objects. Frame generation cannot repair a poor base frame rate; it can also add latency and make uneven frame pacing more obvious. Use it only when the underlying game already feels stable.
Stop crashes on startup, loading screens, and after changing settings
A crash that happens before the main menu points to a different class of problem than a crash after twenty minutes. Work through these fixes in order, testing after each one so you know which change mattered.
Startup crash
- Verify the files in Steam and restart Windows.
- Disable every overlay, capture tool, reshade preset, and third-party injector.
- Run Steam and the game normally first; only test administrator mode if permissions are clearly involved.
- Set the executable to use the dedicated GPU through Windows Graphics settings.
- Update the graphics driver and select a clean installation.
Do not add random launch commands copied from unrelated games. A launch option designed for another engine can disable a required renderer or force an unsupported mode. If the game offers a safe-mode launch prompt, use it to reset display settings rather than manually deleting unknown folders.
Crash while loading a level
Verify the installation again, then temporarily disable cloud synchronization and test a fresh save if the crash is tied to one slot. Back up saves before moving or renaming anything. Never delete the save directory while troubleshooting. If only one save crashes, the installation may be healthy and the save itself may be damaged; reporting that distinction gives the developer much more useful information.
Crash after changing resolution or fullscreen
Use Windows Display settings to confirm the monitor's active resolution and refresh rate, then launch in borderless mode if the game will not keep a fullscreen setting. Disconnect unnecessary monitors for one test, especially unusual refresh-rate combinations such as a 60 Hz laptop panel beside a 165 Hz external display. HDR, variable refresh rate, and driver-level sharpening can also be disabled temporarily while you isolate the issue.
Check Event Viewer > Windows Logs > Application after a crash. An entry naming the game executable, a graphics driver module, or a missing DLL provides a clue, but it is not a complete diagnosis by itself. Do not download replacement DLL files from unofficial websites. Repair the relevant Microsoft Visual C++ Redistributable from Microsoft's official supported Visual C++ downloads page instead.
Recommended performance profiles by PC class
There is no single perfect preset because resolution, VRAM, CPU speed, and display refresh rate all change the target. Use the profiles below as practical starting points, then adjust one setting at a time. The goal is consistent frame delivery, not a benchmark screenshot.
| PC class | Resolution target | Graphics profile | Frame-rate target |
|---|---|---|---|
| Integrated graphics laptop | 720p or 900p | Low preset, textures Medium if memory allows, shadows Low, effects Low, motion blur Off | 30-45 FPS, capped for consistency |
| Entry-level dedicated GPU | 1080p | Medium preset, shadows Medium, reflections Low, effects Medium, textures Medium | 45-60 FPS |
| Mainstream gaming PC | 1080p or 1440p | High textures, Medium shadows, Medium effects, ambient occlusion Medium | 60-90 FPS |
| High-end PC | 1440p or 4K | High textures and effects; lower shadows first if frame time spikes | 60 FPS locked or display refresh target |
For 1080p players, the best-looking compromise is usually High textures with Medium shadows and effects. For 1440p, reduce rendering scale or use a moderate upscaling mode before destroying texture quality. If your GPU runs out of VRAM, the symptoms may be texture pop-in, long pauses, or sudden crashes rather than merely lower FPS, so dropping textures one level is the correct fix.
When nothing works, collect evidence and report it
If the steps above fail, stop changing five variables at once. Record your Windows version, GPU and driver number, CPU, system RAM, resolution, graphics preset, whether the game is installed on an SSD, and the exact moment of the crash. Note whether overlays were disabled and whether Steam file verification found anything.
Use the game's official Steam discussion area or the developer's support channel, and include crash logs when the developer requests them. The official Steam listing and community hub are the safest places to confirm current patches and known issues. Avoid “FPS booster” programs, registry cleaners, pirated DLL packs, and unofficial config downloads; they often add overlays, injectors, or permission problems to an issue that was already difficult to reproduce.
For comparison, Steamoz's guide to PC settings that reduce stutter explains frame pacing in more detail, while the Eiyuden Chronicle performance guide has another useful settings-first workflow. The same principle applies here: verify the files, remove hooks, select the right GPU, then tune the expensive settings.
The reliable order is simple: repair the install, update the driver, disable overlays, force the dedicated GPU, establish a capped frame rate, and only then chase higher visual quality. Most players will get a smoother Don't Be Afraid 2 session by keeping textures reasonably high and cutting shadows, reflections, and post-processing rather than dropping the whole game to Low.