
Detroit: Become Human’s secret locations are mostly hidden interactions, magazines, graffiti clues, and relationship rewards rather than traditional loot. Save the fish in The Hostage, inspect every magazine, complete Markus’s graffiti trail, revisit Hank’s apartment, and protect Kara’s bus-station route to uncover the game’s most easily missed content. The biggest rewards are new flowchart nodes, character scenes, evidence, trophies, and radically different endings.
That distinction matters. Quantic Dream doesn’t scatter armor sets or secret weapons around Detroit. Instead, the game hides information inside ordinary rooms, behind timed investigations, and inside decisions that only pay off several chapters later. A collectible can be a magazine cover, while a tiny optional action—such as rescuing an aquarium fish—can quietly alter later dialogue.
This guide focuses on the locations and secrets worth hunting on a completionist run. It also explains which discoveries are permanent, which are branch-dependent, and which rewards are only visible through the Steam version’s achievement and flowchart systems.

How Detroit’s Secret Rewards Actually Work
Before chasing every hidden item, understand the game’s three collection systems. The first is the chapter flowchart, which records discovered actions and outcomes. The second is the magazine collection, whose contents and availability depend on previous choices. The third is persistent world state: decisions made by one character can create optional dialogue or alter a later chapter for another.
There is no single checklist that reveals every secret on the first playthrough. Some magazines appear only if a particular character survives, reaches a location, or makes a specific political choice. Other nodes require you to replay an earlier chapter, then continue forward from that save rather than simply viewing the flowchart.
| Secret type | Where to look | Reward | Can it be permanently missed? |
|---|---|---|---|
| Magazines | Bedrooms, benches, waiting areas, streets | Collection progress and trophy progress | Yes, until replayed on the correct branch |
| Optional evidence | Crime scenes and investigation rooms | Flowchart nodes, interrogation clues, case outcomes | Often, but chapter replay can recover it |
| Relationship interactions | Hank’s apartment, DPD, Markus’s hideouts | Unique dialogue and later survival options | Yes, relationship values can lock branches |
| Environmental secrets | Roofs, alleys, buses, stores, abandoned buildings | New scenes, clues, and alternate routes | Usually chapter-specific |
| Cross-chapter choices | Any major decision with a visible consequence | New chapters, endings, and character scenes | Yes, if you continue past the decision |
Use chapter replay without breaking your run
For collectibles, replaying a chapter is safe only if you understand save behavior. The game lets you replay for exploration, but many changes won’t carry into later chapters unless you play forward from the altered point. If you want the reward rather than just the flowchart icon, replay the chapter, make the new choice, and continue through the following connected chapters.
Don’t rush through the opening investigation scenes. Detroit hides its best optional content behind the blue interaction prompts that appear after the obvious objective is complete. Rotate the camera, inspect every highlighted object, and revisit rooms before leaving. The game often gives you no second chance once a character crosses a doorway or a timer expires.
🎮 Detroit: Become Human
Looking to experience this game? Grab your digital key directly on our store for $7.99.
View on Steammoz Store →Early Secrets You Can Miss in Connor’s Chapters
The Hostage: rescue the fish
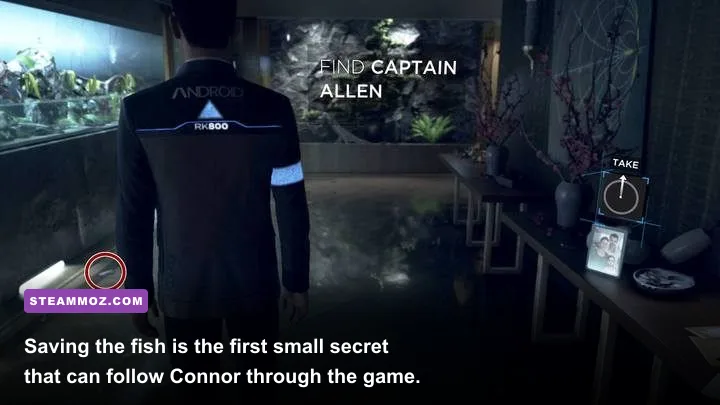
At the start of The Hostage, Connor is thrown through the apartment window during the standoff. Before following the trail toward the hostage negotiation, turn back and interact with the fish flapping on the floor near the balcony. Choose to save it.
This is a tiny action, but it’s one of the game’s signature secrets. Connor can later mention the fish to Hank, giving the machine a strangely compassionate detail that contrasts with his cold police-programming persona. It also contributes to the game’s optional interaction tracking and is easy to miss because the timer and the hostage objective encourage players to move forward.
Search the crime scene before interrogating the suspect
In Partners, don’t leave Carlos Ortiz’s apartment after finding the obvious clues. Inspect the android’s behavior, examine the kitchen and living room, and look for the hidden location connected to the victim’s murder. The important reward is not an item in your inventory; it’s a fuller reconstruction of what happened and a better chance of finding the deviant’s hiding place.
Connor’s investigation score is built from individual discoveries. Scan blood, bodies, the weapon, the damaged android, and every relevant photograph. The final reconstruction can change which evidence is available during The Interrogation. A rushed investigation may still complete the chapter, but it leaves entire flowchart branches blank.
The Interrogation: don’t destroy the evidence chain
During The Interrogation, Connor must question the detained android while managing its stress. The strongest route is to build pressure gradually: inspect the android, ask about the murder, present evidence, and keep its stress in the middle range rather than immediately forcing a confession.
The hidden reward is a more complete interrogation outcome. If Connor obtains a confession without pushing the android into panic, you can unlock additional evidence and later dialogue. If the android escapes or dies, that branch closes for the current playthrough. The trick is to avoid using every aggressive option in sequence; Detroit’s stress meter is a balancing puzzle, not a simple intimidation gauge.
The Nest: follow the rooftop route
In The Nest, investigate the apartment and chase Rupert across the rooftops. Search the rooms before committing to the pursuit, then move quickly when the chase begins. The best completion route comes from combining careful evidence collection with a clean rooftop pursuit.
Connor can find Rupert’s journal, examine the birds, and identify the escape route. During the chase, don’t waste time wandering after each jump prompt appears. The reward for a strong run is additional investigation data and a better relationship position with Hank. Connor’s pursuit efficiency also influences how the scene feels later: Hank remembers whether Connor prioritized the case, empathy, or reckless speed.
The Bridge: the quiet secret is the point
The Bridge contains no collectible room packed with loot. Its secret is conversational. Exhaust Hank’s dialogue, pay attention to his questions about androids, and avoid treating the entire meeting as a button-mashing exchange. Connor’s answers influence Hank’s opinion, which becomes one of the most important hidden meters in the game.
| Connor action | Immediate result | Long-term value | Completionist advice |
|---|---|---|---|
| Save the fish | Optional compassionate interaction | Extra callback and character texture | Turn around immediately in The Hostage |
| Find all crime-scene clues | Higher investigation score | More evidence and flowchart branches | Search rooms before leaving |
| Control interrogation stress | More stable confession route | Additional evidence outcomes | Escalate gradually |
| Talk carefully with Hank | Relationship changes | Later cooperation and survival branches | Replay conversations, not just action scenes |
Magazines, Graffiti, and Markus’s Hidden Routes
Magazines are branch-dependent collectibles
Magazines are Detroit’s most recognizable collectible, but collecting all of them is not as simple as sweeping every chapter once. There are 46 magazine entries to discover, and several have alternate covers. The cover you receive can depend on earlier events, including whether Markus is peaceful or violent, whether Kara remains in the story, and how the public views androids.
Check flat surfaces rather than glowing story objects: coffee tables, kitchen counters, benches, desks, motel rooms, bus stations, and abandoned interiors. The magazine interface lets you flip through the issue, so interact with the object fully instead of assuming that picking it up is enough.
Keep a manual checklist. The game’s menu tracks magazines, but it doesn’t always make branch requirements obvious. If a cover is missing, don’t assume you overlooked a corner. First check whether the chapter has two possible versions of the magazine. This is especially important in Kara’s motel and bus-station chapters and in Markus’s later public demonstrations.
Markus’s graffiti trail in Jericho
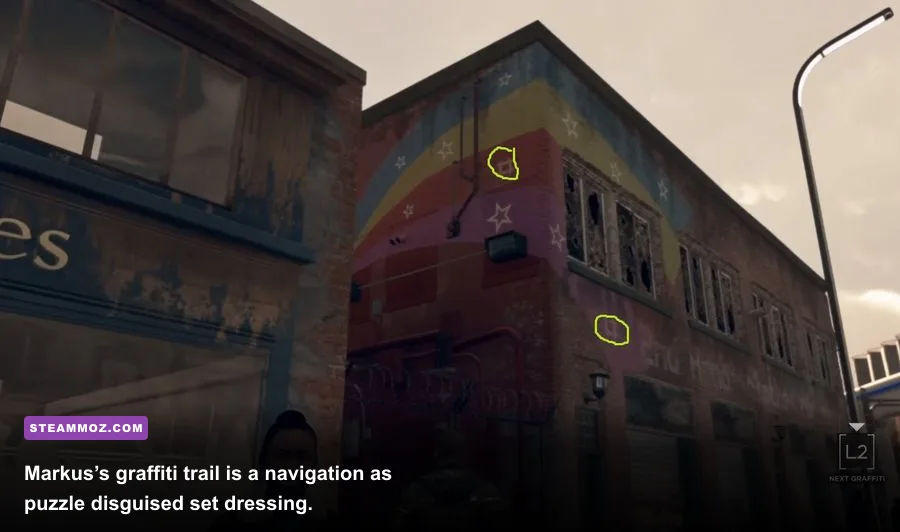
Time to Decide is one of the game’s best hidden-location sequences. Markus must follow graffiti symbols across Detroit to locate Jericho. The route moves through rooftops, industrial spaces, walls, pipes, and abandoned structures. Use the camera freely and line up each marking from the correct angle; some symbols are visible only when Markus reaches the intended viewpoint.
At each graffiti cluster, scan every highlighted symbol before moving on. Missing one can make the next route appear impossible, particularly when the clue is high on a wall or behind a rooftop obstruction. The reward is access to Jericho and a more complete flowchart, not a weapon or costume. More importantly, this sequence establishes Markus’s role as a seeker before the game turns him into a revolutionary leader.
Explore Jericho before triggering the next objective
Once Markus reaches Jericho, search the hideout before following the main prompt. Talk to North, Josh, and Simon, inspect the sleeping areas, and look for environmental details that reveal how desperate the android community has become. Several interactions are short, but they add relationship information that can affect later conversations.
In Spare Parts, search the CyberLife warehouse thoroughly while Markus and the group gather supplies. The central secret is the injured android, John. You can decide whether to rescue him and bring him to Jericho. Saving John adds a later ally and opens extra flowchart outcomes, but it also increases the danger during the escape. This is a classic Detroit trade: a compassionate choice creates a future resource while making the immediate mission harder.
When stealing the truck and supplies, check the warehouse routes before committing to an exit. Alarm timing and guard placement matter. A clean approach preserves more options; a noisy escape can still work, but it reduces the number of safe outcomes available to Markus’s group.
Kara’s Secret Locations and the Rewards for Staying Hidden
Stormy Night: search the house, then protect Alice
Stormy Night is built around urgency, but there are still optional details worth finding. Examine the kitchen, Alice’s room, and the downstairs areas before the confrontation reaches its final stage. Kara’s discoveries make the abuse in the house clearer and fill in important context for Alice’s behavior.
Your most valuable reward is not a collectible. It’s access to safer escape routes and stronger relationship outcomes. Hide Kara and Alice effectively, avoid unnecessary noise, and choose the route that keeps Todd from reaching them. If Kara breaks her programming and acts too late, later chapters can disappear entirely.
Fugitives: the motel, squat, and abandoned car
In Fugitives, Kara and Alice can spend the night at several locations: the motel, an abandoned car, or the squat. Each route contains different scenes, risks, and collectible opportunities. The motel is safer but requires clean clothes and money; the car is immediately available but exposes the pair to the cold; the squat is dangerous but reveals more about the android underground.
Search the environment before choosing a sleeping place. Inspect the laundry, look for usable clothing, and speak to Alice whenever the game allows it. The hidden reward here is branch variety: the location you choose changes dialogue, magazine availability, and how much trust develops between Kara and Alice.
Midnight Train: keep the evidence out of sight
Midnight Train is one of the most important secret-management chapters in the game. Before the police officer arrives, clean the house and hide anything that exposes Kara, Alice, or Luther. Put away android-related evidence, deal with visible blood, and make sure the room doesn’t look like a refugee shelter.
Look for the magazine in the laundry area and inspect the house methodically. Don’t trigger the door sequence until you’ve completed the cleanup. The reward is a chance to preserve Kara’s route and keep the family together. A missed clue or visible object can make the officer suspicious, and that suspicion can end the storyline immediately.
Battle for Detroit: the bus-station secret
Kara’s bus-station route contains one of the most valuable hidden outcomes in the game. If you have the ticket from the earlier bus sequence, keep it safe. At the station, search the benches and nearby areas for the magazine, then decide whether to return the ticket when the opportunity appears.
Returning the ticket is morally generous but can close Kara’s safest route across the border. Keeping it allows Kara, Alice, and Luther to travel, though the decision carries an obvious ethical cost. If Luther is alive, his presence can affect the final crossing. Rose’s earlier help, public opinion, and border-guard conditions also matter, so this secret is really the payoff for many chapters of quiet preparation.
Hank, CyberLife, and the Most Valuable Hidden Outcomes

Hank’s apartment has more than one layer
Whenever Connor visits Hank’s apartment, don’t immediately choose the highlighted conversation objective. Inspect the rooms, look at photographs, interact with the dog, and check Hank’s music collection. These details unlock optional dialogue and reveal Hank’s history in a way the main mission never explains directly.
The key hidden reward is Hank’s relationship score. A high relationship can unlock cooperation, emotional scenes, and survival possibilities that simply completing investigations won’t provide. Be respectful when the game offers personal questions, and remember that Hank responds to Connor’s behavior more than to a single heroic decision. Saving lives, showing empathy, and avoiding needless violence generally build the strongest connection.
Meet Kamski only after examining the pool area
In Meet Kamski, explore the mansion before speaking to Elijah Kamski. Examine the pool, the androids, and the surrounding artwork. The scene’s famous choice—asking for Chloe’s sacrifice or refusing—changes Connor’s information and emotional direction.
Asking Chloe to die grants Connor the information he needs about the deviancy anomaly, but it damages the moral texture of the decision and changes later dialogue. Refusing protects Chloe and can support Connor’s developing empathy, though it leaves him without the same direct answer. Neither choice is a conventional hidden reward; both are deliberate trade-offs that alter Connor’s route.
CyberLife Tower: rescue the trapped androids
During CyberLife Tower, Connor can find and awaken androids held in storage. Search the tower instead of sprinting straight toward the main objective. The optional androids can help during the escape, creating alternate combat and survival outcomes.
This is where Connor’s software instability and relationship with Hank collide with practical consequences. A machine-like Connor may follow the mission efficiently, but an increasingly sympathetic Connor can recognize the people inside the facility rather than treating them as inventory. The best completionist route searches every accessible section, avoids unnecessary gunfire, and keeps an eye on time when the tower begins to collapse.
| Location or chapter | Secret to find | Reward | Best approach |
|---|---|---|---|
| The Hostage | Fish near the balcony | Optional Connor callback | Turn around before investigating the apartment |
| Time to Decide | Every graffiti symbol | Jericho access and flowchart completion | Rotate the camera until each marking registers |
| Spare Parts | John in the warehouse | Extra ally and later outcomes | Rescue him, then plan the alarm escape |
| Midnight Train | Magazine and incriminating evidence | Preserved Kara route | Finish cleanup before opening the door |
| Battle for Detroit | Bus ticket and station magazine | Potential border escape | Decide based on your entire Kara relationship route |
| CyberLife Tower | Sleeping androids | Extra escape options | Search storage areas before triggering the finale |
Best Completionist Route for Every Hidden Reward
A perfect first run is unrealistic because Detroit’s most interesting secrets conflict with one another. Instead, use a two-pass strategy. On the first playthrough, prioritize survival and story discovery. Save the fish, investigate every crime scene, rescue John if you want Markus to keep more allies, and keep Kara’s family alive. Don’t restart every time a relationship dips; the tension is part of the design.
On the second pass, use chapter select to target collectibles and alternate branches. Start with the magazine list, then replay the chapters that control missing covers. For Markus, replay Spare Parts, Capitol Park, and the demonstration chapters to compare peaceful and violent outcomes. For Connor, concentrate on investigations, Hank’s relationship, and the CyberLife finale. For Kara, test the motel, squat, car, and bus-station routes separately.
- Save the fish in The Hostage. It takes seconds and is the easiest secret to miss.
- Complete every investigation before leaving. Connor’s clues unlock more than cosmetic flowchart nodes.
- Record every magazine cover. Alternate covers are often branch rewards, not hidden corners.
- Follow Markus’s graffiti from the correct camera angles. A missed symbol can stall the entire Jericho route.
- Search Jericho and the CyberLife Tower. Talk to side characters and inspect storage areas before advancing.
- Protect Kara’s evidence. Cleanup chapters reward patience more than speed.
- Replay from the decision point. Viewing a new flowchart branch alone won’t always update later chapters.
For a useful companion read, Steamoz’s secret-location reward guide covers the same kind of environmental hunting in a very different game. If your PC struggles with older narrative titles, the ELEX crash and FPS fixes are also worth bookmarking, while Filament’s performance settings guide explains how to keep exploration smooth.
Detroit: Become Human is at its best when you treat every room as part of the story. The fish, the magazine on a bench, the android hidden in a warehouse, and the ticket at the bus station may look insignificant in isolation. Together, they form the game’s real reward system: a version of Detroit shaped by what you noticed, who you protected, and which small act you refused to ignore.
For the official game listing, see Detroit: Become Human on Steam, and for developer information visit Quantic Dream’s official Detroit page. The game’s official PlayStation page also provides the original release details and character overview.