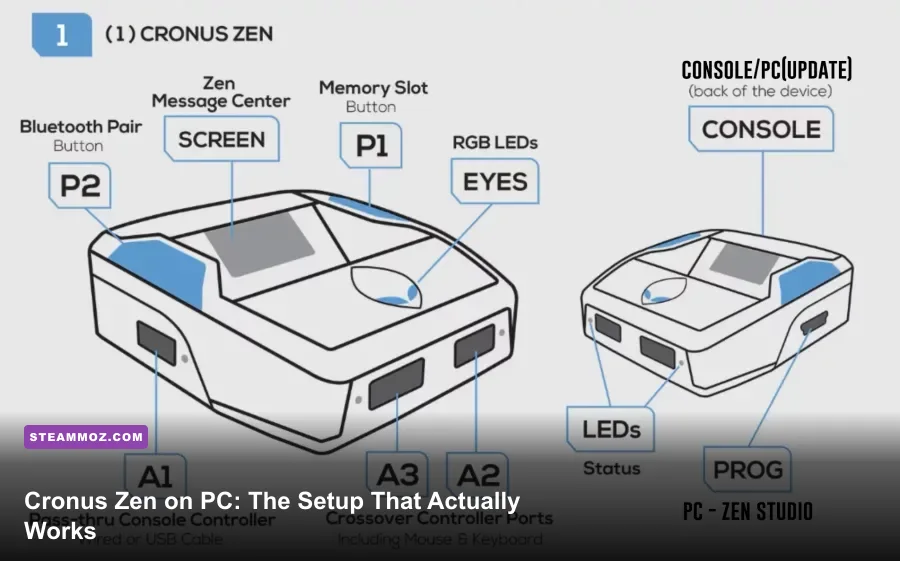
If you’re setting up a Cronus Zen on PC, the reliable path is simple: update the Zen through Zen Studio, connect the controller to the correct port, disable conflicting input layers, and calibrate only the controls your game actually uses. Keep the setup to legitimate controller mapping and accessibility; macros, recoil automation, rapid-fire routines, and anti-cheat evasion can violate a game’s rules and trigger bans.
The Zen is best treated as a controller-compatibility and remapping device, not a magic performance upgrade. It won’t lower your monitor’s response time, fix unstable frame pacing, or turn a drifting analog stick into a healthy one. What it can do is make a supported controller behave consistently across PC games, especially when Steam Input, Xbox Game Bar, native gamepad support, and third-party overlays start fighting over the same device.
Start With a Clean, Supported PC Connection
Before opening Zen Studio, remove every variable you don’t need. Plug the Zen directly into a rear motherboard USB port rather than a passive hub. Use a data-capable USB cable for the controller; charging-only cables are a remarkably common reason Windows sees nothing. Close DS4Windows, reWASD, JoyToKey, and similar remappers during initial setup. Running two virtual-controller layers at once can produce duplicate inputs, stuck buttons, or a controller that works in the Windows test panel but disappears inside a game.
Install the current version of Cronus Zen’s official software and support resources, then launch Zen Studio with the Zen connected to the PC’s programming or device port as directed by the hardware documentation. The exact port behavior depends on the controller platform and firmware, so don’t rely on a random cable diagram from a three-year-old video. The official downloads page is the safest place to verify the current Zen Studio package and firmware procedure.
The connection order that avoids most headaches
- Shut down the game and close all controller remapping utilities.
- Connect the Zen to the PC with a known-good USB data cable.
- Open Zen Studio and confirm that the device is detected before connecting the controller.
- Check the firmware version and install the official update if Zen Studio requests it.
- Connect the controller to the designated controller port, then wait for Windows to finish device recognition.
- Open Windows’ game-controller panel and confirm that every button registers once.
- Launch the game only after the controller passes that test.
For Xbox controllers, Windows usually exposes an XInput device directly. That is the least troublesome route because many PC games are built around XInput button prompts and behavior. PlayStation controllers can introduce another layer: some games expect DirectInput, some expect XInput, and some rely on Steam Input to translate the device. If a PlayStation controller is detected twice, disable one translation layer instead of stacking them. Steam Input and a separate virtual-gamepad application should not both be remapping the same controller.
| Connection Area | Recommended Choice | Why It Matters |
|---|---|---|
| Zen-to-PC cable | Direct motherboard USB port | Reduces hub power and detection problems |
| Controller cable | Short, data-capable USB cable | Prevents charge-only connection failures |
| Input layer | Native XInput or one Steam Input layer | Avoids duplicate and conflicting inputs |
| Wireless connection | Use only if officially supported and stable | Wireless adds another possible source of dropout |
Update Firmware Before You Calibrate Anything
Calibration performed on an outdated firmware build is wasted effort. Firmware changes can affect controller recognition, supported platforms, and how the Zen reports input to Windows. Open Zen Studio, inspect the device information panel, and follow the official update workflow rather than disconnecting the unit halfway through a flash. If an update fails, don’t repeatedly pull the cable while the device is writing. Follow the manufacturer’s recovery instructions and test a different rear USB port or cable first.
After updating, perform a clean restart. Disconnect the Zen, reboot Windows, reconnect the device, and let the operating system enumerate it again. This clears stale HID entries more reliably than repeatedly restarting a game. Windows can keep an old controller instance alive after a firmware change, especially if you have previously used DS4Windows or another virtual-device utility.
Keep your game and operating system updated too. The official Microsoft Windows Update guidance is useful when controller behavior changes after a major Windows patch. If the Zen works in Windows but fails in one title, check that game’s own controller settings before assuming the hardware is defective.
Use one profile for one purpose
Keep the first profile deliberately boring: standard button mapping, default stick behavior, no timed actions, and no automated input. This becomes your baseline. If the baseline fails, you know the problem is connection, firmware, or input translation—not a complicated profile.
Once the baseline works, duplicate it for individual games. A platformer may need a different shoulder-button layout from an FPS, while a racing game may benefit from a more natural trigger assignment. Name profiles clearly, such as “Apex Native Layout” or “Steam FPS Standard,” and write down the original mapping before changing it. That small habit saves more time than endlessly reinstalling drivers.
Calibrate Sticks, Triggers, and Button Response
Calibration is where many Cronus Zen PC setups go wrong because players tune around a hardware fault. Start with the Windows controller test or the game’s own input screen. Leave the stick untouched for 30 seconds. If the crosshair or cursor moves without input, you have drift. Increasing the deadzone can hide mild drift, but it also reduces fine movement near center. If the stick needs a large deadzone to remain still, replace or repair the controller instead of calling the problem “calibration.”
A practical deadzone method
- Set the game’s deadzone to its lowest safe value.
- Observe the idle stick for 30 seconds.
- Raise the deadzone one step at a time until idle movement stops.
- Move the stick slowly in a full circle and check for notches or sudden jumps.
- Test a slow 180-degree turn and a quick 180-degree turn.
- Keep the lowest stable value that eliminates drift.
Don’t confuse deadzone with sensitivity. Deadzone controls the amount of initial stick movement ignored by the game. Sensitivity controls how quickly the camera responds after that threshold. A high deadzone plus high sensitivity often feels “snappy” in menus but produces clumsy micro-adjustments in an FPS. For most modern shooters, a low stable deadzone and moderate look sensitivity are easier to control than a huge deadzone paired with extreme sensitivity.
Triggers deserve their own test. In a racing game, verify that the input reaches 0 percent at rest and 100 percent at full pull. A trigger that begins at 3 or 4 percent can cause a car to creep forward, while a trigger that never reaches full travel can reduce acceleration. In shooters, check whether the game supports trigger thresholds natively. If it does, use the game’s setting instead of building a complicated external workaround.
| Control | Baseline Test | Good Result | Warning Sign |
|---|---|---|---|
| Left stick | Idle for 30 seconds | No visible movement | Cursor or character drifts |
| Right stick | Slow full-circle movement | Even response throughout | Notches or sudden jumps |
| Triggers | Rest-to-full pull | Clean 0–100 percent range | Input starts early or caps low |
| Face buttons | Press each once | One input per press | Double presses or missed presses |
Build a Low-Latency PC Profile
A Cronus Zen cannot compensate for poor frame pacing. The controller may report an input quickly, but the game still has to render the result, present the frame, and display it on your monitor. That’s why a locked 120 frames per second can feel better than a wildly fluctuating 165 FPS. Consistency gives your aim and timing a predictable rhythm.
Start by matching your frame-rate target to your display. For a 144Hz monitor, a stable 120 or 141 FPS cap is often preferable to an unlocked counter that swings between 90 and 170. Use the game’s built-in cap where possible. If it lacks one, a trusted driver-level limiter can help, but test one change at a time. Enable V-Sync only when tearing is worse than the added latency; adaptive-sync users should follow their monitor and GPU vendor’s recommended range.
| PC Setting | Competitive Starting Point | Typical Impact | Visual Trade-Off |
|---|---|---|---|
| Display mode | Exclusive fullscreen or dependable borderless | Low | Fullscreen may reduce desktop interference |
| Frame cap | Stable value below monitor refresh | Positive consistency | May sacrifice peak FPS |
| V-Sync | Off for lowest latency; test with VRR | Medium | Off can produce tearing |
| Motion blur | Off | Small performance gain | Cleaner target tracking |
| Shadows | Low or medium | Medium to high | Less depth and softer scene detail |
| Texture quality | Highest setting VRAM allows | Low if VRAM is sufficient | Higher clarity at distance |
| Ray tracing | Off for competitive play | High | Less lighting detail |
Use the controller wired while testing. Wireless latency can be perfectly playable, but wired removes battery state, radio interference, and sleep behavior from the equation. Turn off overlays you don’t need, including Xbox Game Bar recording features, Discord’s overlay, and GPU performance overlays. You don’t have to disable every background process on your PC; focus on software that hooks into games or creates virtual input devices.
For broader PC troubleshooting, Steamoz’s guides on stopping crashes and rescuing FPS and optimizing graphics settings for maximum FPS cover the same frame-pacing principles from the game side.
Steam Input, Game Profiles, and Detection Problems
Steam Input is powerful, but it should be intentional. If your controller already appears as a standard XInput device, start with Steam Input disabled for that specific game and test native support. If the game only recognizes a PlayStation controller through Steam Input, enable it and use one clean layout. The goal isn’t “Steam Input always on” or “Steam Input always off.” The goal is one translation path with a predictable result.
What common symptoms actually mean
If the game shows Xbox prompts while you’re using a PlayStation pad, that may be normal: many PC games only include Xbox glyphs for XInput. If buttons are duplicated, you likely have both a physical and virtual controller active. If the Zen works in Windows but not in a game, check whether the game blocks unsupported devices or requires its own controller toggle. If inputs stop after alt-tabbing, close overlays and test borderless mode.
Competitive games require extra caution. Some publishers prohibit controller adapters, remapping hardware, or any device capable of automated input even when you only use basic mappings. Anti-cheat systems can flag unusual device behavior, and “I only used the harmless features” is not a reliable defense after a suspension. Read the game’s current rules and publisher support pages before using a Zen in ranked or tournament play. Never use the device to automate recoil, fire timing, aim behavior, movement sequences, or any other action your hands should perform.
For games that are simply unstable on PC, a hardware adapter is rarely the correct fix. Steamoz’s guides for EscapeVR crashing and low FPS and Everspace 2 performance problems show the better order: solve the game’s rendering and stability issues first, then troubleshoot the controller.
A Repeatable Test Routine for Every Game
Once the hardware and software are ready, use the same five-minute routine whenever you create a profile. First, test every button in a menu. Second, move both sticks slowly and quickly. Third, hold each trigger at 25, 50, and 100 percent. Fourth, play a low-stakes training mode for ten minutes. Finally, return to the desktop and reconnect the controller to see whether the profile survives a full application switch.
Record three things: your deadzone, your sensitivity, and your frame-rate cap. If the controls feel wrong later, change only one value and retest. Players often adjust deadzone, response curve, sensitivity, FOV, and frame cap at the same time, then have no idea which change helped. Good optimization is less dramatic than that. It’s controlled, repeatable, and slightly boring—and that’s exactly why it works.
For noncompetitive games, the Zen can be a convenient accessibility tool when it provides a remap you genuinely need. For competitive PC play, the safest setup is the most transparent one: official firmware, a wired controller, one input layer, no automation, and settings that the game itself supports. That configuration won’t manufacture skill, but it will remove a lot of needless friction—and your hands, hardware, and account will all thank you.