
The best Borderlands 4 Deluxe Edition graphics settings for max FPS are a mix of 1440p upscaling, medium shadows, reduced volumetric effects, high textures, and carefully limited frame generation. The Deluxe Edition does not unlock a faster rendering mode or improve image quality by itself; it simply bundles additional game content. For most gaming PCs, start with the Balanced profile below, cap your frame rate a few frames below your monitor's refresh rate, and only raise visual settings after your one-percent lows stay stable during heavy combat.
That last part matters. Borderlands 4 is at its most demanding when several enemies, elemental effects, damage numbers, particles, and environmental lighting collide on screen. A quiet corridor can make a bad preset look fine, while a chaotic firefight exposes every hitch. This guide focuses on repeatable performance rather than a pretty screenshot taken in an empty area.

Use This Borderlands 4 FPS Profile First
Before changing individual options, set the display correctly. Use exclusive fullscreen if the game offers it and your alt-tab behavior remains reliable; otherwise borderless fullscreen is perfectly acceptable on modern Windows systems. Select your monitor's native resolution, disable V-Sync when using G-Sync or FreeSync, and apply a frame cap that your GPU can sustain.
A 1440p monitor is the sweet spot for this game. Native 1440p looks excellent, but a quality upscaler usually gives back enough GPU headroom to keep combat smooth without turning the cel-shaded image into a blurry mess. At 1080p, prioritize a clean native or quality-scaled image. At 4K, upscaling is not optional for most cards if you want high refresh-rate performance.
| Setting | Recommended Value | FPS Impact | Visual Note |
|---|---|---|---|
| Resolution | Native monitor resolution | Very high | Lower only when GPU usage stays near 99%. |
| Upscaling | Quality at 1440p; Balanced at 4K | Very high benefit | Quality preserves weapon and foliage detail best. |
| Frame Generation | Off for latency; On for cinematic single-player play | Large displayed-FPS gain | Needs a strong base frame rate to avoid artifacts. |
| Textures | High, or Ultra with 10GB-plus VRAM | Low to medium | Mostly affects VRAM use and texture clarity. |
| Shadows | Medium | High | The best major setting to lower first. |
| Global Illumination | Medium or High | High | Lowering it changes interior lighting noticeably. |
| Volumetrics | Medium | Medium to high | Fog, smoke, and bright effects become cheaper. |
| Effects and Particles | High | Medium | Keep High unless large fights cause drops. |
| View Distance | High | Medium | Important for open zones and distant geometry. |
| Motion Blur | Off | Negligible | Sharper aiming and cleaner fast traversal. |
Keep textures higher than you might expect. Texture quality usually stresses VRAM rather than shader throughput, so dropping it from High to Medium often produces a softer image without fixing a GPU-limited frame rate. If you have an 8GB graphics card, High is safer than Ultra in large zones. Cards with 10GB or more can experiment with Ultra, but watch for texture pop-in and hitching after fast travel rather than trusting average FPS alone.
For more PC troubleshooting habits, Steamoz's guide to turning stutters into smooth spaceflight has a useful frame-time mindset that applies here too.

🎮 Borderlands 4 Deluxe Edition
Looking to experience this game? Grab your digital key directly on our store for $49.99.
View on Steammoz Store →Which Settings Actually Cost the Most FPS?

Lowering every option to Low is the lazy fix, and it can make Borderlands 4 look far worse than necessary. The real performance villains are resolution, ray-traced or advanced global illumination if available, shadows, volumetric lighting, and effects density. Change those in that order while watching GPU utilization and the frame-time graph.
If GPU usage is 95–99% during the slowdown, you are GPU-limited. Reduce resolution scale, upscaling quality, illumination, or shadows. If GPU usage falls well below that while your frame rate still collapses in crowded fights, the limit is more likely CPU simulation, streaming, or shader compilation. Lowering textures will not solve a CPU bottleneck. A frame cap can still make that experience feel steadier by preventing unnecessary swings.
| Priority | Option to Adjust | Typical Performance Cost | Best Compromise |
|---|---|---|---|
| 1 | Resolution and upscaler mode | Highest | Use Quality before dropping native resolution. |
| 2 | Shadows | High | Medium keeps scenes grounded with a major gain. |
| 3 | Global illumination or ray tracing | High to extreme | Disable advanced lighting for competitive targets. |
| 4 | Volumetric fog and clouds | Medium to high | Medium preserves atmosphere in most areas. |
| 5 | Effects and particles | Medium | High unless explosions trigger severe dips. |
| 6 | View distance | Medium | High for open-world traversal; Medium on weaker CPUs. |
| 7 | Textures and anisotropic filtering | Low on FPS | Keep High and use 8x or 16x filtering. |
Advanced lighting deserves a special warning. If Borderlands 4 exposes ray tracing, Lumen-style software or hardware lighting, or a similarly named global illumination option, test it separately rather than assuming the Ultra preset is worthwhile. Stylized art benefits from strong color contrast, but ray-traced lighting can cost a huge amount for subtle shadow and bounce-light improvements. For a 60 FPS target, Medium global illumination is the sensible ceiling. For 120 FPS, turn advanced lighting off unless your GPU has substantial headroom.
Keep anisotropic filtering at 8x or 16x. It sharpens ground textures viewed at an angle and is usually a tiny performance expense. Post-processing quality can sit at High, but disable chromatic aberration, film grain, and motion blur if those toggles exist. They do not meaningfully improve performance; they simply make aiming and fast camera movement less clear.
Best Settings by PC Performance Target
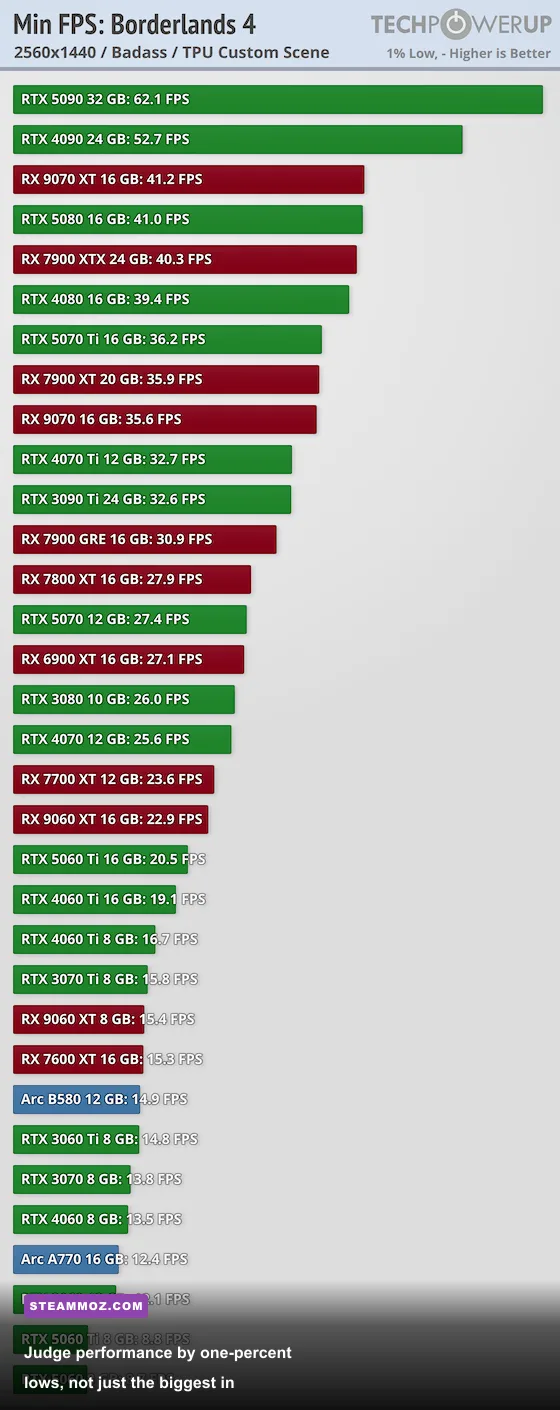
There is no single perfect Borderlands 4 preset because a 60Hz 1080p system and a 165Hz 1440p system are chasing completely different outcomes. The profiles below are better starting points than the game's broad Low, Medium, High, or Ultra presets.
| Target | Resolution and Upscaling | Core Quality Settings | Frame Generation |
|---|---|---|---|
| 1080p / 60 FPS | Native or Quality | High textures, Medium shadows, Medium lighting, High effects | Off |
| 1440p / 60 FPS | Quality | High textures, Medium shadows, Medium-High lighting, High effects | Optional |
| 1440p / 120 FPS | Balanced or Quality if stable | High textures, Low-Medium shadows, Low lighting, Medium effects | Optional with VRR |
| 4K / 60 FPS | Balanced or Performance | High textures, Medium shadows, Medium lighting, Medium effects | Recommended if latency is acceptable |
| Portable PC | 800p–1080p Performance | Medium textures, Low shadows, Low lighting, Medium effects | Off unless the base FPS is stable |
For 60 FPS, cap at 60 on a standard display or around 58 FPS on a 60Hz variable-refresh monitor. For 120Hz, try 117 FPS; for 144Hz, try 141; and for 165Hz, try 162. These caps keep the render queue under control and reduce the feeling of uneven motion. If your system cannot hold the cap, choose a lower fixed target rather than allowing the counter to bounce from 48 to 91 FPS.
Frame generation is useful, but only after the base frame rate is healthy. If the game renders 42 real frames per second and reports 84 generated frames, movement can look smoother while aiming still feels closer to 42 FPS. Turn it on for relaxed solo play when your native frame rate is consistently around 60 FPS or higher. Turn it off for precision-heavy gunfights, competitive play, or whenever you see ghost trails around fast-moving enemies and damage numbers.
AMD FSR, NVIDIA DLSS, or Intel XeSS should be selected according to your GPU when available. DLSS is generally the first choice on GeForce hardware, FSR is the broadest fallback, and XeSS can be worth testing on Intel cards. Don't swap upscalers mid-benchmark without restarting the game if it compiles shaders on launch; otherwise you may mistake temporary shader work for a permanent performance problem.
How to Eliminate Stutter and Protect One-Percent Lows
Average FPS tells only half the story. Borderlands 4 feels good when frame times are consistent, especially during vehicle travel, fast movement between zones, and elemental-heavy battles. A stable 72 FPS often feels better than an unstable 100 FPS that repeatedly dives into the 40s.
1. Build a repeatable benchmark route
Use the same busy settlement, open vista, and enemy encounter for every change. Test for at least two minutes, including shooting, sprinting, swapping weapons, and triggering the most visually chaotic action skill available to your Vault Hunter. A quiet menu or empty hallway proves almost nothing.
2. Let shader compilation finish
After a driver update or major game patch, the first few minutes can be rough while shaders and streamed assets settle. Don't immediately slash settings because the first firefight stutters. Restart once, revisit the same route, and compare one-percent lows rather than the initial loading sequence.
3. Keep the game on a fast SSD
Open-zone streaming and rapid traversal are much more sensitive to storage latency than a static arena. Install Borderlands 4 on an SSD with free space available, close aggressive background recording tools, and avoid downloading large files while playing. This will not magically add 30 FPS, but it can reduce asset-streaming hitching and delayed texture detail.
4. Fix the CPU side before reducing image quality
If lowering resolution barely changes the problem, check background processes, CPU temperatures, and power mode. Borderlands games can become CPU-heavy when many enemies, projectiles, loot drops, and physics objects are active. A frame cap, lower view distance, and reduced effects density are more useful than dropping textures to Low.
Driver-level sharpening can restore a little crispness after using Balanced upscaling, but don't overdo it. Excess sharpening exaggerates outlines and makes the comic-book rendering look noisy. Start around a modest 10–20 percent equivalent, then judge weapon sights, foliage, and distant signage during actual play.
If a particular update introduces hitching, check the official Borderlands site, 2K Support, and the game's Steam announcements before rebuilding your entire configuration. Patch notes can explain sudden shader recompilation, driver recommendations, or known problems with frame generation.
Deluxe Edition Performance Notes and Final Setup
The Borderlands 4 Deluxe Edition uses the same PC rendering options as the standard release. Its bonus weapons, skins, missions, or cosmetic packs don't make the engine render faster, and installing the extras won't increase FPS. The only practical difference is that additional content can create more inventory, effects, and combat situations to test later in the campaign.
My final recommendation is simple: use 1440p Quality upscaling, High textures, Medium shadows, Medium global illumination, Medium volumetrics, High effects, High view distance, 8x or 16x anisotropic filtering, and disabled motion blur. Cap below your refresh rate. Add frame generation only when the real frame rate already feels solid. If performance still dips, lower shadows first, then volumetrics and lighting; leave textures alone until VRAM usage becomes the actual problem.
That approach gives Borderlands 4 room to show off its bold environments and ridiculous firefights without turning every boss arena into a frame-time stress test. For more examples of practical PC tuning, compare it with Steamoz's Hunt: Showdown PC fixes, Food Truck Simulator stutter fixes, and Hacknet's max-FPS settings guide. The same rule keeps winning: find the bottleneck, change one setting, and measure the result in real gameplay.