
Alien: Isolation Lost Contact has no character levels, XP, or gold currency. The fastest way to “farm” progress is to complete Salvage objectives, collect blueprints and supplies on the route, avoid unnecessary combat, and preserve multipliers by staying alive. Treat each run as a score-and-resource loop rather than an RPG grind: plan your path, finish the next task, break the Xenomorph’s search pattern, and extract before your inventory turns into dead weight.
That distinction matters because plenty of search results describe Lost Contact like a conventional leveling game. It isn't. The DLC uses Survivor Mode rules, with score, time, challenge objectives, item pickups, and leaderboard performance replacing gold and permanent character progression. Your reward is a better run, a stronger route, and a higher score—not a larger wallet.
What Lost Contact Actually Rewards

Lost Contact is built around the Salvage format. You move through a hostile section of Sevastopol, complete objectives, gather equipment, and survive long enough to bank the result. The game does not carry credits, crafting materials, weapons, or levels from one attempt into the next. If you die, the run ends. If you restart, you begin again with the scenario’s starting resources.
That makes “gold farming” a misleading term. The closest equivalent is efficient resource farming inside a single attempt. Search cabinets, lockers, corpses, and side rooms, but only when they sit near your objective route. A five-minute detour for a single component is usually a bad trade if the Alien is active and your score is tied to time and survival.
| Progress Type | Present in Lost Contact? | Best Way to Improve It |
|---|---|---|
| Character levels | No | Improve route knowledge and stealth timing |
| Gold or credits | No persistent currency | Collect supplies efficiently during each run |
| Experience points | No traditional XP system | Complete objectives and survive longer |
| Score | Yes | Finish objectives quickly without deaths or wasted tools |
| Crafting inventory | Run-based | Loot components and craft only high-value items |
| Leaderboards | Yes, through Survivor Mode scoring | Optimize time, risk, and objective order |
Before chasing a score, check the official Lost Contact Steam page for the DLC listing and mode details. The official Alien: Isolation support page is also useful if your version has controller, display, or save issues.

🎮 Alien: Isolation Lost Contact
Looking to experience this game? Grab your digital key directly on our store for $3.99.
View on Steammoz Store →The Fastest Lost Contact Route Starts With Recon

Your first attempt should not be a farming run. Use it as reconnaissance. Identify the objective rooms, save points, emergency lockers, vents, hiding spots, and doors that force a long animation. Amanda Ripley is vulnerable while interacting with terminals, rewiring panels, opening doors, and climbing ladders, so the shortest route is not always the safest route.
Step 1: Read the objective before moving
Open the map and note the next task rather than wandering toward every unexplored corridor. Lost Contact punishes indecision: the longer you remain in the open, the more opportunities the Alien gets to investigate your noise. Mark a return route through lockers, desks, or low cover. You need somewhere to disappear after the objective completes.
Step 2: Loot the first safe loop
On the opening pass, prioritize components that support stealth and recovery: Compound B, Ethanol, Sensor, Bonding Agent, Charge Pack, and Semiconductors. Exact spawns can vary by scenario placement and difficulty, so don't build a route around one guaranteed cabinet. The principle is consistent: take nearby supplies, then move. Do not sweep an entire floor just because a room is technically accessible.
Step 3: Complete objectives in clusters
If two tasks are in neighboring rooms, finish them during the same quiet window. Interacting with a terminal can trigger noise, so moving away immediately after completing one task may waste the opening created by your previous distraction. Clustered objectives reduce backtracking, and reduced backtracking means fewer encounters with the Alien.
Step 4: Bank the run when the route becomes unstable
Once you've spent a medikit, fired the revolver, or used a flare to escape a bad search, stop thinking about perfect loot. The value of another cabinet falls sharply when your location is compromised. Complete the next objective, reach the safest available exit or checkpoint, and preserve the run. A finished medium-score attempt teaches more than a dead attempt carrying a full inventory.
| Run Stage | Priority | Acceptable Risk | What to Avoid |
|---|---|---|---|
| Opening recon | Map rooms, objectives, exits | Slow exploration | Using weapons to test the Alien |
| First objective | Nearby components and blueprint progress | Short detours under cover | Full-floor loot sweeps |
| Middle run | Objective clusters and safe rotations | One deliberate distraction | Repeated door backtracking |
| Threatened run | Escape and objective completion | Flare or defensive tool | Chasing optional pickups |
For broader stealth fundamentals, Steamoz's hidden-locations guide makes the same useful point: route knowledge is a reward multiplier. The games differ, but the habit carries over perfectly here.
Crafting Priorities for Score and Survival
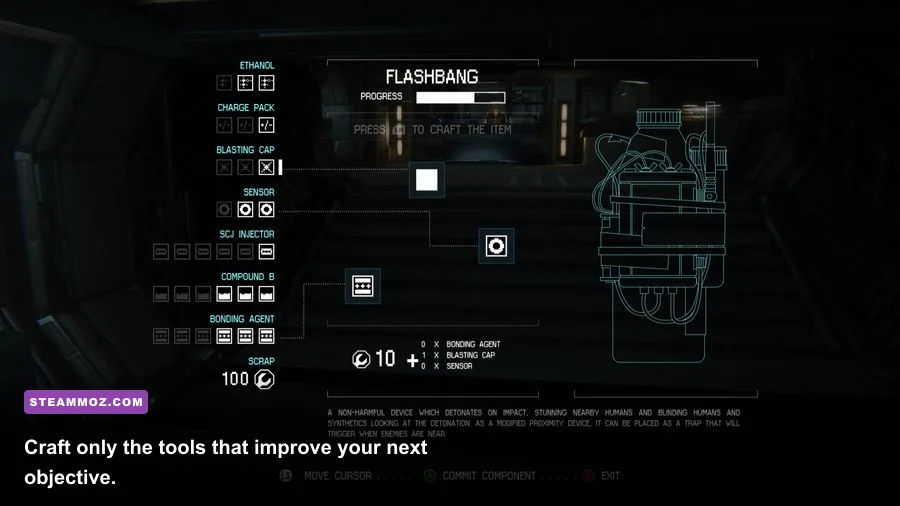
Crafting is where your fake “gold farm” really happens. Every component has an opportunity cost. A noisemaker can pull the Alien away from a terminal, while a pipe bomb can create a much larger distraction but consumes rare materials. Don't craft because the recipe is available. Craft because the next objective demands a specific answer.
S-tier craft: noisemaker, medikit, and EMP mine
The noisemaker is the best general-purpose tool for objective routing. Throw it away from your intended path, wait for the Alien to commit, then move during the investigation. It creates distance without announcing Amanda's exact position as loudly as gunfire.
The medikit is your insurance against damage from humans, Working Joes, falls, or a mistimed encounter. Its value is not just restored health; it lets you survive a mistake without abandoning a high-score run. Carry one whenever the recipe is affordable, but don't heal from minor damage if the next room is already safe.
The EMP mine is particularly valuable around Working Joes and android-heavy sections. It disables synthetic enemies long enough to pass or reposition, avoiding the ammunition burn of the revolver or shotgun. It is less useful as an Alien solution—the Xenomorph isn't a machine—so don't waste it during a creature chase.
A-tier craft: flare, smoke bomb, and flashbang
Flares are cheap, flexible, and underrated. They can distract humans, illuminate a dark route, and help you control where attention goes. A smoke bomb is stronger when human enemies are blocking a doorway, while a flashbang buys a short opening but can leave you exposed if thrown too close.
Use weapons as emergency tools
The revolver and shotgun are not farming tools. Shooting humans may solve an immediate problem, but gunfire attracts the Alien and can turn a manageable room into a three-way disaster. The flamethrower is the clearest exception: a short burst can force the Xenomorph back, but holding the trigger drains fuel quickly. Tap it, create space, and move. Do not stand there trying to win a boss fight the game never intended you to have.
| Tool | Best Use | Resource Value | Common Mistake |
|---|---|---|---|
| Noisemaker | Pull Alien away from an objective | Excellent | Throwing it beside your escape route |
| Medikit | Recover from unavoidable damage | Excellent | Healing chip damage automatically |
| EMP mine | Disable Working Joes | High | Using it against the Alien |
| Flare | Distract humans or shape movement | High | Lighting one while already being hunted |
| Molotov | Force the Alien back in an emergency | Situational | Using it for ordinary room clearing |
| Pipe bomb | Large distraction or emergency control | Expensive | Crafting it before a dangerous objective |
If you're used to aggressive resource loops, Steamoz's Garage: Bad Trip farming guide is a useful contrast. In Lost Contact, hoarding everything is not efficient. Supplies only matter when they convert into distance, time, or a completed objective.
How to Handle the Alien Without Losing the Run

The Xenomorph's behavior is the real progression system. You learn its search rhythm, recognize its telegraphs, and stop treating every appearance as a combat encounter. The creature can investigate noise, patrol nearby corridors, drop from vents, and linger after a failed search. Moving too early is often worse than staying hidden for another few seconds.
Use the motion tracker in short checks rather than staring at it while walking. The tracker gives direction, not perfect safety. A blip moving away can still loop back through a junction. Watch for audio cues—footsteps, the hiss of the creature, ceiling movement, and nearby ventilation activity—then pair that information with cover.
The reliable escape sequence
- Break direct sight. Turn a corner, enter a locker room, crouch behind a desk, or use a low route. Sprinting in a straight line only works if the Alien has not committed to your position.
- Stop making noise. Crouch, avoid unnecessary doors, and don't reload or craft while exposed. A panicked action often creates a second problem.
- Wait through the investigation. The Alien may pause, look around, and leave before the tracker gives you a comfortable distance. Patience is faster than dying and replaying the entire route.
- Distract away from the objective. Throw a noisemaker or flare into a side room, then move in the opposite direction. Never throw the distraction toward the terminal you need to use.
- Use fire only to buy space. A flamethrower burst or Molotov is an escape button, not a damage rotation. Back away immediately after the creature recoils.
Humans and Working Joes change the equation. A suppressed, careful human takedown can be safer than letting armed enemies trigger alarms, but the revolver still creates noise. Against Joes, stealth and EMP tools are generally better than trying to trade blows. The longer a fight lasts, the more likely the Alien is to arrive and make the decision for you.
For PC players, stable frame pacing matters more than chasing maximum image quality. The Steamoz stutter guide covers the same broader principle: consistent performance makes timing easier. In Alien: Isolation, a hitch during a tracker check or door animation can turn a clean escape into a death.
The Best Farming Loop for High Scores
Use this loop when you're ready to optimize rather than simply survive. Start by completing one reconnaissance run with minimal crafting. On the second attempt, take the shortest objective path, collect only route-adjacent components, and use one distraction per major danger zone. Your target is not maximum loot; it's maximum value per minute.
- Record the objective order. Write down which rooms and terminals appear first, plus the safest return corridors.
- Choose a carry plan. Enter the main route with a noisemaker or flare, one healing option, and enough flexibility to respond to a Working Joe encounter.
- Loot on the way in, not on the way back. Returning through a cleared room is safer than entering an optional room after the Alien has started hunting.
- Preserve the first distraction. Don't spend a noisemaker on a distant patrol if crouching behind cover solves the problem.
- Finish before greed takes over. Once the next objective is complete and your inventory is healthy, stop detouring for low-value cabinets.
| Goal | Recommended Approach | Score Benefit | Risk Level |
|---|---|---|---|
| First clear | Explore and identify every objective route | Low | Low to medium |
| Resource clear | Loot only rooms beside the planned path | Medium | Medium |
| Score clear | Complete objectives with minimal combat and backtracking | High | Medium |
| Leaderboard attempt | Use memorized routes, fast interactions, and deliberate distractions | Highest | High |
Finally, remember the most important Lost Contact rule: there is nothing to buy after the run, so there is no reason to play like credits are waiting at the finish line. The real currency is information. Every death should reveal an objective location, a patrol timing, a bad door choice, or a better hiding spot. Convert that knowledge into a cleaner route, and your score will climb much faster than any imaginary gold counter ever could.
For more PC performance advice, see Steamoz's low-FPS troubleshooting guide, and browse the official Alien: Isolation Steam listing for the base game and platform information. The official game website remains the best source for announcements and supported editions.