
The best Baldur’s Gate 3 endgame build is a level 12 Oath of Vengeance Paladin 6 / Storm Sorcerer 6, commonly called the Sorcadin. It delivers Extra Attack, Divine Smite, Aura of Protection, Metamagic, Counterspell, Haste, and fifth-level spell slots for upcast smites. With Balduran’s Giantslayer, Great Weapon Master, and high Charisma, this character can delete priority targets while protecting the entire party from dangerous saving throws.
This guide is designed for Act 3, late-game boss fights, and Honour Mode. It assumes a normal melee party rather than a stealth-only composition, and it favors dependable damage and defensive consistency over complicated exploit setups. For broader RPG build coverage, compare this approach with Steamoz’s co-op build recommendations.
Why the Sorcadin Is the Best Endgame Build
The Paladin 6 / Sorcerer 6 split solves nearly every endgame problem at once. Six Paladin levels provide Divine Smite, Fighting Style, Extra Attack, Lay on Hands, and Aura of Protection. The aura adds your Charisma modifier to saving throws for you and nearby allies, which is one of the strongest defensive effects in Baldur’s Gate 3. With 20 Charisma, everyone standing within 3 metres receives a +5 saving throw bonus.
Six Sorcerer levels add four major advantages. First, the multiclass reaches a ninth-level spellcaster progression, giving you fifth-level spell slots even though your Sorcerer spells only reach third level. Those slots become enormous Divine Smites. Second, Metamagic lets you Quicken a spell or Twin Haste. Third, Sorcerer gives access to Shield, Counterspell, Misty Step, and Haste. Finally, Storm Sorcery grants Tempestuous Magic, allowing a 6-metre flight after casting a first-level spell or higher without provoking opportunity attacks.
The build is stronger than a pure Paladin when a fight lasts several rounds, but it is also easier to pilot than many high-damage multiclasses. You can open with Haste, lock down a dangerous humanoid with Hold Person, use Vow of Enmity against a boss, or simply attack twice and spend spell slots on Divine Smite. That flexibility matters in encounters such as Raphael, Sarevok Anchev, Ansur, and the Netherbrain.
Build ranking
- S-Tier: Oath of Vengeance Paladin 6 / Storm Sorcerer 6. Best all-purpose melee endgame build.
- A-Tier: Oathbreaker Paladin 7 / Warlock 5. Excellent damage, but its oath-breaking requirements and party-aura interactions are less convenient.
- A-Tier: College of Swords Bard 10 / Paladin 2. Outstanding control and ranged damage, but it plays more like a caster than a front-line champion.
- B-Tier: Pure level 12 Paladin. Extremely reliable, though it loses Metamagic, Counterspell, and the extra high-level spell slots.
The Sorcadin is not the only viable answer; the defensive setup principles covered by Steamoz also apply here: prioritize reliable mitigation, saving throws, and positioning instead of chasing a theoretical damage record.
Character Creation and Leveling Order

Choose a race with useful defensive or mobility features. Half-Elf is a strong default because it provides shield proficiency, Darkvision, Fey Ancestry, and resistance to being Charmed. Zariel Tiefling is also excellent for extra smite-themed spells, while Githyanki provides valuable mobility and Misty Step access. Race is not mandatory for the build, so select whichever fits your campaign.
Recommended starting ability scores
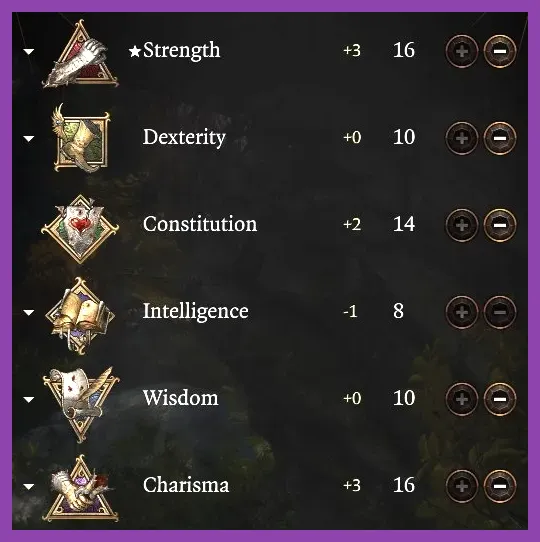
- Strength 17: Your primary attack and damage stat until you use a Strength elixir.
- Dexterity 10: Initiative is useful, but heavy armor reduces the importance of Dexterity.
- Constitution 14: Improves hit points and Concentration checks.
- Intelligence 8: Not used by this build.
- Wisdom 8: Aura of Protection helps compensate for weak Wisdom saves.
- Charisma 16: Powers Paladin auras, spellcasting, dialogue checks, and Sorcerer spells.
Respec with Withers after reaching the necessary milestones if you want a cleaner leveling route. Begin as Paladin for heavy armor, martial weapon proficiency, and early survivability. Take Oath of Vengeance at level 3. Continue to Paladin 5 for Extra Attack, then Paladin 6 for Aura of Protection. After that, take Sorcerer from levels 7 through 12.
At Paladin level 2, choose Great Weapon Fighting if you intend to use Balduran’s Giantslayer. It allows you to reroll low weapon-damage dice, although it does not reroll Divine Smite dice. Take Great Weapon Master at Paladin level 4. Its -5 attack penalty and +10 damage bonus are extremely powerful when you have advantage, Bless, or a high attack bonus. Take a +2 Charisma Ability Improvement at Sorcerer level 4, raising Charisma to 18, or to 20 if your starting score and permanent bonuses allow it.
For Sorcerer spells, select Shield, Misty Step, Counterspell, Haste, and Hold Person. Lightning Bolt is a good area-damage option, while Magic Missile provides reliable finishing damage. Recommended Metamagic choices are Quickened Spell and Twinned Spell. Quickened Haste is a strong opening when you need to attack immediately; Twinned Haste can transform both you and your best martial companion.
Best Endgame Gear and Stat Priorities

Your final stat priority is Strength, Charisma, attack accuracy, critical-hit range, and survivability. Strength improves Balduran’s Giantslayer attacks, while Charisma increases Aura of Protection, spell difficulty, dialogue checks, and several Paladin features. If you have access to an Elixir of Cloud Giant Strength, use it before difficult encounters. It sets Strength to 27 and lets you invest permanent ability points into Charisma instead.
Core equipment
- Weapon: Balduran’s Giantslayer. This legendary greatsword adds your Strength modifier to damage a second time, deals extra damage against Large, Huge, and Gargantuan creatures, and grants Giantslayer, which doubles the damage bonus from your Strength modifier. It is obtained after defeating Ansur beneath Wyrmway.
- Armor: Helldusk Armor. This legendary heavy armor grants 21 AC, reduces incoming damage by 3, provides resistance to fire, and gives the wearer proficiency automatically. Its Fly spell and Infernal Retribution reaction add both mobility and punishment.
- Helmet: Helm of Balduran. It restores 2 hit points at the start of each turn, adds 1 AC, and prevents the wearer from being Stunned. It is particularly valuable against bosses with disabling effects.
- Gloves: Legacy of the Masters. These gloves add +2 to attack and damage rolls with weapons, directly improving Great Weapon Master reliability.
- Amulet: Amulet of Greater Health. It sets Constitution to 23 and grants advantage on Constitution saving throws, making Haste and other Concentration spells much safer.
- Cloak: Cloak of Protection. The +1 AC and +1 saving throws are simple but valuable additions to a front-line character.
- Ring: Risky Ring. Advantage on attack rolls makes the Great Weapon Master penalty much easier to accept, though its disadvantage on saving throws means Aura of Protection and the Helm of Balduran become even more important.
If you prefer a shield, use the Viconia’s Walking Fortress and a one-handed weapon, but the two-handed Giantslayer setup produces substantially higher boss damage. The Strange Conduit Ring is a strong alternative to Risky Ring when you regularly maintain Concentration, adding 1d4 psychic damage to weapon attacks while Concentrating.
For a useful comparison on equipment-focused progression, Steamoz’s weapon tier list methodology highlights the same principle: a weapon’s value depends on how well its bonuses support the complete build, not just its base damage.
Combat Rotation, Smites, and Metamagic

Before a major fight, cast Aid using a high-level spell slot, activate any long-duration defensive buffs, and drink an Elixir of Cloud Giant Strength if available. Do not waste Haste before combat unless you are deliberately ambushing an encounter. Keep your party within 3 metres when the first enemy control effect is likely, ensuring Aura of Protection applies to the saving throws that matter.
Standard boss rotation
- Start with positioning. Move close enough to threaten the boss, but avoid standing beside explosive surfaces or multiple enemies with opportunity attacks.
- Use Vow of Enmity. Apply it to the primary target for advantage. Advantage offsets Great Weapon Master’s attack penalty and increases your chance to trigger critical hits.
- Cast Haste. Use normal Haste for a safe opening, or Quickened Haste when the boss must die immediately. If another martial character is present, Twin Haste can be more valuable than personal damage.
- Make your attacks. Use Great Weapon Master whenever your accuracy is acceptable. With advantage, Bless, Legacy of the Masters, and high Strength, the bonus damage usually outweighs the penalty.
- Smite selectively. Divine Smite can be declared after a melee weapon attack hits. Spend third-, fourth-, and fifth-level slots on confirmed hits, especially critical hits. A critical Divine Smite doubles the extra radiant dice, making it your best burst option.
- React defensively. Use Shield when an attack would otherwise hit and Counterspell against Hold Monster, Dominate Person, or another fight-ending spell. Do not spend every reaction early if the enemy has not revealed its caster.
Against humanoid bosses, cast Hold Person when the spell’s chance to land is reasonable. Every melee attack against a Paralyzed target is an automatic critical hit within 3 metres, creating a devastating sequence of Giantslayer attacks and Divine Smites. Against undead, fiends, or enemies resistant to radiant damage, inspect the combat log before spending your highest slots. Raw weapon damage remains useful, but reckless Smite usage can waste resources.
Quickened Spell has two primary uses. Quickened Haste lets you cast Haste as a bonus action and still attack on the same turn. Quickened Hold Person can create an immediate critical-hit window. Twinned Spell is best reserved for Haste or another single-target spell that meaningfully improves two allies. Tempestuous Magic also gives you an emergency 6-metre flight after casting, letting you escape melee range without provoking opportunity attacks.
Act 3 Boss Tactics and Party Setup

The build performs best with allies who add accuracy, control, and area damage. A Life or Light Cleric can provide Bless, Mass Healing Word, and emergency restoration. Gale or another Wizard can cover Counterspell and wide-area spells, while a Rogue, Ranger, or Swords Bard handles high-ground targets and locks. Keep one character dedicated to battlefield control so the Sorcadin can spend actions attacking rather than repeatedly solving crowd-control problems.
Important endgame encounters
- Raphael: Use Radiant Retort carefully because reflected radiant damage can punish repeated Divine Smites. Focus on destroying the pillars with allies, use Counterspell against enemy casters, and consider ordinary weapon attacks until the reaction is under control. Helldusk Armor’s fire resistance helps against the House of Hope’s many fire effects.
- Ansur: Keep Misty Step or Helldusk Armor’s Fly available for the lightning storm phase. When Ansur begins charging the large area attack, move behind the available crystal or platform cover. Balduran’s Giantslayer is obtained after this encounter, so use another strong weapon such as the Silver Sword of the Astral Plane beforehand.
- Sarevok Anchev: Do not rush into the middle of the room. Use Vow of Enmity on Sarevok, eliminate supporting threats, and Counterspell dangerous necromancy. Hold Person can create automatic criticals if the target’s Wisdom save is not protected.
- The Netherbrain: Save your highest spell slots for guaranteed attacks and avoid clustering under the brain’s area effects. Use Haste and Fly or Misty Step to reach the brain quickly, then prioritize reliable melee hits. If the character becomes stunned or loses Concentration, use the next turn to reposition rather than forcing a low-percentage attack.
Honour Mode rewards restraint. The Sorcadin is durable, but it is not immune to bad positioning, failed Concentration checks, or legendary actions. Inspect each boss’s resistances, keep a backup weapon for enemies resistant to slashing damage, and do not rely on a single Hold Person attempt to win the fight. The official Baldur’s Gate 3 website and the game’s official Steam page remain useful references for patch information and platform updates.
For the final version, aim for 20 Charisma, 27 Strength through an elixir or equivalent permanent setup, Balduran’s Giantslayer, Helldusk Armor, Helm of Balduran, Great Weapon Master, and a high Constitution score. Open with Vow of Enmity and Haste, use advantage to make Great Weapon Master reliable, and reserve fifth-level slots for critical Divine Smites. That combination gives the best balance of endgame damage, party protection, mobility, and boss-fight control available to a level 12 Baldur’s Gate 3 character.