The fastest way to level in Absolute Tactics: Daughters of Mercy is to clear every optional combat encounter on the current map, collect every visible chest, and rotate newly unlocked classes into battles before your core team outlevels them. Gold works the same way: side objectives, treasure, and efficient victories beat mindlessly replaying story fights. Build around Huxley, keep Max active for pressure and utility, and spend skill points on complementary roles rather than six damage dealers.
That approach matters because Absolute Tactics has no traditional loot treadmill packed with endlessly respawning enemies. Your progress comes from how thoroughly you work through each section of the campaign. The game’s gridless battlefields reward positioning, elevation, crowd control, and turn order more than raw grinding. If you clear maps intelligently, you’ll usually have enough experience and gold for the next story mission without turning the campaign into a slog.
How XP and gold actually flow
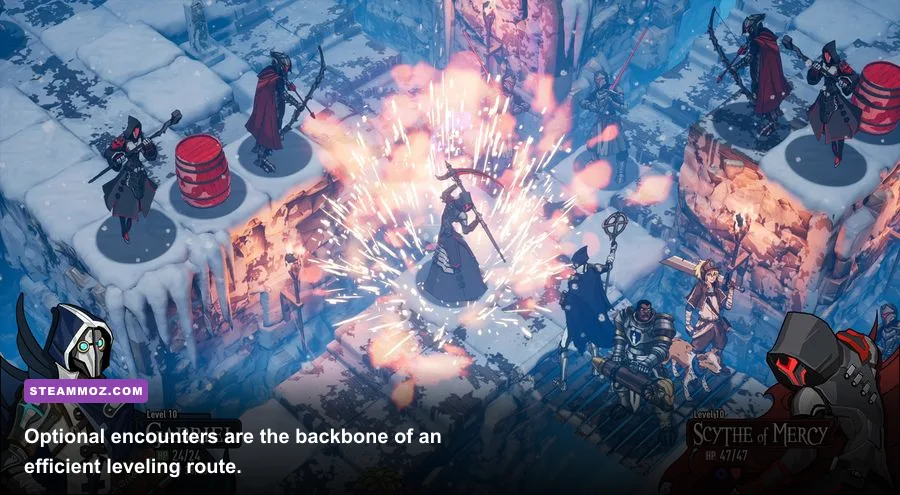
Absolute Tactics uses a campaign progression loop rather than a dedicated dungeon-farming system. Story battles provide the obvious rewards, but optional encounters and side content are where the efficient gains live. Before launching the next objective, open the world map and look for available fights, unexplored paths, and rewards you skipped while following the main marker.
Experience is most valuable when it keeps your entire active roster close together. A high-level Huxley surrounded by underdeveloped recruits is less useful than a party whose classes can all contribute immediately. Bring one or two established carries, then fill the remaining slots with characters or class combinations that need investment. The strong units handle dangerous targets while the weaker units safely collect finishing blows and participate in objectives.
Gold is usually earned from battles, chests, and mission rewards, so the best farming route is also the safest completion route. Don’t abandon a map after defeating its headline enemy if unexplored branches remain. A chest at the end of a side path costs nothing but movement and can contain more practical value than a second attempt at a high-risk encounter.
| Activity | XP Value | Gold Value | Best Use |
|---|---|---|---|
| Main-story battle | Reliable, usually highest available | Reliable mission payout | Advance the campaign after clearing side content |
| Optional encounter | Excellent for keeping the roster current | Consistent battle reward | First choice for fast, legitimate leveling |
| Treasure chest | None or indirect progression | Immediate resource gain | Always collect while exploring a map |
| Side objective | Often substantial | Frequently better than a standard fight | Prioritize before the next story mission |
For a useful comparison, our Blood Knights farming guide covers a more conventional repeatable grind. Absolute Tactics is different: route planning and battle quality matter more than finding one respawning mob pack.

🎮 Absolute Tactics: Daughters of Mercy
Looking to experience this game? Grab your digital key directly on our store for $9.99.
View on Steammoz Store →The fastest leveling route for every chapter

Use a three-pass routine whenever a new area opens. On the first pass, follow the obvious path and identify enemy types, elevation, and objective triggers. On the second, clear optional fights and collect chests. On the third, return to any encounter where your initial party struggled and bring the class mix that counters it. This prevents wasted turns and gives underused units a safer opportunity to catch up.
Pass one: map the danger
Do not immediately spend consumables or commit your strongest area attacks. Check whether enemies are clustered, whether ranged units occupy high ground, and whether the objective is a survival timer, defeat mission, escort, or position-based task. Understanding the win condition is a faster leveling tactic than rushing damage, because failed battles produce no useful XP or gold.
Pass two: clear rewards efficiently
Start with optional encounters that sit near the recommended story path. These usually offer the best return for your travel time. Use Huxley as the flexible anchor, then pair him with a front-line class, a ranged attacker, and a support or control specialist. Keep Max involved whenever his mobility or disruption can isolate an enemy. The goal isn’t to win every fight in the fewest turns; it’s to win without losing units, burning your entire skill economy, or forcing a reload.
Pass three: train the bench
Once the active team is stable, swap one experienced unit for a weaker character or class configuration. Never replace the whole party at once. One veteran can hold a lane while the developing unit takes safe attacks, captures an objective, or finishes damaged enemies. This staggered rotation is the quickest way to prevent the roster from developing a crippling level gap.
| Party Slot | Recommended Role | Leveling Job | Why It Works |
|---|---|---|---|
| Huxley | Flexible damage or control | Anchor difficult fights | Adapts to the map and protects weaker allies |
| Front line | Guardian or durable melee class | Hold chokepoints | Creates safe space for low-level units |
| Back line | Archer or Mage | Chip targets and finish weakened foes | Earns progress without taking unnecessary hits |
| Support slot | Cleric, Bard, or control-focused class | Heal, buff, or disable | Improves clear consistency more than another attacker |
For a broader look at progression-focused RPG routing, see our Citizen Sleeper 2 leveling guide. The games handle progression differently, but both punish players who ignore secondary rewards.
Best class setup for fast, safe clears

Absolute Tactics lets you shape characters through classes and skill trees, so the best farming setup is not a pure damage composition. You want enough burst to end fights quickly, enough durability to survive a bad turn, and at least one tool that changes enemy positioning or disables a dangerous unit.
Huxley should usually occupy the adaptable slot. Give him a class that can reach priority targets or punish enemies grouped around an objective. A Warrior or Guardian pairing is safer while learning a map; a more aggressive Rogue or ranged option becomes stronger once you know enemy placements. Max is particularly valuable when the battlefield rewards mobility, because he can pressure exposed targets while the main party secures the center.
Archers are excellent farming tools because consistent ranged damage lets them contribute without spending turns crossing the map. Mages become more valuable when enemies cluster or hide behind a front line. A Cleric keeps a no-reload run alive, while a Bard or other support-oriented setup can improve the entire party’s efficiency. The exact skill tree matters less than avoiding overlap: two units competing for the same short-range damage role waste opportunities to control the battlefield.
| Build | Tier | Core Strength | Best Farming Situation |
|---|---|---|---|
| Guardian + Cleric support core | S-Tier | Reliable survival and recovery | Unknown maps, elite enemies, objective battles |
| Warrior + Archer damage core | A-Tier | Simple frontline pressure and safe finishing | Open maps with clear firing lanes |
| Mage + control support | A-Tier | Punishes clustered enemies | Dense encounters and chokepoints |
| Rogue-heavy burst party | B-Tier | Excellent target deletion | Known maps where positioning is predictable |
Spend skill points around a plan. If a unit is your finisher, choose mobility and single-target damage. If it is holding a lane, prioritize durability and tools that discourage enemies from passing. Resist buying every available skill immediately; a focused kit reaches its useful breakpoint sooner and makes each optional encounter faster.
Gold farming without wasting turns
The biggest gold mistake is treating every battle as equally profitable. A fight that takes several turns, costs healing resources, and forces you to reload is a poor farm even if its displayed payout looks attractive. Favor encounters you can complete while preserving your strongest abilities for the next objective.
Explore before triggering story progression. Many missions change the available route or move you toward a new objective, and leaving a map can make backtracking inconvenient. Sweep side paths, check corners around terrain, and inspect every branch that looks deliberately placed. Chests are guaranteed value; risky optional battles are only worth prioritizing when your party can handle them consistently.
Use gold on the units you actually deploy. Upgrade the core four or five characters first rather than spreading purchases across the entire roster. A stronger front line reduces incoming damage, which indirectly preserves healing and turns. After that, improve the ranged attacker who can safely finish enemies. This creates a compounding advantage: faster kills mean fewer enemy turns, and fewer enemy turns mean fewer resources spent between encounters.
Save before entering a demanding optional encounter if your current checkpoint allows it. That isn’t an exploit; it’s simply good campaign management. If the enemy composition hard-counters your party, reload and change the class mix instead of repeatedly feeding gold and time into a bad matchup. For more gear-economy thinking, our Dins Legacy gear guide offers a useful contrast between loot-driven and campaign-driven progression.
Combat tricks that make the grind faster

Protect your action economy. Every turn spent walking a fragile unit into range is a turn an enemy gets to attack. Start battles by claiming favorable terrain and forcing opponents to move through your damage zones. Ranged units should soften targets while durable characters block routes. Don’t chase a fleeing enemy if doing so abandons the objective or exposes your support unit.
Focus fire is usually better than spreading damage across the whole enemy formation. Removing one attacker means one fewer hostile action next round. Use area attacks when they hit several targets without compromising your formation, but don’t delay a guaranteed elimination just to create a larger damage number. A dead enemy cannot retaliate, reposition, or disrupt your weaker leveling unit.
Watch telegraphs and turn order before committing mobility skills. If an enemy is about to act, moving a vulnerable unit may be worth more than attacking. Likewise, don’t place your healer where a single flank can reach them. Absolute Tactics looks approachable because it lacks a traditional square grid, but spacing still controls the entire fight: lanes, elevation, obstacles, and movement range decide whether your party gets clean turns.
| Problem | Common Mistake | Better Response | Result |
|---|---|---|---|
| Ranged enemy pressure | Rush the nearest target | Use cover, control, or a fast flanker | Fewer exposed turns |
| Weak trainee dies early | Let them lead the push | Place them behind a veteran and feed safe finishes | Steady catch-up XP |
| Gold-heavy failed battle | Repeat the same party setup | Change class roles and attack order | Lower reload and resource costs |
| Objective ignored | Chase every enemy | Secure the required position first | Shorter, safer clears |
Finally, keep the game updated through its official Steam page and check Akupara Games’ official site for patches or balance notes. Absolute Tactics doesn’t need an artificial grind. Clear optional content, rotate your roster intelligently, and spend gold on consistency; you’ll stay ahead of the campaign while seeing far more of what makes its tactical battles work.