
Stepping into Night City on PC today is an entirely different experience than it was at launch, but it will still crush your hardware and punish sloppy build choices if you go in blind. Following the massive 2.0 overhaul and the Phantom Liberty expansion, core systems like armor, skill progression, police behavior, and cybernetic augmentation underwent ground-up redesigns. Clothes no longer provide bullet resistance, attribute points are largely permanent, and turning on path tracing without AI reconstruction will turn a high-end graphics card into a space heater. If you want to conquer Watson without bricking your frame rate or ruining your character build, here are the foundational mechanics you need to lock down before taking your first fixer contract.
1. Optimize Your PC Settings Before Stepping Out of V's Apartment
Night City is one of the most demanding urban environments ever rendered in video games. When you first step out of V's megabuilding into the bustling streets of Little China, your CPU and GPU hit a collective wall. A common newcomer mistake is leaving every setting maxed out simply because a graphics card meets the recommended specs on Cyberpunk 2077 on Steam. In reality, a handful of hyper-aggressive settings tank your performance while yielding negligible visual gains.
The biggest CPU killer in the game is Crowd Density (found under Gameplay settings, not Video). Setting Crowd Density to High floods sidewalks with complex pathfinding routines that choke even 8-core, 16-thread processors during heavy vehicle transit. Dropping it to Medium preserves the bustling metropolis illusion while stabilizing frame-time pacing significantly. If you have tackled complex frame stabilization before in our Elex crash and performance fixes or balanced demanding engines using our Far Cry 6 PC optimization guide, you know that granular setting drops are your best friend.
On the GPU side, Screen Space Reflections Quality and Volumetric Fog Resolution are the primary culprits behind sudden indoor-to-outdoor frame dips. Lowering Volumetric Fog from Ultra to High yields an immediate 10% to 14% frame rate uplift with zero discernible loss in environmental atmosphere. If you run an Nvidia RTX card, DLSS Super Resolution set to Quality combined with DLSS Frame Generation (on 40-series cards) is the gold standard for buttery performance. AMD users should lean heavily on FSR 2.1/3 on Balanced mode at 1440p or Quality at 4K.
| Graphic Setting | Optimal PC Value | FPS Cost | Visual & Gameplay Impact |
|---|---|---|---|
| Crowd Density (Gameplay) | Medium | High (CPU) | Eliminates micro-stutter in dense markets like Kabuki. |
| Volumetric Fog Resolution | High (Skip Ultra) | Medium (GPU) | Preserves volumetric god-rays while saving 10-12% FPS. |
| Screen Space Reflections | Low or Medium | High (GPU) | Removes grain on wet asphalt without ray tracing overhead. |
| Cascaded Shadows Resolution | Medium | Low-Med (GPU) | Virtually identical to High during daytime outdoor transit. |
| Ray Traced Reflections | On (Off if non-RTX) | Very High | Transforms Night City puddle reflections; requires DLSS. |
| Subsurface Scattering | High | Very Low | Essential for realistic skin shaders in story dialogue scenes. |

🎮 Cyberpunk 2077
Looking to experience this game? Grab your digital key directly on our store for $59.99.
View on Steammoz Store →2. Attributes Are Permanent Locks—Perks Are Free to Swap
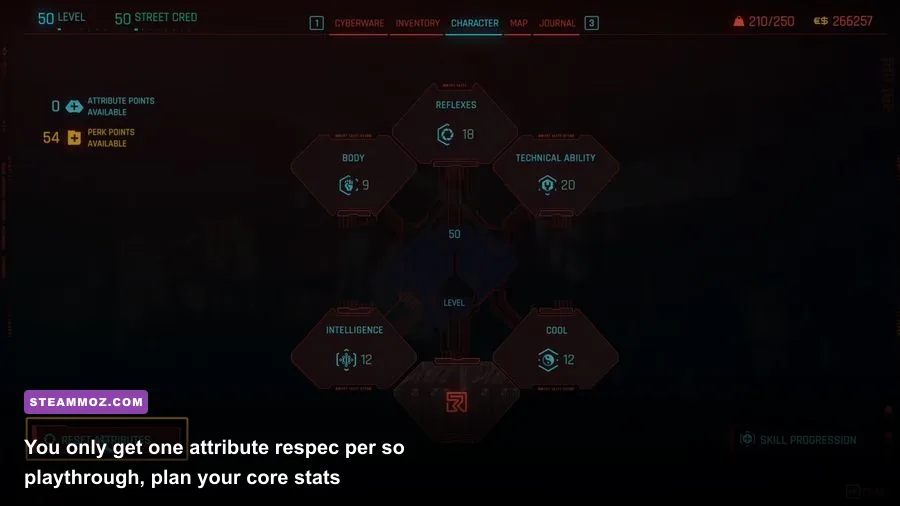
Character progression in Cyberpunk 2077 is divided into two distinct layers: Attributes and Perks. Understanding the mechanical divide between these two systems saves you from restarting a 40-hour save file. You earn one Attribute Point and one Perk Point per character level, up to the level cap of 50 (or level 60 if you own the Phantom Liberty expansion). However, the respec rules for each are vastly different.
You can refund and reallocate your individual Perk points at any time, anywhere, outside of active combat, completely free of charge. Want to switch from an assault rifle focus to throwing knives for a stealth mission? Simply click on the rifle perks to refund them and drop those points into the Cool tree. This mirrors the flexible loadout philosophy we often highlight in tactical guides like our Far Cry 6 beginner build breakdown.
Attributes (Body, Reflexes, Technical Ability, Intelligence, Cool), however, are hard commitments. You are granted exactly one full Attribute reset per character across your entire playthrough. Once you burn that single reset button on the bottom left of the character sheet, your core stat spread is etched in stone. Attribute milestones unlock distinct perk tiers at values 4 (Rookie), 9 (Pro), 15 (Phenom), and 20 (Legend). If you do not invest at least 15 points into an attribute, you lock yourself out of its game-altering tier-3 perks, such as the Reflexes tree's mid-air dash or the Technical Ability tree's cyberware overclocks.
| Attribute | Core Archetypes | Crucial Milestone Perks | Environmental Utility |
|---|---|---|---|
| Body | Shotguns, LMGs, Blunt Melee, Tank | Adrenaline Rush (15), Pain to Gain (20) | Forcing locked blast doors, hijacking civilian cars. |
| Reflexes | Assault Rifles, SMGs, Katanas, Blades | Dash (9), Air Dash (15), Slaughterhouse (20) | Unlocks unmatched mobility and bullet-deflecting blades. |
| Technical Ability | Tech Weapons, Explosives, Cyberware Tuning | License to Chrome (9), Edgerunner (20) | Overriding security panels, opening tech bypass gates. |
| Intelligence | Netrunning, Smart Weapons, Monowire | Overclock (15), Smart Synergy (20) | Hacking access points for quick cash and crafting specs. |
| Cool | Pistols, Snipers, Throwing Knives, Stealth | Deadeye (15), Run 'N Gun (20) | Slipping past cameras undetected, critical headshots. |
3. Armor Belongs to Ripperdocs, Not Your Wardrobe

If you played Cyberpunk 2077 prior to Patch 2.0 or watched outdated beginner tutorials, scrub clothing stats from your memory. In the current engine build, your wardrobe is virtually 100% cosmetic. Wearing a heavy ballistic vest, an armored helmet, or walking into combat in hot pink shorts and aviator shades provides the exact same base defensive rating. While a tiny handful of specific headwear items offer negligible utility perks—like netrunning visors slightly cutting quickhack upload times—clothing no longer stops incoming bullets.
Your defense is derived almost exclusively from your Cyberware installed at Ripperdoc clinics, detailed extensively across the Cyberpunk Wiki. Skeleton mods like Titanium Bones, Para Bellum, and integumentary implants like Subdermal Armor provide your raw armor rating and elemental resistances. Every point of damage reduction you rely on requires an investment in chrome, paid for with Eurodollars (Eddies) and regulated by your character's Cyberware Capacity meter.
That capacity meter acts as a hard limiter to prevent you from becoming unkillable in the early game. If you install chrome beyond your standard threshold using the high-tier Edgerunner perk in the Technical Ability tree, you dip into your maximum health pool to trigger a berserk state known as "Fury." Because of this fundamental redesign, Technical Ability has quietly become the single most vital attribute in the game regardless of your chosen weapon class. Skipping Tech means capping your cyberware capacity at mediocre levels, leaving V extremely squishy on harder difficulty settings.
4. Don't Rush the Main Story: Watson NCPD Scanners Are Pure Gold
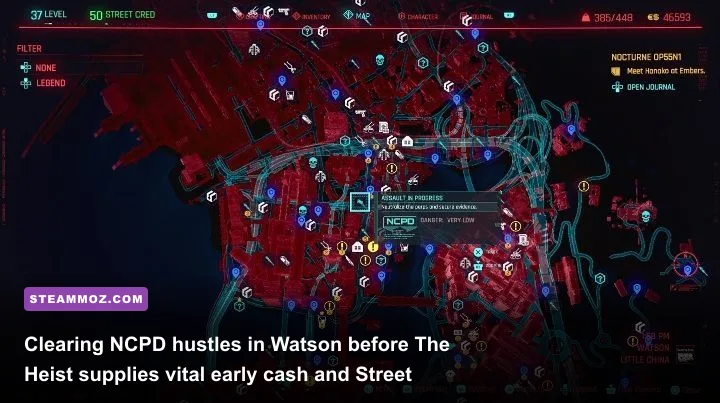
The prologue of Cyberpunk 2077 places the entire district of Watson under a heavy corporate police lockdown. Many players treat this as a narrative cue to rush through primary story missions—specifically meeting with Dex Deshawn and pushing toward the Konpeki Plaza heist. Rushing that critical turning point is a massive strategic error that leaves your character severely under-geared and under-leveled.
Watson is crammed with blue NCPD Scanner Hustles (Assault in Progress, Organized Crime Activity, and Reported Crimes). These short, bite-sized combat encounters take two to three minutes each to clear and reward massive payouts of early Eddies, high-tier loot drops, and critical Street Cred. Street Cred is the gateway mechanic that controls what tiers of cyberware, weapons, and quickhacks local vendors are willing to sell you. Similar to resource farming dynamics seen in our fast leveling and currency farming guide, front-loading your grind early radically alters the combat balance in your favor.
By clearing roughly 60% of Watson's NCPD hustles before launching "The Heist," you will enter the mission around Level 10-12 with Street Cred floating near Level 20. That lets you stroll into Viktor Vector's clinic in Little China to purchase Reinforced Tendons (the iconic double-jump cyberware legs) and install Tier 2 or Tier 3 Subdermal Armor before you ever cross paths with Arasaka security forces. Double-jumping transforms traversal, turning complex stealth infiltration paths into simple rooftop walks.
5. Iconic Weapons Dictate Your Playstyle: Never Disassemble Them
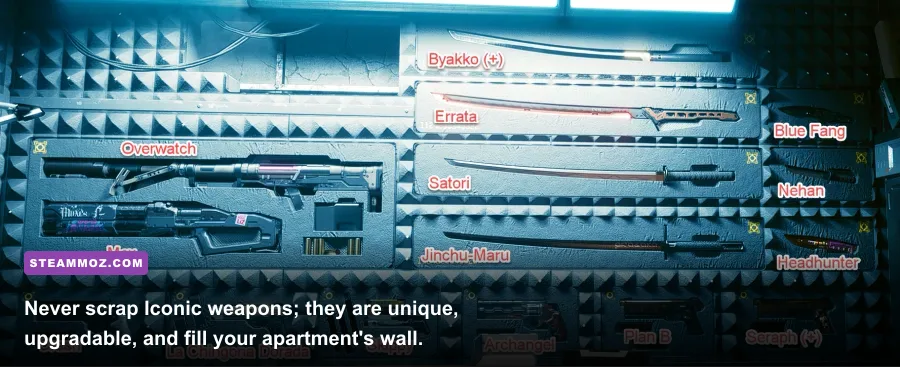
As you run contracts across Night City, you'll pick up hundreds of mundane green, blue, and purple weapons dropped by street gangers. These common guns are cannon fodder meant to be sold for quick cash or disassembled into crafting components. However, keep your eyes peeled for weapons marked with a distinct striped background and a unique name: these are Iconic Weapons.
Iconic weapons feature intrinsic custom modifiers that cannot be found on standard loot. The Fenrir submachine gun fires thermal rounds with a massive chance to upload cyberware-disabling shockwaves; Lizzie turns an ordinary Tech pistol into a burst-firing plasma shotgun; and Satori scales lethal critical hits based on katana bleed stacks. More importantly, Patch 2.0 changed crafting rules: standard weapons cannot be upgraded in rarity anymore—only Iconic weapons can be upgraded at your crafting menu from Tier 1 up to Tier 5++ using collected components.
Managing weapon upgrades demands resource discipline similar to keeping high-end ships optimized in Everspace weapons and upgrades. Dismantling an Iconic weapon permanently deletes it from your save file—there is no buyback kiosk or crafting recovery method. Every time your inventory gets encumbered, make it a strict habit to stash your Iconics in V's apartment trunk or vehicle stash. As a bonus, collecting specific Iconics will physically mount them on the weapon display wall in V's Megabuilding H10 apartment, turning your safehouse into a trophy room of your mercenary career.
Take Your Time and Build Your Mercenary Smart
Night City is designed to be absorbed at an atmospheric crawl rather than sprinted through like a linear hallway shooter. Take an extra twenty minutes in the graphics settings menu to clamp your cascaded shadows and crowd density so your frame rate stays pinned to your monitor's refresh rate. Plan your attribute path toward at least two 15-point milestones early, visit your Ripperdoc every three levels to fill newly unlocked cyberware slots, and bank your Iconics in your weapon stash. If you respect the game's interlocking systems and avoid treating your clothing like body armor, you will survive everything Arasaka and the NCPD throw at you from the moment you hit the asphalt.