The best beginner build in Blackguards is a durable melee controller: prioritize Strength, Constitution, and the Sword or Spear weapon line, then add defensive talents before chasing flashy damage upgrades. Start with a one-handed weapon and shield, keep a second weapon ready for awkward terrain, and let companions specialize around you. This setup survives the early campaign, works with almost every party, and teaches the game's most important lesson: winning fights is usually about action-point discipline and positioning, not simply having the biggest attack number.
Blackguards uses the rules and terminology of The Dark Eye, so character creation can feel unusually dense if you're coming from a conventional class-based RPG. There isn't a clean warrior, mage, and rogue menu that tells you exactly what to buy. Your attributes, talents, weapon skills, and equipment all pull together. A bad early investment can leave you accurate enough to hit but too fragile to stand in melee, or clever enough to use magic without enough endurance to survive the campaign's brutal encounters.
This guide focuses on the original Blackguards on Steam, not Blackguards 2. The advice assumes a first playthrough on Normal difficulty, but the core priorities remain useful on Hard.
The beginner build at a glance
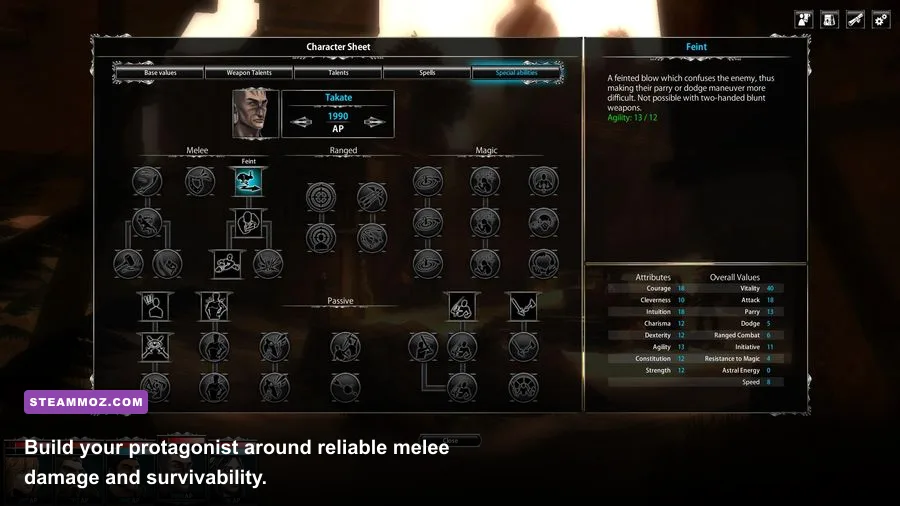
Your protagonist should be the party's dependable front-line anchor. That means standing where enemies want to pass, threatening valuable targets, and absorbing pressure without spending every turn scrambling back into position. A shield is more valuable than a slightly stronger two-handed weapon during the opening chapters because Blackguards frequently puts objectives, hazards, narrow bridges, and elevation between you and the enemy.
Choose Strength as your main offensive attribute. It supports the kind of melee damage this build wants, while Constitution gives you the staying power to survive focus fire. Dexterity is the third priority because it improves the feel of your attacks and keeps the build from becoming clumsy. You don't need to spread points evenly across all eight The Dark Eye attributes.
| Priority | Investment | Why it matters | Beginner target |
|---|---|---|---|
| Strength | Highest | Improves reliable melee pressure | Raise whenever an upgrade is available |
| Constitution | High | Protects your health pool and front-line uptime | Keep close behind Strength |
| Dexterity | Medium | Supports accuracy and a smoother attack profile | Raise after core survivability |
| Agility | Medium-low | Useful for movement and defense, but not your first damage lever | Add after the first defensive talents |
| Courage, Cleverness, Intuition, Charisma | Situational | Useful for checks, magic, or dialogue-related options | Don't sacrifice combat fundamentals early |
For weapons, use a sword-and-shield setup as your default. Spears are an excellent alternative when you want safer reach and control, especially on maps where enemies approach through a single lane. Axes and hammers can hit hard, but they are less forgiving if your accuracy or positioning isn't ready. Daggers are better suited to a dedicated Dexterity character, while bows and crossbows belong to a ranged specialist rather than a hybrid protagonist.
What to buy first
Spend early advancement on your chosen weapon talent, then pick defensive abilities that make standing in a dangerous tile less punishing. Avoid buying one point in every weapon category. Blackguards rewards specialization: a protagonist who is excellent with one practical weapon is far more useful than a mediocre generalist carrying four different options.
Keep a backup weapon in your inventory anyway. A sword may be perfect in an open courtyard, while a spear is safer around a chokepoint or when an enemy can punish anyone who steps adjacent. That flexibility comes from equipment, not from wasting advancement points across unrelated talent lines.

🎮 Blackguards
Looking to experience this game? Grab your digital key directly on our store for $0.99.
View on Steammoz Store →Exact skills and equipment priorities

Think of the build in three layers. First, improve the weapon you use every turn. Second, protect your action economy with defensive and movement tools. Third, add utility once the protagonist can survive a bad round. The mistake beginners make is treating every new skill as equally important. It isn't.
Recommended skill order
- Primary melee weapon talent: Put your first serious investment here. A sword is the safest all-purpose choice; choose Spears if you prefer reach and positional control.
- Shield and defensive options: Buy these before luxury damage upgrades. A shield helps you hold a lane while Naurim or Takate works around the flank.
- Constitution and health improvements: Your front-line character must remain functional after the first enemy turn. More damage is worthless if you spend the next round recovering or retreating.
- Movement and utility: Add mobility once you understand how far the current map allows you to move and still attack.
- Secondary weapon talent: Only invest here when the campaign's equipment or map design gives you a clear reason.
Don't rush into Magic just because Zurbaran makes spells look impressive. Magic is a separate investment path with its own attribute demands, and a half-built spellcaster usually produces less value than a focused fighter. If you want to experiment, let Zurbaran handle the arcane role while your protagonist keeps enemies occupied.
| Gear slot | Recommended choice | Reason | What to avoid |
|---|---|---|---|
| Main hand | Reliable sword or spear | Consistent melee output and broad usefulness | Changing weapons every encounter |
| Off-hand | Shield | Improves front-line safety and makes holding ground easier | Dropping defense for tiny damage gains |
| Armor | Best protective armor you can equip without crippling mobility | Reduces the cost of being targeted | Ignoring movement penalties entirely |
| Backup | Second melee weapon with a different reach profile | Helps on narrow maps and awkward objectives | Spending skill points on every weapon family |
| Consumables | Healing supplies and useful tactical items | Turns a near-loss into a recoverable fight | Saving every consumable until the final chapter |
Armor deserves a warning. The heaviest available protection isn't automatically the best choice if it leaves you unable to reach a tile before the enemy acts. Blackguards' battlefields often hide the real objective behind a few turns of movement. A slightly lighter setup that lets you reach a lever, rescue a captive, or block a bridge can outperform heavier armor in practice.
For a useful comparison point, our Decay: The Mare starting build guide also emphasizes focused early investments rather than scattering upgrades. Blackguards is more tactical, but the principle is identical: make the first few upgrades solve the problems you'll face every battle.
How to play the build in combat

Your basic combat rotation is simple: move into a position that forces enemies to engage, attack the highest-value reachable target, then preserve enough action points to respond to the next threat. Don't sprint toward the nearest enemy just because the path is open. The front-most target may be bait, while an archer, spellcaster, or objective sits two tiles behind it.
The opening two turns
On turn one, inspect the map before moving. Look for elevation, burning ground, pits, barricades, explosive objects, and narrow approaches. Move to a tile that protects one side of your party or creates a body-block. If you can attack without abandoning that position, do so. If not, waiting can be the correct play.
On turn two, finish wounded enemies rather than spreading damage across the whole formation. Blackguards' action economy favors removing a threat completely: a living enemy still attacks at full efficiency, while a defeated enemy generates no pressure at all. Have Naurim hammer durable targets, Takate exploit exposed enemies, and Zurbaran use control or damage from behind the line rather than copying your role.
Use the protagonist to control access, not to chase kills. If an enemy has to spend its turn walking around you, you've already gained value. If you leave your position to hit a low-health target and expose Zurbaran, the damage number may look satisfying, but the trade is usually bad.
| Situation | Your move | Party follow-up | Common mistake |
|---|---|---|---|
| Open approach | Hold a central lane and attack the first high-value target | Ranged allies fire around you | Charging beyond healer or spell support |
| Narrow bridge or doorway | Use spear reach or shield defense to seal the passage | Takate attacks from the side | Letting two enemies surround you |
| Enemy archers | Advance behind cover and pressure the nearest shooter | Zurbaran disrupts or damages back-line units | Trading turns in the open |
| Hazard-heavy map | Prioritize safe tiles and the objective route | Spread out so one effect cannot catch everyone | Standing on a glowing tile for extra damage |
| Wounded protagonist | Withdraw one tile while keeping the lane blocked | Another melee character takes the front position | Fighting to zero health for one extra hit |
Watch enemy telegraphs. Archers want clear lines, melee units want adjacency, and many encounters are designed around forcing you through a dangerous route. Move one character at a time when possible so a single trap or area attack doesn't punish the whole party. Save an escape route before committing to a surrounded target.
If you enjoy systems-heavy party tactics, the positioning lessons in our Door Kickers raid tips are surprisingly transferable. The games handle turns differently, but both punish rushing into rooms—or tiles—without an exit plan.
Build your party around the protagonist

The protagonist should not try to replace every specialist. Blackguards gives you memorable companions with distinct strengths, and the easiest campaign comes from making those strengths overlap only when the battlefield demands it.
Naurim is your natural heavy hitter. Let him handle sturdy enemies and benefit from the space your shield fighter creates. His dwarf identity is not just flavor: he works best when he can commit to a target instead of spending turns crossing the map.
Takate is valuable when the party can create a flank or expose a vulnerable enemy. Don't send him alone into the middle of a formation. Your protagonist pins attention while Takate turns that stable front into an angle of attack.
Zurbaran should remain protected. He provides the magical answer to encounters where ordinary weapon damage is inefficient, but he is not a substitute for a front line. Keep a clear retreat tile behind your melee characters and avoid blocking his line of sight.
Later companions and scenario-specific allies can change the exact party, but the role structure stays sound: one anchor, one heavy damage dealer, one ranged or mobile attacker, and one support or magic specialist. If a mission removes a party member, adjust equipment before rebuilding your entire protagonist.
| Party role | Best fit | Primary job | How the protagonist helps |
|---|---|---|---|
| Front-line anchor | Protagonist | Hold lanes and absorb attention | Creates safe space for everyone else |
| Heavy melee | Naurim | Break durable targets | Prevents enemies from reaching him |
| Mobile damage | Takate | Exploit flanks and isolated targets | Pins enemies in place |
| Magic and support | Zurbaran | Control or punish clustered enemies | Protects his casting position |
| Scenario specialist | Rotating allies | Answer mission-specific threats | Fills gaps without duplicating the core role |
Party management is also why a balanced protagonist beats an extreme glass cannon. If you make the main character another fragile damage dealer, one unlucky turn can collapse the entire formation. A resilient anchor gives every companion more time to do what they were recruited to do.
Early-game traps that ruin new builds
The first major trap is buying breadth instead of power. The game tempts you with many weapon types and talents, but the opening campaign doesn't need a walking equipment catalog. Pick sword or spear and stay with it until your core attributes and defenses are comfortable.
The second trap is ignoring accuracy and assuming damage solves everything. Missing an attack costs more than the displayed damage suggests because it also wastes the opportunity to remove a threat. If your protagonist repeatedly misses, stop buying heavier equipment and improve the relevant weapon progression before pushing further into specialized upgrades.
The third trap is treating healing as a replacement for defense. Healing after every hit can keep a fight alive, but it doesn't fix a formation that lets three enemies attack one character. Use terrain, shields, chokepoints, and body-blocking first. Consumables should stabilize a good plan, not rescue a reckless one every turn.
Finally, don't reload every time an attack misses. Blackguards contains enough randomness to punish perfectionism, and learning how to recover from an imperfect turn is part of mastering it. Reload when you made a strategic error, lost a key objective, or misunderstood a mechanic—not merely because one sword swing failed.
Before committing to a difficult encounter, check your equipment, restock healing items, and make sure the party's roles are covered. If you want another example of how much a strong opening plan matters, see our Dariusburst starter build guide; its genre is completely different, but its advice on learning one reliable baseline setup applies here.
For patch history, ownership details, and the game's current PC listing, consult the Daedalic Entertainment website and the Blackguards community wiki. The original game is old enough that some guides use different translations for talents and equipment, so compare names against your in-game interface before spending advancement points.
The short version is simple: build Strength first, keep Constitution close behind, specialize in Sword or Spear, carry a shield, and let your companions cover magic and mobility. Hold the center, spend turns deliberately, and finish enemies instead of scattering damage. That setup won't produce the most spectacular character sheet, but it gives beginners the one thing Blackguards values above all else: enough control to turn a messy battle into a winnable one.
For more beginner-friendly build coverage, Steamoz's Cthulhu: The Cosmic Abyss starter build is another useful read when you want to avoid wasting early progression points.