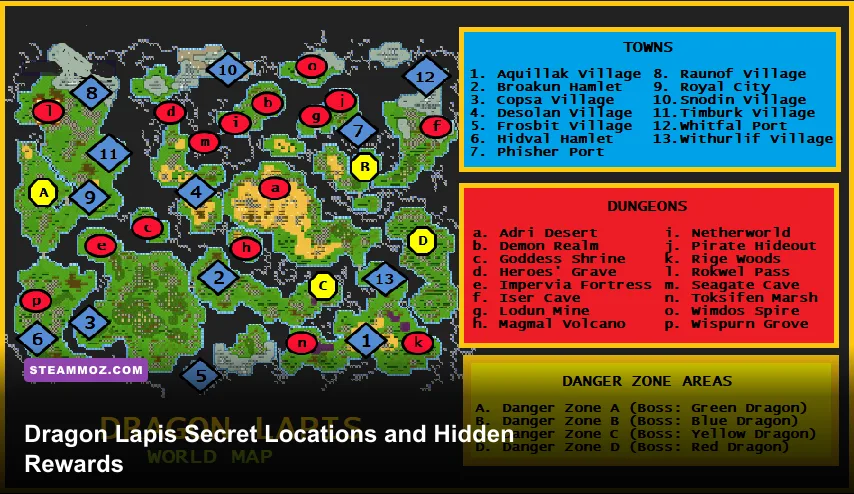
Dragon Lapis hides its best extras in dead ends, breakable-looking corners, optional rooms, and treasure routes that are easy to skip while following the main quest. The safest approach is to fully sweep every dungeon before triggering its boss, revisit towns after major story events, and check every suspicious wall and one-tile gap. This guide maps the important secret locations and explains which hidden rewards are worth the detour, while also flagging missable timing windows and the traps that waste the most time.
The game’s classic pixel presentation makes its secrets deliberately easy to overlook. Unlike a modern RPG with glowing interact prompts, Dragon Lapis expects you to test the environment. A chest tucked behind a foreground pillar can look decorative, and a side path may be only a few tiles wide. Keep a backup save before entering a new story dungeon, especially before the final approach to a boss. That small habit protects you from the game’s most annoying form of missable content: rewards tied to a location you may not be able to revisit immediately.
If you’re new to Kemco’s old-school design, our Dungeon Siege retrospective is useful context for the genre’s fondness for hidden detours. Dragon Lapis is more menu-driven and more generous with its job system, but it shares that same “check the corner before leaving” mentality.
How to search Dragon Lapis without missing anything

Start by separating story progression from exploration. When an NPC tells you to enter a cave, tower, or ruin, don’t immediately follow the quest marker to the deepest room. Clear the outer loops first. Many dungeons place their obvious chests on the main route and their valuable equipment one turn beyond it. If a corridor ends at a blank wall, walk directly against every tile rather than assuming the route is decorative.
There are four visual clues worth memorizing. First, inspect walls whose texture changes by one shade from the surrounding tiles. Second, check behind large pillars, trees, and rock formations. Third, walk along the outside edge of rooms, because hidden passages often begin in a corner. Finally, interact with objects that look slightly too prominent for background scenery. You won’t find a secret behind every suspicious tile, but the game uses repetition: once you recognize the visual language, your completion rate rises sharply.
Don’t burn recovery items while farming every side room. Dragon Lapis’s random encounters can turn a simple treasure hunt into an expensive retreat if your party is under-leveled. Use a physical attacker with reliable area damage to clear weak groups, keep one character focused on healing, and return to town whenever your MP drops low. The fastest route is rarely the one with the fewest battles; it’s the route that avoids a second trip because you skipped one fork.
| Clue | What to do | Why it matters | Common mistake |
|---|---|---|---|
| Different wall shade | Walk against the entire section | May conceal a one-tile passage | Checking only the center tile |
| Dead-end corridor | Inspect corners and interact nearby | Optional chests often sit beyond it | Turning around immediately |
| Large foreground object | Walk behind or around both sides | Can mask a passage or chest | Assuming it is scenery |
| New town story event | Revisit shops and NPCs | Dialogue and inventories can change | Leaving after the first visit |
For broader RPG route-planning advice, compare this with our Everspace 2 hidden-reward guide. The games are wildly different, but the rule is identical: mark what you couldn’t reach yet and return after the next progression unlock.

🎮 Dragon Lapis
Looking to experience this game? Grab your digital key directly on our store for $7.49.
View on Steammoz Store →Early-game secrets in towns, roads, and caves

Your first priority is the opening town and its surrounding routes. Search every building, not just the item shop and inn. Drawers, shelves, and side rooms frequently contain low-value consumables early on, but those items matter because the opening party has limited healing and weak defensive equipment. A few extra recovery items can save enough gold to buy a weapon upgrade before the first difficult story fight.
When the first overworld routes open, hug the coastline and forest edges instead of cutting straight between objectives. Dragon Lapis uses visual boundaries that make secret paths look like ordinary terrain. Look for narrow openings between trees and cliff faces, especially where the camera leaves a small strip of walkable ground. These routes usually lead to isolated chests rather than major plot areas, which is precisely why they disappear from memory when you’re rushing.
The early cave is the first real test of the game’s secret design. Clear the visible central route, then return to every fork after the floor is safe. One branch contains ordinary treasure, while another typically leads to stronger equipment or a useful stock of consumables. Equip the best weapon on your primary damage dealer rather than spreading upgrades evenly. A single character hitting a meaningful damage threshold is more valuable than four party members receiving minor improvements.
Town NPC dialogue also deserves attention after you complete a major objective. Speak to characters who previously repeated generic lines. Their dialogue may point toward a newly available location, an item exchange, or a side reward. The game doesn’t always label these interactions as quests, so keep notes using simple landmarks: north house, western road, cave entrance, and so on. That’s less glamorous than relying on memory, but it prevents the classic mistake of remembering the reward and forgetting the NPC.
| Area type | Search pattern | Likely reward | Best timing |
|---|---|---|---|
| Opening town | Inspect every house and container | Consumables and early equipment | Before leaving for the first dungeon |
| Overworld road | Trace coastlines and tree gaps | Gold and hidden chests | Immediately after the route opens |
| First cave | Clear the main route, then backtrack | Weapons, armor, recovery items | Before entering the boss room |
| Post-event town | Revisit changed NPCs | Hints, exchanges, optional rewards | After each major story chapter |
One important warning: don’t sell every old weapon just because a new shop upgrade appears. Some older gear has useful stat combinations for a job that doesn’t become attractive until later. Keep at least one copy of unusual equipment until you understand your party’s preferred roles.
Mid-game ruins and the secret equipment routes

The ruins and larger temple-style dungeons are where Dragon Lapis starts hiding meaningful power. Their layouts often split into a clean story route and a looping optional route. The loop is designed to make you think you’ve returned to a familiar room, but a shifted entrance or second staircase opens a new section. If a map appears to circle back on itself, compare the room’s entrances carefully rather than treating it as wasted movement.
Prioritize chests containing weapons and armor over raw gold. Money is useful, but equipment improves damage, defense, and survivability across every subsequent encounter. The best mid-game secret reward is often not the item with the highest listed attack value. A weapon that supports your chosen job’s damage type or a piece of armor that patches a character’s weakness can outperform a nominal upgrade.
This is also where the job system becomes the key to making hidden rewards count. Dragon Lapis lets characters change roles, and the strongest party is usually built around complementary functions rather than four identical damage dealers. Give your main physical attacker a job with reliable single-target output, keep a second character on area damage or support, and reserve at least one slot for healing or defensive utility. Hidden equipment is strongest when it completes a role instead of creating overlap.
| Reward priority | Who should use it | Reason | When to skip it |
|---|---|---|---|
| New physical weapon | Main damage dealer | Raises boss damage immediately | Only if its job scaling is poor |
| Elemental or magic weapon | Spell-focused character | Improves weakness exploitation | If MP economy is already strained |
| High-defense armor | Front-line character | Reduces healing pressure | If it lowers a vital resistance |
| Accessory or rare utility item | Support or healer | Improves consistency in long fights | Only when a stronger resistance item is equipped |
Search the ruins in two passes. On pass one, follow the obvious route and activate every staircase or door you can reach. On pass two, start from the entrance and take every branch that did not lead to the boss. This avoids the confusing backtracking that happens when you explore randomly. It also lets you use your remaining MP intelligently: clear encounters on the main route first, then spend resources on the optional loop once you know the exit is nearby.
For a useful comparison with another loot-heavy RPG, see our beginner build breakdown. Dragon Lapis is less demanding mechanically, but both games reward specialization over unfocused upgrades.
Late-game secret rooms, revisits, and hidden rewards
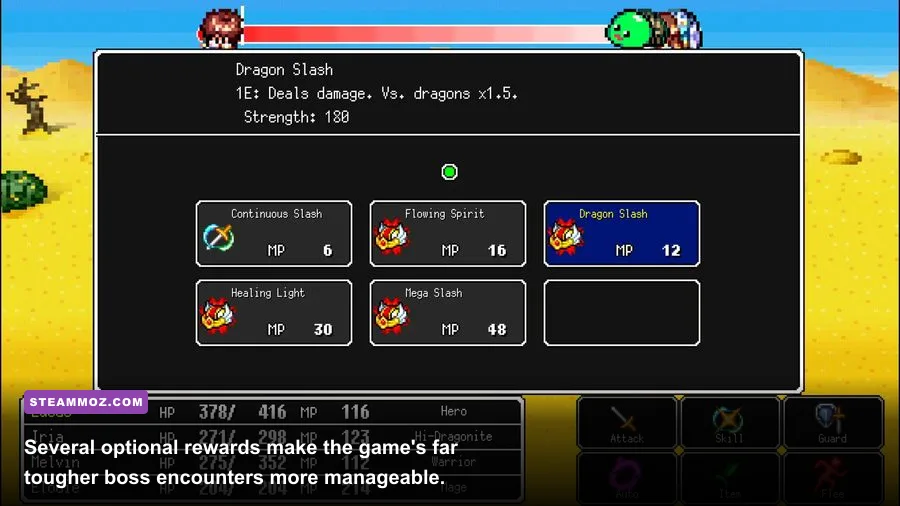
Late-game secrets tend to be less about stumbling across a chest and more about knowing when a location has changed. Revisit earlier towns after major plot revelations, especially locations connected to the central conflict. Speak with shopkeepers and named NPCs, then inspect buildings that previously had no reason to enter. A new dialogue line can be the signal that an optional encounter or reward is now available.
Before entering the final story dungeon, make a complete circuit of the overworld. This is the ideal moment to collect anything that requires your full party, mature job options, or late-game equipment. Save in a separate slot before beginning the final sequence. Even if the game allows post-story exploration, a separate save makes it easier to test optional content without losing your pre-finale state.
Late dungeons punish blind rushing with stronger enemy groups and longer corridors. Build your party around sustained efficiency, not just the biggest opening attack. Area damage clears ordinary encounters, but a reliable single-target skill matters for enemies with high defense or resistance. Keep healing available every round rather than waiting for a character to fall into critical health. The game’s turn-based combat is forgiving until it suddenly isn’t, particularly when a random encounter chains status effects.
| Late-game task | Recommended preparation | Reward value | Risk if skipped |
|---|---|---|---|
| Revisit old towns | Talk to every changed NPC | Optional items and new leads | Missing time-sensitive dialogue |
| Overworld sweep | Trace coastlines, forests, and mountains | Late equipment and gold | Entering the finale under-equipped |
| Final dungeon branches | Save before entry and map forks | Best optional treasure | Long backtracking or missed chests |
| Optional encounters | Bring healing and resistance gear | Powerful upgrade potential | Wasting items on repeated attempts |
Don’t confuse a difficult optional battle with a mandatory gear check. If an enemy’s damage spikes far beyond the surrounding encounters, leave and return after improving jobs, weapons, or resistances. Dragon Lapis rewards patience more than stubbornness. The best hidden reward is useless if you burn your entire inventory trying to claim it ten levels too early.
For players who enjoy hunting obscure side content, our Dungeons 4 secret-reward guide offers a similar checklist mindset, even though its strategy-game systems are completely different.
Jobs, combat preparation, and making every secret count

Hidden gear only matters when it fits the party you’re actually playing. Before opening a difficult optional room, review each character’s job rather than blindly equipping the newest item. A physical attacker wants consistent weapon damage and enough durability to survive contact. A magic user benefits from gear that supports spell output and MP efficiency. A healer should prioritize survival and reliable turn order, because a dead healer turns a manageable battle into a reset.
Build around a simple four-role foundation: primary damage, secondary damage or support, healer, and flexible utility. The flexible slot can switch into another attacker for easy encounters or a defensive role for bosses. This structure is more dependable than a party made entirely of offensive jobs. Random encounters reward speed, but bosses reward redundancy. If your only source of healing is incapacitated, the rest of your carefully collected secret equipment won’t save the fight.
Use buffs and debuffs before spending your strongest attack. Many players waste a hidden weapon’s advantage by opening with an expensive skill against a fully defended boss. Test the enemy with a normal attack, watch for elemental resistance or status immunity, and then commit. If the boss telegraphs a high-damage turn through a stance change, guard, heal, or apply a defensive effect instead of gambling on one more attack. A conservative turn often saves more resources than a risky burst.
| Party role | Stat focus | Combat job | Secret reward priority |
|---|---|---|---|
| Primary attacker | Weapon power and survivability | Single-target physical damage | Best weapon and offensive accessory |
| Secondary attacker | Area damage or elemental coverage | Flexible damage job | Elemental gear and MP support |
| Healer | Survival and dependable casting | Healing or support job | Armor, resistance, and utility items |
| Utility slot | Speed, defense, or status resistance | Boss-specific role | Accessories that solve encounter problems |
Keep a small reserve of money for shop equipment even after finding secret chests. Optional rewards aren’t always direct replacements, and a shop item may cover a missing resistance or let another character inherit your previous weapon. Upgrade the party as a group, but spend premium items on the role that gains the most from them.
If you’re playing on Steam, use the official Steam store listing and the KEMCO official website for platform and version information. Also check the game’s Steam Community hub before assuming a missing chest is a bug; version differences, translation changes, and an unopened prerequisite can all look like a broken secret.
Dragon Lapis secret-location checklist
Use this final checklist before moving each chapter forward. It’s intentionally practical: the goal is to stop a missed corner from becoming a second playthrough.
- Save before every major dungeon. Keep a separate file before entering the first room and another before the boss approach.
- Clear the visible route first. Open obvious chests, activate doors and stairs, and identify every branch.
- Sweep the perimeter. Walk along outside walls, behind pillars, around trees, and across every one-tile opening.
- Return to dead ends. A blank corridor is often a clue, not a conclusion.
- Revisit towns after story events. Talk to named NPCs, check shops, and inspect previously empty rooms.
- Compare equipment by role. Attack value alone doesn’t tell you whether a secret item is an upgrade.
- Leave optional fights when necessary. Come back with stronger jobs, better resistances, and a full supply of healing items.
- Record unresolved clues. Write down blocked doors, unreachable chests, and NPC hints so the next progression event has a purpose.
Dragon Lapis doesn’t hide its rewards behind elaborate puzzles. Its real trick is spatial memory. The game trains you to accept a dungeon’s first apparent layout, then quietly places the worthwhile prize one turn outside your routine. Slow down at transitions, search before bosses, and revisit places after the story changes them. That approach finds nearly every meaningful hidden reward without turning the adventure into a tedious tile-by-tile marathon.
For more old-school RPG route advice, browse Steamoz’s Dragonkin secrets guide. The systems differ, but the same rule holds: the strongest loot is usually waiting where the main path stops.