
The fastest way to level in Astrea: Six-Sided Oracles is to build around reliable Purification, take high-value combat nodes, and spend gold only on dice that solve your run’s immediate weakness. Astrea doesn’t use a traditional experience grind, so “leveling” really means powering up an Oracle during a run and unlocking stronger options between runs. The winning loop is simple: finish fights with minimal Corruption, collect every safe reward, improve a compact dice pool, and stop paying for upgrades that don’t advance your core plan.
This approach is much more reliable than gambling on enormous Corruption numbers early. Six-sided dice give you plenty of variance, but the best runs are built by shrinking the number of bad rolls. If you want a broader look at efficient roguelike progression, Steamoz’s Death Howl farming guide follows a similar principle: make every encounter pay for itself.
What “fast leveling” actually means in Astrea

Astrea has no conventional character XP bar where you repeatedly kill weak enemies for levels. Your real power curve comes from four things: the dice you add, the dice you remove, the upgrades attached to those dice, and the healing or defensive tools that let you survive increasingly dangerous encounters. Between runs, progression also comes from unlocking Oracles, dice, and permanent content through play.
That distinction matters because a short, clean run can be more valuable than a long run filled with weak purchases. Every extra die changes your odds of seeing the face you need. A bloated pool can make a supposedly powerful build feel broken, while a small pool with complementary faces often clears encounters faster.
Think of your run as three progression phases:
- Opening: establish a reliable way to deal Purification or protect against incoming Corruption.
- Middle: remove filler dice, improve your best faces, and add one scaling engine.
- Endgame: prepare for elite encounters and bosses instead of spending every coin on damage.
For new players, Moonie is an excellent teaching Oracle because her plan is easy to read: build a stable Purification engine, keep your health under control, and use defensive effects before the enemy’s dangerous turn. Don’t judge a dice upgrade only by its maximum output. A face that produces modest Purification every roll is often worth more than a spectacular effect you see once every four turns.

🎮 Astrea: Six-Sided Oracles
Looking to experience this game? Grab your digital key directly on our store for $12.49.
View on Steammoz Store →The best early-run leveling route
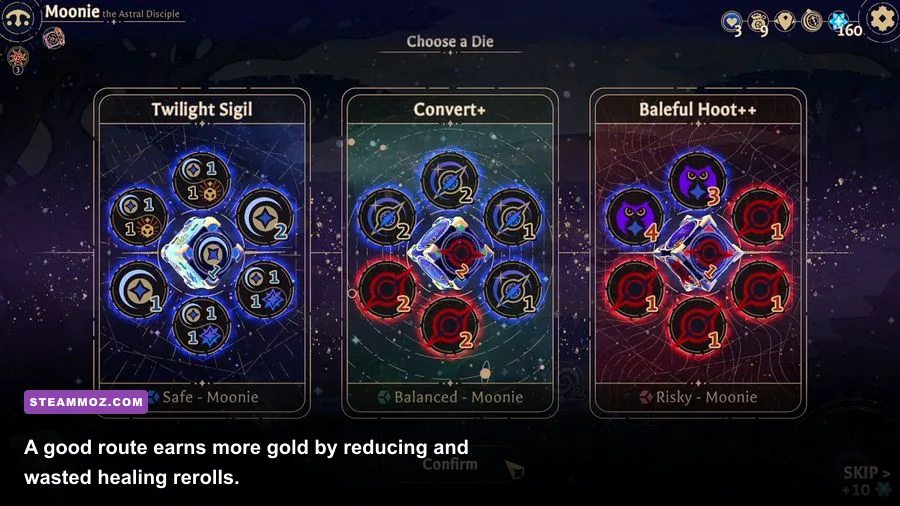
Your first map decisions determine whether gold becomes useful or merely decorative. Prioritize ordinary combat nodes early because they provide rewards, reveal what your build is missing, and usually carry less risk than elite fights. You want enough early battles to establish a win condition before taking a dangerous detour.
Step 1: Pick a single primary damage language
Purification is the default safe route. It damages corrupted enemies without asking you to spend your own health as aggressively as a Corruption-focused strategy. Corruption builds can be faster once assembled, but they need a recovery plan: healing, cleansing, shields, or effects that turn self-inflicted danger into value.
Don’t split your first purchases between every keyword you see. If your opening dice clearly support Purification, keep improving that package. Add Corruption only when it gives you a specific payoff, such as a strong conversion effect or a way to finish an enemy before its next attack.
Step 2: Upgrade consistency before ceiling
When you find a dice upgrade, favor faces that appear frequently and contribute to your main loop. A six-sided die can contain excellent and terrible faces at the same time; your goal is to replace dead faces with useful ones. Removing one face that does nothing is effectively a small consistency upgrade on every future roll.
Step 3: Take elites only after your engine works
Elite encounters are worthwhile for stronger rewards, but they are terrible emergency solutions. Enter one when your Oracle can handle a bad roll without immediately collapsing. If a normal fight still forces you to burn healing or accept heavy Corruption, an elite will usually turn that weakness into a lost run.
| Run Phase | Priority | Gold Use | Common Mistake |
|---|---|---|---|
| Opening | Reliable Purification or defense | Buy one core upgrade | Taking flashy off-plan dice |
| Middle | Remove weak faces and add scaling | Upgrade the best die first | Keeping every reward |
| Endgame | Boss answers and survivability | Save for healing or key shop items | Spending down to zero |
Gold farming without throwing the run
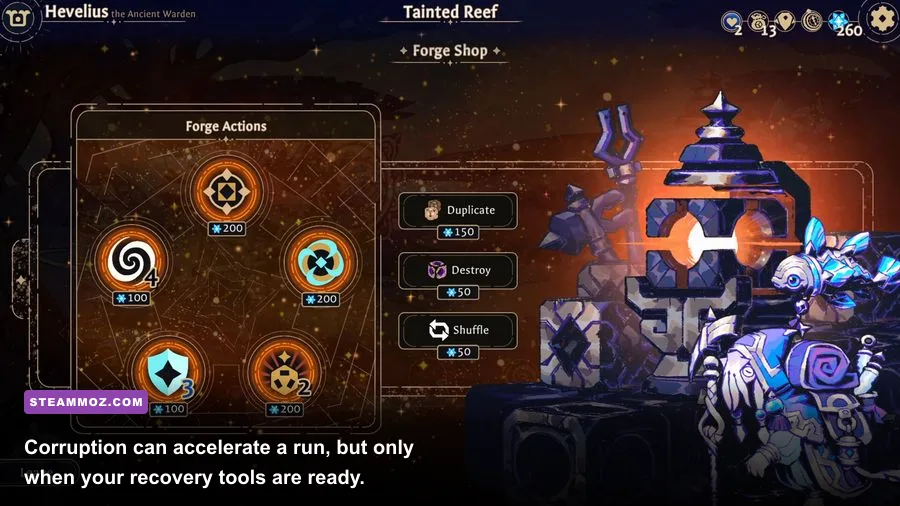
Gold is most valuable when it fixes a structural problem. Buying a random dice effect because you can afford it is one of the fastest ways to make Astrea’s combat less consistent. Treat every shop visit like a build check: identify the weakest part of your current plan, then spend only if the purchase directly improves it.
The strongest gold route usually has three ingredients: several safe combat encounters, at least one shop when your build has enough information to make a smart purchase, and a reserve for healing or a defensive solution. Early gold from fights should not automatically be converted into more dice. If your starting pool already wins normal battles, saving is often the better farm.
What to buy first
- Core dice upgrades: upgrade a face that advances your main Purification or defense loop.
- Removal or refinement: cut weak faces when the option appears. Fewer bad outcomes improve every later encounter.
- Healing and cleansing: buy these before an elite if Corruption is already threatening your health total.
- Scaling tools: choose effects that become better over several turns, especially when paired with repeat rolls or dice manipulation.
A practical rule is to keep enough gold for one emergency purchase after entering the middle of a run. The exact price can vary by shop and reward, so don’t treat a fixed coin threshold as gospel. The important habit is preserving flexibility. A shop that leaves you broke can still lose you the next fight because you can’t repair the damage from a bad roll.
Events deserve the same discipline. Take a risky reward when your build can absorb the downside, not because the upside looks large. Astrea’s economy rewards players who finish encounters cheaply. A defensive choice that saves health lets you take more combat nodes later, which often produces more total gold than one greedy event.
For comparison, Steamoz’s Decay: The Mare progression guide makes a similar point from a different genre: progression accelerates when you stop wasting resources on options that don’t open the next area.
Purification and Corruption builds ranked for farming

For gold farming, consistency beats theoretical damage. You want builds that clear routine fights while preserving health, because surviving one more combat node is often worth more than squeezing a few extra points from the current encounter.
| Build Plan | Tier | Core Synergy | Best Situation |
|---|---|---|---|
| Purification control | S-Tier | Reliable Purification plus cleansing and defense | Long runs and first clears |
| Purification with repeat rolls | A-Tier | Consistent faces amplified by extra dice manipulation | Elite hunting after the opening |
| Corruption burst | A-Tier | High output balanced by healing or conversion | Experienced players chasing fast kills |
| Mixed keyword pool | B-Tier | Several effects without a defined engine | Only when rewards force the pivot |
| Pure defense without a finisher | B-Tier | Survival effects but limited enemy pressure | Learning enemy patterns |
Why Purification is the farming choice
Purification gives you a clean route through ordinary encounters. It also makes mistakes less expensive: when your roll is mediocre, you can often recover without stacking dangerous self-damage. Build around repeatable faces first, then add utility that protects the turns where your primary die fails to appear.
When Corruption is worth the risk
Corruption becomes attractive when it lets you end a fight before an enemy’s attack pattern escalates. The trap is taking Corruption effects with no way to manage the cost. If your health is already unstable, a high-output face can be a liability. Use Corruption as a calculated burst tool, not as a default replacement for Purification.
For a broader look at choosing efficient loadouts, our Dead in Antares gear tier list covers the same key idea: a strong tool is only strong when it fits the situation.
Combat tactics that protect your gold run
The best farming route dies in combat, not on the map screen. Read enemy intent before committing every useful face. If an enemy is preparing a heavy attack, spending the entire roll on damage can be a mistake when a defensive effect would prevent far more health loss.
Use the first roll to identify the fight
Astrea’s dice system gives you six-sided outcomes, so the first roll tells you whether the fight is behaving normally or demanding a pivot. If your core faces appear, push your damage plan. If they don’t, preserve resources and stabilize. Don’t throw away a healing tool just to maintain a perfect turn.
Finish enemies in the right order
Focus the enemy whose next action creates the largest long-term problem, not necessarily the one with the lowest health. Removing a support or corruption-heavy target can save more health than finishing a basic attacker. This is especially important before elites and bosses, where one bad status chain can erase the gold earned across several rooms.
Keep a boss reserve
Before a boss, stop buying marginal upgrades. Enter with your best dice improved, enough health to survive a bad turn, and at least one answer to the boss’s pressure pattern. The final shop purchase should usually be a consistency or survival upgrade, not another narrow damage face.
| Problem | Warning Sign | Counterplay | Best Resource |
|---|---|---|---|
| Weak opening roll | Core faces fail to appear | Defend and preserve recovery | Defense or cleansing |
| Rising Corruption | Health becomes the limiting resource | Stop greedy damage and stabilize | Healing or purification |
| Bloated dice pool | Useful faces appear too rarely | Remove filler and avoid random rewards | Removal or refinement |
| Elite pressure | Normal fights already cost health | Choose a safer map branch | Defensive upgrade |
| Boss preparation | Gold is spent on minor output | Save for survival and consistency | Final shop reserve |
Unlocks, settings, and the fastest repeatable loop
Permanent progression is best earned by playing cleanly rather than restarting every time the opening roll looks ordinary. Learn one Oracle’s basic plan, complete fights with fewer mistakes, and gradually unlock more dice and options. Once you understand the combat flow, raise the difficulty only when you can consistently reach the later stages; a failed high-difficulty run is not an efficient farming session.
For performance, Astrea is not a game where ultra settings dramatically improve decision-making. Prioritize a stable frame rate and readable effects. If your system struggles, lower shadows and post-processing first, keep interface clarity high, and cap the frame rate to a value your PC maintains consistently. The game is turn-based, but hitching during rolls can still make visual feedback harder to read.
| Setting | Recommended Value | FPS Impact | Visual Note |
|---|---|---|---|
| Resolution | Native display resolution | Medium | Keeps dice and icons sharp |
| Shadows | Medium | Low to medium | Small visual sacrifice |
| Post-processing | Medium or low | Medium | Reduces distracting effects |
| Frame-rate cap | Stable monitor-friendly cap | Improves consistency | Prevents needless fluctuation |
Finally, use the official Astrea: Six-Sided Oracles Steam page for patch notes and current system information, and check the Little Leo Games website for developer updates. If you want more PC performance advice, Steamoz’s Dragonkin settings guide has useful tuning principles.
The short version is brutal but effective: fight often, keep your dice pool focused, upgrade consistency before maximum damage, and protect enough gold to recover from bad luck. Purification is the safest starting engine, Corruption is the faster high-risk option, and neither works if you keep buying every shiny reward. Astrea rewards restraint. Build a smaller, sharper pool, and your leveling and gold income will take care of themselves.